Full-Arch All on X Workflow: Post-Surgery
-
1Stage 1: Post-Op Prototype
- Options:
- DDL sends a prototype ahead of time based on surgery planning
- DDL designs a prototype after you share post-surgery records for you to print in your office
- You convert an existing denture as the initial prototype
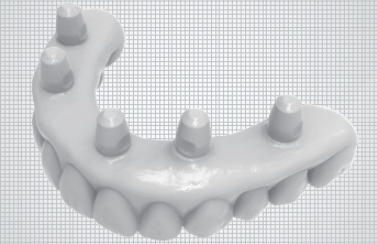
- The prototype will fit directly to the multi unit abutments (MUAs). This prototype will be used as a short-term healing and aesthetic appliance while a longer-term, higher accuracy prototype is fabricated.
- Options:
-
2Stage 1, Task 1: Check fit for passive seatingIf the fit is not right/not passive: Prototype must be sectioned and securely luted in the patient's mouth.
-
3Stage 1, Task 2: Check biteIf the bite is off in centric or functional movements: Prototype must be altered chairside until the patient is in the proper Centric Relation (CR).
-
4Stage 1, Task 3: Collect post-surgery records
- Take Face Pictures with the prototype in place that correlates to the intraoral scan.
- Clearly mark the midline, smile line, occlusal plane, and any required changes to tooth shape and contours
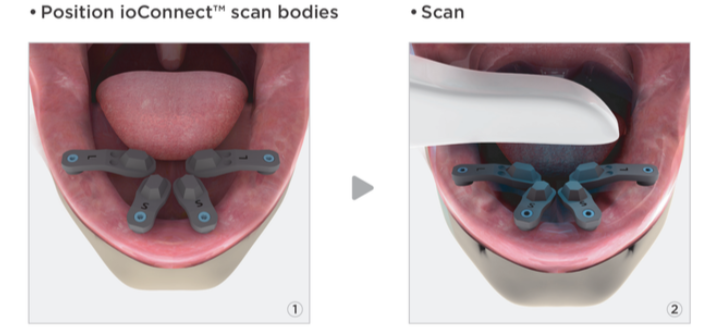
- Take full scan records for fabrication of a prototype that fits the actual implants using the TruAbutment ioConnect and Dual Align Scan Body Workflow
- Scan properly seated and adjusted prototype in the mouth
- Upper scan
- Lower scan
- Bite scan
- Scan with ioConnect scan flags on multi-unit abutments. This scan is most accurate when you ONLY scan the hexes, you do not need to scan the entire scan flag (see below
 Critical Scan Area shown below:
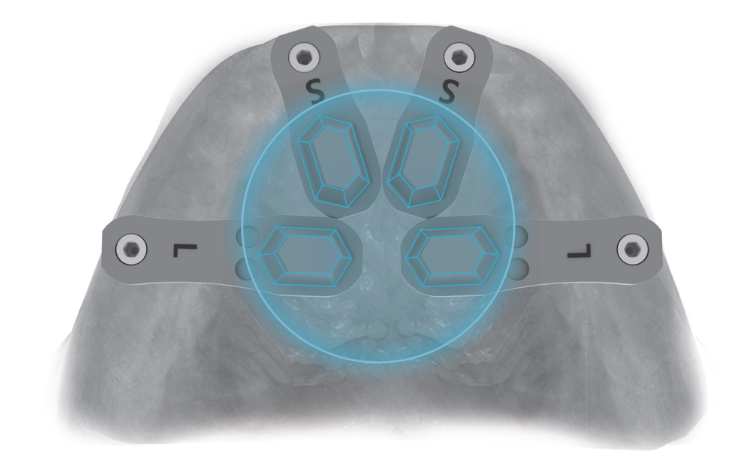 3. Scan the Tissue with the TruAbutment HS Caps
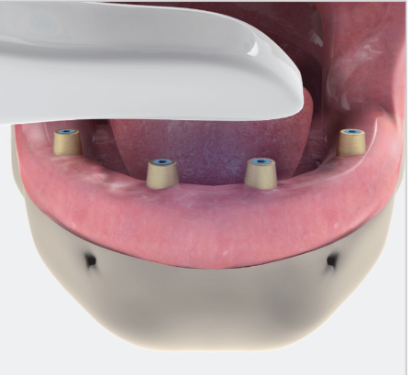 4. Scan the Prototype extraorally using the Dual Align Scan Bodies to accurately capture it and align it to the implants in the other scans.
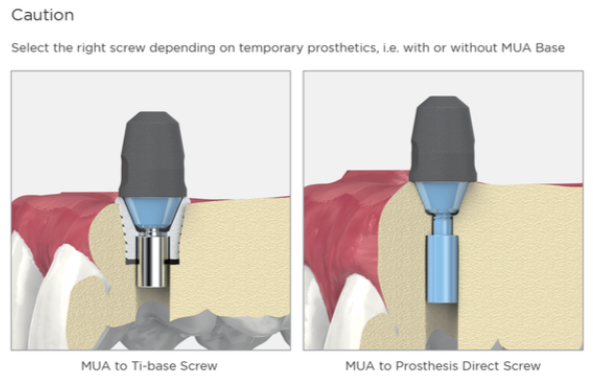
- Select the right screws and screw on the dual align scan bodies to the prototype prosthesis.
- Scan the entire prototype extraorally
- Select the right screws and screw on the dual align scan bodies to the prototype prosthesis.
- Scan properly seated and adjusted prototype in the mouth
-
5Stage 1, Task 4: Send Post-Surgery Records to DDL for New Prototype
- DDL will align scans and photos and design a modified prototype to fit the post-surgery records.
- Dr. may choose to print a new prototype in office, but DDL highly recommends milling and shipping a new prototype that would be replicated most accurately in the final prosthesis.
-
6Stage 2: Healing Prototype
-
7Stage 2, Task 1: Receive and Seat New Prototype
- New Prototype will be shipped in 3 days for doctor to seat and patient to wear during osseointegration.
- Seat, Verify, and Adjust as needed
- The bite must be accurate with the prototype seating passively on all implants.
- Tissue support must be adequate. If inadequate, a new tissue scan must be taken. Adjustments should be made as needed.
- If adjustments are made to the PMMA prototype, use the dual align scan bodies and scan the 360 degree prototype and send to DDL for future adjustments.
- If major adjustments are required (e.g., ill-fit, incorrect tooth shape, occlusal/midline cants, or seating issues):
- Mark or make all necessary changes and rescan
- The case remains in Stage 2 (Stage 2a, 2b, 2c, etc.).
- Do not proceed until the clinical team and patient are in full agreement to move to Stage 3.
-
8Stage 2, Task 2: Allow patient to heal for 3 to 6 months, take scans of any adjustments
- During that time, if you make any adjustments to the prototype, scan the parts of the prototype that you adjusted with enough surrounding data to align accurately to the records DDL has.
- DDL will use those adjustments to modify the final restoration accurately before finishing and shipping.
-
9Stage 2, Task 3: Decide if a pre-final prototype is neededIf enough changes have been made or the patient is showing signs of uncertainty or extra opinions; send notes, updated scans of changes made, and request one more PMMA prototype so that the patient can see, wear, and approve before the final restoration is fabricated and delivered.
-
10Stage 3: Final Prosthesis
-
11Stage 3, Task 1: Collect and Send Records for Final Prosthesis
- After sufficient time for healing, follow Stage 1, Task 3 again.
- Decide on materials (monolithic zirconia or zirconia on Ti bar)
- Finalize shade for teeth and tissue
- Make any notes for changes or special instructions especially regarding the tissue adaptation and design, as well as if tissue is desired on the lingual of the prosthesis. Using the scan protocol with the dual align scan bodies will give us an accurate replication of the tissue position and how the Prototype does or does not properly fit.
- Plan and communicate the desired cleansibility access and tissue shape and pressure for the final design.
- Communicate due date, if applicable
-
12Stage 3, Task 2: Receive and Seat Final RestorationTime: Approximately 10 business days in lab
The final fit, design, and aesthetics will closely match the agreed-upon Stage 2 prototype. But Zirconia and PMMA have different sound, wear, weight, and light properties.
Patient should be instructed that there will be slight differences between the Prototype and Final in terms of shade and sound.
Did this answer your question?
If you still have a question, we’re here to help. Contact us