Full-Arch All on X Workflow: Pre-Surgery
-
1Stage 1: Patient Consultation and Data AcquisitionThis stage focuses on gathering all necessary clinical and photographic data
-
2Stage 1, Task 1: Initial Consultation and Examination
- Patient History & Needs: Conduct a comprehensive review of the patient's medical and dental history. Discuss their expectations, desired tooth shade, and aesthetic goals.
- Clinical Examination: Perform an intraoral and extraoral soft tissue and hard tissue examination.
- Radiographic Assessment: Obtain a Cone-Beam Computed Tomography (CBCT) scan for bone volume and vital structure assessment, and a current Panoramic Radiograph.
- Initial Records: Collect pre-operative photographs and preliminary scans of the existing dentition/ridge.
-
3Stage 1, Task 2: Intraoral Scanning
- Scanning Protocol: Use an intraoral scanner to capture full-arch digital impressions of the maxilla and/or mandible, including the opposing arch and the bite registration.
NOTE: It is highly recommended to use bone screws in the palate or on the arch for a consistent reference point to align to across all scans in the pre/post surgery records.- Maxillary Scan: Start scanning a reliable, non-mobile area (e.g., rugae). Follow the recommended sequential scanning protocol (e.g., center ridge, buccal vestibule, tuberosity, palate). Goal: Capture the entire denture-bearing area, including the vestibule, frenum attachments, tuberosities, and hard/soft palate junction.
- Mandibular Scan: Start scanning a stable area (e.g., retromolar pad). Follow the sequential scanning protocol (e.g., retromolar pad, center ridge, lingual vestibule, buccal vestibule). Goal: Capture the entire denture-bearing area, including the retromolar pads, vestibules, and frenum attachments.
- Bite scan
- Quality Check: Review the digital scan quality and ensure it includes complete arch coverage, and accurate occlusion.
- Scanning Protocol: Use an intraoral scanner to capture full-arch digital impressions of the maxilla and/or mandible, including the opposing arch and the bite registration.
-
4Stage 1, Task 3: Photographic Documentation and/or 3D Facial Scan
- Standard photos: Capture a standard series of clinical photographs (e.g., retracted views - may be necessary for data matching, occlusal photos)
- Profile & Full-Face photos: Crucially, capture standardized full-face and profile photographs with the patient smiling and at rest. These pictures should correlate to the intraoral scan.
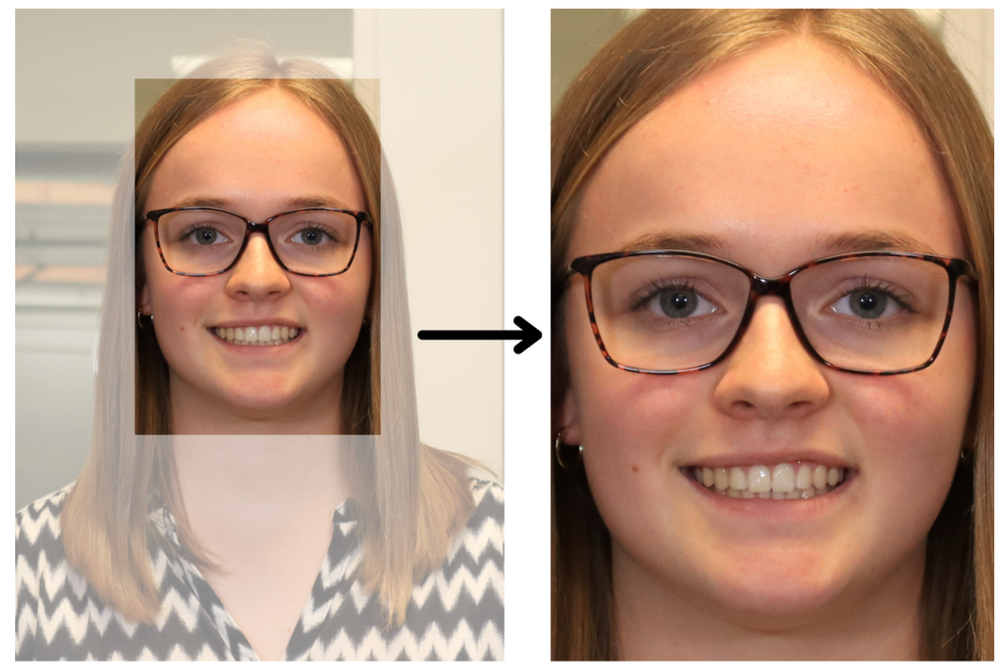
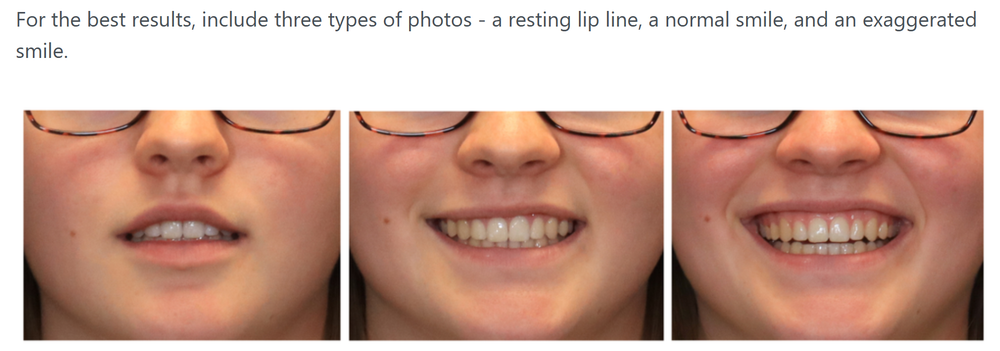
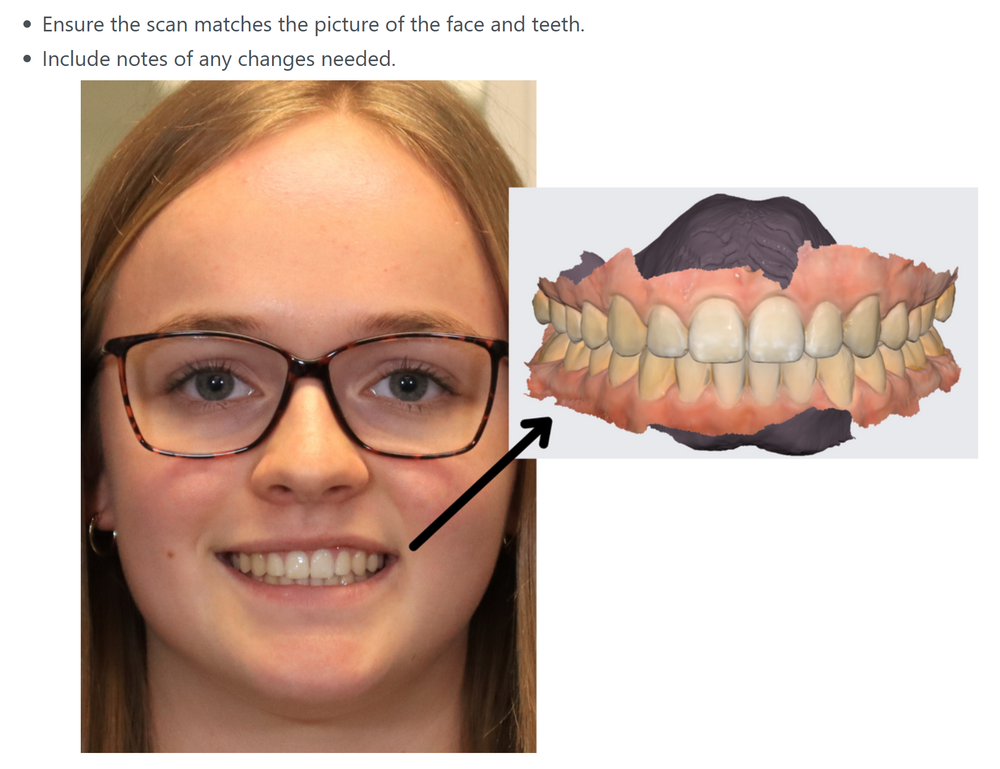
These photos guide the lab's tooth setup and aesthetic choices.
Must be high-quality and well-lit.
SET CAMERA TO 40MM FOCAL LENGTH TO ELIMINATE FISH EYE IMAGES. THIS CAN BE ACHIEVED ON MOST PHONES BY ZOOMING IN TO 2X WHICH IS AROUND 38MM -
5Stage 2: Digital Smile Design and PlanningThis stage integrates the collected data for digital treatment planning and patient communication.
-
6Stage 2, Task 1: Send all Records and Instructions to DDL for a Digital Smile Design
- All Scans and Records: Send in everything from Stage 1 Tasks (CBCT, intraoral scans, photos).
- Rx with clear instructions:
- Description of # implants being placed and locations
- Implant system, size and reference #
- Information on screws being used, and if you need screws to be provided with the prosthesis
- Cylinders vs. direct to abutments?
- Want a temporary sent with the surgical guide, or planning to convert a denture or print a temporary in-office post-surgery?
- Material shade and pink tissue shade (if applicable)
- Pink tissue on lingual or just facial side of arch?
- Anything you want us to copy about existing dentition or denture, or start with a fresh design?
- Any other special instructions
-
7Stage 2, Task 2: Smile Design and Surgical Guide Approval
- Smile Design Approval: DDL will reach out to you when the smile design draft is ready for your approval.
- Surgical Guide Approval: If you are ordering a surgical guide, DDL will reach out to you when the implant planning draft is ready for your approval.
-
8Stage 3: Final Review and PreparationThis final stage ensures all components are ready and the patient is fully prepared for surgery
-
9Stage 3, Task 1: Patient Approval and Consent
- Design Presentation: Present the Smile Design mock-up (either digitally or as a printed/milled diagnostic overlay) to the patient.
- Final Approval: Obtain the patient's final aesthetic approval of the planned arch form, tooth shape, and arrangement. Obtain signed final approval
- Informed Consent: Review the full surgical and prosthetic treatment plan, associated risks, and costs. Obtain signed informed consent for both the surgical procedure and the immediate prosthetic delivery. If needed, obtain signed consent for use of photos for educational or promotional purposes.
-
10Stage 3, Task 2: Pre-Surgical Checklist
- Lab Component Verification:
- Confirm the Surgical Guide/Bone Reduction Guide is present, inspected, and sterilized.
- Confirm the Immediate Denture/Temporary Prosthesis is present, inspected, and ready for use.
- Confirm all necessary prosthetic components (multi-unit abutments, screws) are present and organized.
- Medical Clearance: Verify all necessary medical clearances (if required) are obtained and pre-operative medications (e.g., antibiotics, chlorhexidine rinse) are prescribed and understood by the patient.
- Logistics: Confirm the surgery appointment, make sure all necessary surgical instruments are prepared, and the assistant/technician team is briefed on the full-arch conversion protocol.
- Lab Component Verification:
Did this answer your question?
If you still have a question, we’re here to help. Contact us