Create a SSL Certificate for your website - Copy

  1. 1

    Overview

    In this guide, you'll learn exactly how to buy a SSL certificate for your website. It is the first step to running your site securely with "https"
  2. 2

    Which certificate should I purchase?

    There are two kinds of certificate you might want.

    1 - standard
    puts a padlock on the browser address bar

    2 - extended: turns the entire address bar green (like a bank)

    both do the job of securing your website. One costs $9/ year the other costs $350/ year

  3. 3

    Purchase a certificate

    We'll buy a cheap certificate to cover both example.com and www .example.com (believe it or not they are treated as two different websites!)

    visit:

    - namecheap.com/ssl-certificates/comodo.aspx
    - namecheap.com/ssl-certificates/exclusive-po... (discount); or
    - godaddy.com/compare/gdcompare2_ssl.aspx

    namecheap covers both in the one certificate, but you'll need to buy two separate godaddy certificates if you want both example.com and www .example.com to be covered.


  4. 4

    Deciding on your FQDN

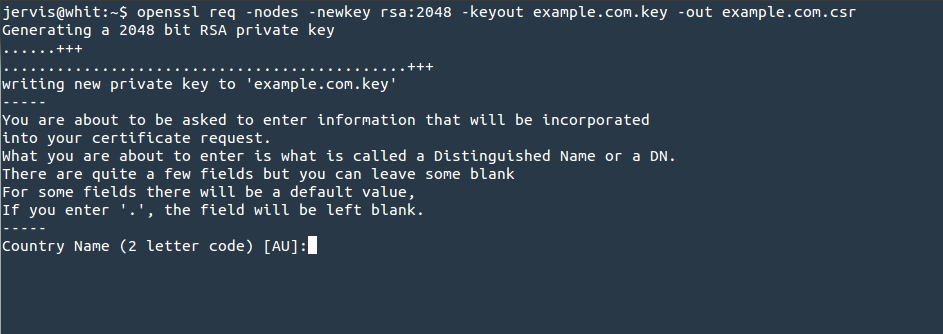
    The next step (Step 5) will ask for your Fully Qualified Domain Name.

    If you purchased your certificate at the namecheap website your FQDN is:
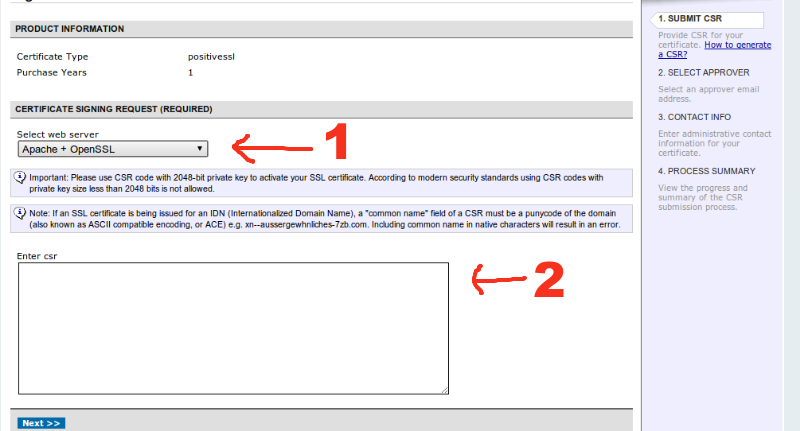
    - example.com (replace with your own domain name, but omit the 'www' part)

    otherwise set the FQDN to the domain that you want covered - because you will buy two certificates, one for each:
    - example.com
    - www. example.com


    Finally, if your certificate is covering a different domain altogether like:

    secure.example.com

    then enter that domain as your FQDN (both in namecheap and godaddy)
  5. 5

    Create your CSR

    To activate your certificate, you'll need to create a CSR (certificate signing request)

    These instructions will work on MacOSX or Linux.
    open the "Terminal" program and type the following - replace example with your domain name:
    openssl req -nodes -newkey rsa:2048 -keyout example.com.key -out example.com.csr
    It will create two files:
    - example.com.key; and
    - example.com.csr

    Further instructions on generating your CSR are here:

    support.comodo.com/index.php?_m=knowledgebase&am...
  6. 6

    Activate your certificate

    Visit your control panel (assumed to be namecheap in this case)

    select the activate link next to the certificate you purchased.

    Select Apache + OpenSSL at #1 and copy and paste the contents of your example.com.csr certificate (created in step 5) into #2
  7. 7

    Provide your contact and company details

    The rest of the process on the activation website will ask for your contact information and will ask to validate that you own the domain.

    Domain ownership is proven by them sending an email with a link you must click to admin@example.com (or administrator, webmaster and a few others) -- or to the owner's email as listed by whois: whois.net/

    Ensure that you have set up one of these email addresses for your domain so that you can receive these emails.
  8. 8

    Certificate is emailed to you

    You will be emailed a zipped file with the certificates inside when the process is complete.

    This takes from 10 minutes to 1 hour for the email to come through.

    Once you have the certificates, you can install them on your system! The procedure for installing your certificate will follow.
  9. 9

    Create the chained certificate file

    For use on nginx, you may concatenate many certificate files into a single file:
    cat domain.crt PositiveSSLCA2.crt AddTrustExternalCARoot.crt > domain.com_chained.crt
    You may then use the domain.com_chained.crt as your certificate file in nginx