How do I add a decision to a process?
The instructions below will show you how to add conditional logic to a process. This is also known as branching, "yes-no", and so on. Essentially, when someone reaches the decision point in the process, they can choose from the options you created, and based on their choice, they will take a different path/branch. Please note You can also add multiple decisions to a process.
-
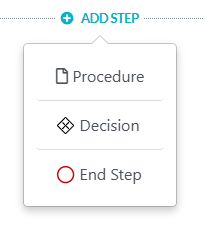
1Adding the Step
While adding steps to a process you will see "ADD A STEP" and you need to click on the Decision button to add it to the Process Step.
-
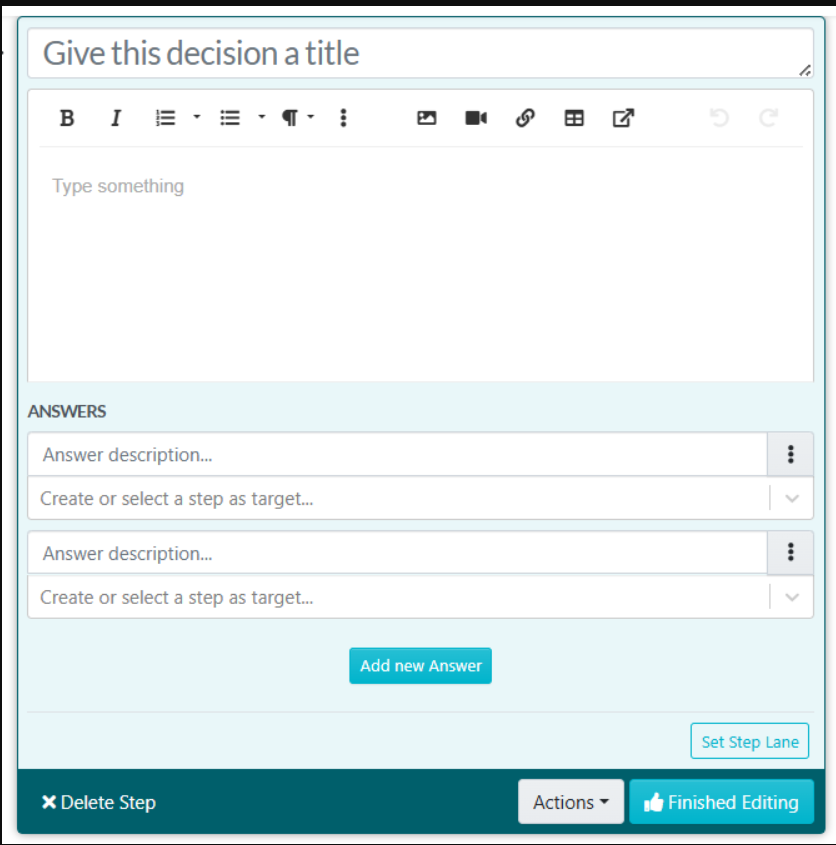
2Configuring the Step
1. Title and Describe the Decision
When you first create a Decision Step, you’ll see a workspace designed to frame the question your team needs to answer.- Give this decision a title: Enter a clear, concise question or scenario (e.g., "Is the client's payment overdue?").
- Description Box: Use the text editor to provide additional context, instructions, or images that help the user make the right choice.
2. Build Your Branching Paths (Answers)
The Answers section is where you define the possible outcomes and where they lead.- Answer description: Type the specific response (e.g., "Yes" or "No").
- Select a step as target: Click the dropdown to choose which step the user should go to next if they select this answer. You can point to an existing step or create a new one on the fly.
- Add new Answer: If there are more than two outcomes, click the Add new Answer button to create additional branching paths.
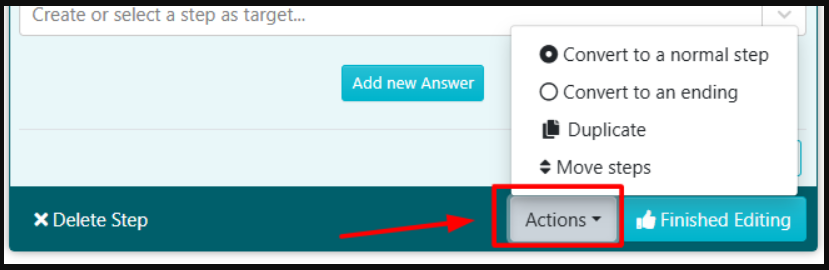
3. Advanced Actions and Converting Steps
If you need to change the nature of the step or reorganize your procedure, use the Actions menu at the bottom.- Convert to a normal step: Changes the Decision Step into a standard instructional step.
- Convert to an ending: Turn this path into a final stop for the process.
- Duplicate: Create a copy of the decision to use elsewhere.
- Move steps: Reorder where this decision sits within the overall process.
4. Finalize Your Changes
- Set Step Lane: Use this if you need to assign this specific decision to a particular department or role.
- Finished Editing: Click this button to save your decision logic and return to the main process view.
-
3Finish the Step by Approving or Requesting for Approval
As soon as you are done with documenting all the steps of the procedure, click on “Approve”, which’s on the top right-hand corner of the page to approve the procedure and make it live.

Note: if you do not have the ability to approve the procedure, you will be able to request approval by clicking on the "Request Approval" button as shown below.

-
4Evaluate and Collect Stakeholder Feedback
After finalizing the decision-making process, conduct a review with key stakeholders to gather feedback and ensure the logic aligns with business objectives. Make necessary adjustments based on the feedback received before making the process live.