Create New Document Request in Pipefile

Pipefile is a service that enables you to gather documents from clients or other people in a simple, easy, stress-free way. To set up a Pipefile account follow this procedure. If you want to learn more about Pipefile's various features, check out their Help Center webpage.


Below are steps to follow to create a document request 

And you can watch this YouTube tutorial video  8-minute YouTube tutorial video
  1. 1

    Navigate to Pipefile website

  2. 2

    Login using your credentials


  3. 3

    Create a document request

    If you have not ever created a document request you'll see this displayed. Click on the green button that says "Create New Request" to get started.
  4. 4

    Define parameters of document request

    You'll be asked for the following information: 

    Recipient Info

    • Name (required)
    • Email address (required)
    • Phone number (optional)

    Auto Reminders

    • How often to send (defaults to 3 days, but can be anything between 1x/day to every 7 days (or even never)
    • When the request expires (due date)

    Tag Info

    • This is optional (if you use tags then you'd enter the tag here). Remember to abide by your Tag Naming Policy
    • If you're considering using tags, here are some possible ones relevant to lawyers: discovery_request, client_docs, e_signature, financial_docs, tax_related_docs

    Documents

    Add each document individually, providing the following information
    • Document Name (e.g. Photo of I.D.)
    • Instructions about the document (e.g. you can use your drivers license as photo I.D.)

    Then CLICK the BLUE BUTTON when you've entered all the required information.

  5. 5

    Send the request

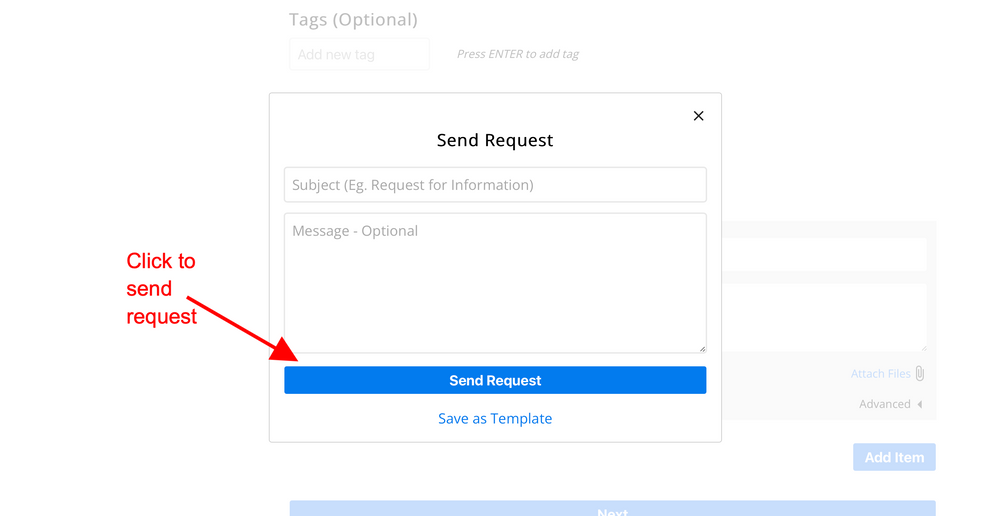
    After clicking the blue "NEXT" button in the step above, you'll see this pop up window where you need to enter:
    • The SUBJECT LINE for the email, and
    • the BODY TEXT of the email.
    After entering that information, click the blue "SEND REQUEST" button as shown below.
  6. 6

    Confirm success of request being sent

    After you click the blue "Send Request" button in the step above, you should see a pop up confirmation notice, like this one.
  7. 7

    Check status in your Pipefile dashboard

    In your dashboard you'll see information about your request:
    1. Options for deleting the request or marking it as complete
    2. Information about the notifications that will be sent out
    3. The Subject Line of the transmitting email
    4. The text of the email (which you aren't able to format)
    5. The number of views of the request (which in the case is NONE)
    6. If anything has been uploaded (which it has not)
  8. 8

    What the request you sent looks like to the recipient

    This is what the request sent above looks like in the email inbox of the recipient. As you can see, they have to click the prominent green "View Request" button to 
    1. See the request you sent, and 
    2. Transmit the documents.
  9. 9

    Process for uploading the documents (what it looks like to recipient)

    After clicking the blue button above, the recipient will be taken to a page that looks like this. As you can see there is a blue button that says "Start" that initiates the uploading process.
  10. 10

    Final step for recipient

    The final step is for the recipient to pick out the document to be sent (as shown below) and click the "Upload" button.