Last Updated on March 30, 2025 by Owen McGab Enaohwo
Ever enthusiastically start a project, only to see it fizzle out halfway through? You’re not alone. Every project, big or small, benefits from a structured approach. Project management is the key element that keeps your projects on track, on time, and within budget.
Managing a project is like conducting a symphony. Imagine a conductor standing before a diverse group of musicians with unique instruments and talents. To transform individual performances into a harmonious piece, the conductor must precisely guide every note and beat.
Similarly, project management involves coordinating different tasks, timelines, and team members to ensure that every aspect of the project aligns perfectly. For your project to be executed successfully, it’s important to have a proper sequence for each business process, from the initial planning and resource allocation to execution and closure.
But how do you implement this process?
This guide will equip you with the key steps to follow in your project management process, techniques, and tips to build a successful project.
Streamline your project management process today! Sign up for a free 14-day trial of SweetProcess and discover how our project management tools can turn your ideas into reality. No credit card is required.
Table of Contents
Understanding the Phases of a Project Management Process
How to Manage the Steps in the Project Management Process Using SweetProcess
7 Key Components of the Project Management Process
5 Common Project Management Techniques and How to Implement Them
4 Fundamental Project Management Process Steps
8 Tips for Building a Successful Project Management Process
Structure Your Project Management Process Seamlessly and Efficiently
What Is Project Management?

Project management is the roadmap that takes your project from a vague idea to a finished product. This process involves applying skills, knowledge, techniques, and steps to ensure that your goals are met within the right period.
Think of the project management process like constructing a building from the ground up. It begins with defining the project’s scope and objectives, like drafting architectural blueprints. Next, you need to do meticulous planning, resource allocation, and risk assessment, like gathering materials and ensuring a solid foundation. You then need to execute and carry out the work, which requires constant monitoring and adjustments to stay on track. Finally, the process concludes with project closure and a review of outcomes to ensure that everything aligns with the initial goals.
This structured approach aims to deliver successful projects on time, within budget, and to the desired standards, much like a well-constructed building.
To achieve this in your business, you need to know your project goals, how to achieve them, and the resources you need to overcome possible challenges.
Understanding the Phases of a Project Management Process

A report by Smartsheet shows that 91% of employees encounter project management challenges. Some of the common challenges are related to remote working, extended leave, and overwhelming deadlines. If your business is experiencing one of these, it’s important to understand the different phases of project management and how to execute them.
Here’s a breakdown of the key phases that will guide your project:
Phase 1: Initiation
The initiation phase is where a project begins its journey. At this stage, you need to define the project’s scope to help determine what needs to be achieved. You also need to determine its feasibility, especially whether the company has enough resources to execute the entire project.
For instance, if you are launching a marketing campaign, you can identify the target audience and campaign goals at this stage.
With the scope and objectives in mind, you can also identify key stakeholders. These are the individuals and teams that will carry out different tasks within the project to ensure its success. Additionally, you can present this plan to external stakeholders for approval. Once this is done, you can create a project charter that outlines all the details.
This phase is essential to process management because it allows organizations to map out every step that the company needs to streamline operations.
Phase 2: Planning
Now that you have started the project management process, you need to refine and lay out the entire project. Due to the detailed nature of this phase, it might take the most time. Project managers develop a comprehensive project plan, including timelines, budgets, resources, and risk management strategies.
For example, in a software development project, this would involve creating a detailed coding, testing, and deployment timeline and allocating tasks to team members.
To achieve this, you need to develop SMART and CLEAR goals. Here’s the difference:
- SMART goals must be specific, measurable, achievable, realistic, and time-based.
- CLEAR goals should be collaborative, limited in scope, have an emotional connection, appreciable, and refine-able.
Although project planning can be intensive, you can simplify the process by following these steps:
- Define and assign key roles and responsibilities to simplify the project management process.
- Develop a work schedule that breaks down the entire project into manageable steps.
- Organize the first meeting with all the stakeholders to discuss ground rules, roles and responsibilities, and the project vision.
- Determine metrics to measure performance and the progress of each project phase.
- Create a budget for the entire project in alignment with the specified period.
- Analyze project risks and develop response plans for easier management.
- Create a communication plan to cover decision-making, problem resolutions, and routines. It should include how the team should communicate, important dates, status reports, and check-ins.
This phase is also a good time to determine which process documentation software your team should use to manage the entire project for better results.
Phase 3: Execution
This is where the work begins!
Your team has the roadmap, and everyone knows their role in the project. As a project manager, you are responsible for timeline and budget management, resource planning, communication and facilitation, reviews, and quality and risk management.
During this execution phase, the project team works on deliverables, following the plan laid out in the previous phase. This phase requires effective coordination and communication to ensure everyone stays on track.
For instance, if your business has a construction project, this would be the actual building phase, where materials are assembled, and the structures are erected according to the plan.
However, you should keep in mind that things might not go smoothly at all times. Therefore, the project manager needs to carefully track the project, conduct status meetings to identify any hiccups, and modify the plans as much as possible to ensure they align with the goal.
Additionally, when working with a team, you can leverage task management software that facilitates project collaboration. This way, your team can access all the project details from a centralized hub.
Phase 4: Monitoring
Although automation and technology are advancing in most business sectors, data shows that 53% of employees still use manual processes to share updates with the project teams. This approach is a downside for most businesses since it could affect the project monitoring process.
Continuous monitoring is essential while the project is executed to ensure it stays on course. Monitoring involves tracking progress, managing changes, and addressing any issues. For instance, in a product launch project, monitoring could involve tracking milestones, managing budgets, and addressing any market feedback or delays.
To effectively measure the progress, you need key performance indicators (KPIs) that track the project’s:
- Progress according to the set goals
- Adherence to the budget
- Level of project quality
- Scope changes and challenges
- Team performance
With these parameters, a project manager can ensure the project is completed within the specified time and budget.
Phase 5: Closure
The closure stage marks the end of the project journey. The project is formally closed, and a final review is conducted to evaluate the success and learn from the experience. This involves completing any remaining deliverables to meet your business goals.
At this stage, you must also document a report with the lessons learned. Your report should be comprehensive, detailing the name of the project, team members involved, project goals, issues encountered during the project, achievements, and general comments.
For example, an event management project would include wrapping up all event-related activities, settling finances, and conducting a post-event analysis to gather insights for future events.
You can record these findings in a collaborative document as part of your organizational process assets for continuity and better management. This way, future teams can refer to your project if they need information.
How to Manage the Steps in the Project Management Process Using SweetProcess

Project management is more seamless if you use software like SweetProcess. You need a tool that manages all your documentation, making it easy for your team members to collaborate on a project. SweetProcess provides a centralized knowledge base with multiple functionalities that simplify the project management process.
Try SweetProcess! Start the 14-day SweetProcess free trial today. No credit card is required.
Let’s look at some ways you can use SweetProcess for project management.
Document Procedures, Processes, and Tasks in One Place
SweetProcess allows users to document all the procedures, processes, and tasks in one place. This is ideal for project managers working with teams on the same campaign or program.
Here’s how to use this tool to document your procedures, processes, and tasks.
To create a procedure, follow these simple steps:
- Log in to your SweetProcess account.
- Click on the “Procedures” tab on the main menu.

- Tap “Create Procedure.”
- Add a procedure title.

- You can assign the procedure to specific teams by selecting or creating a team.
- SweetProcess provides the option to write the procedure using SweetAI.
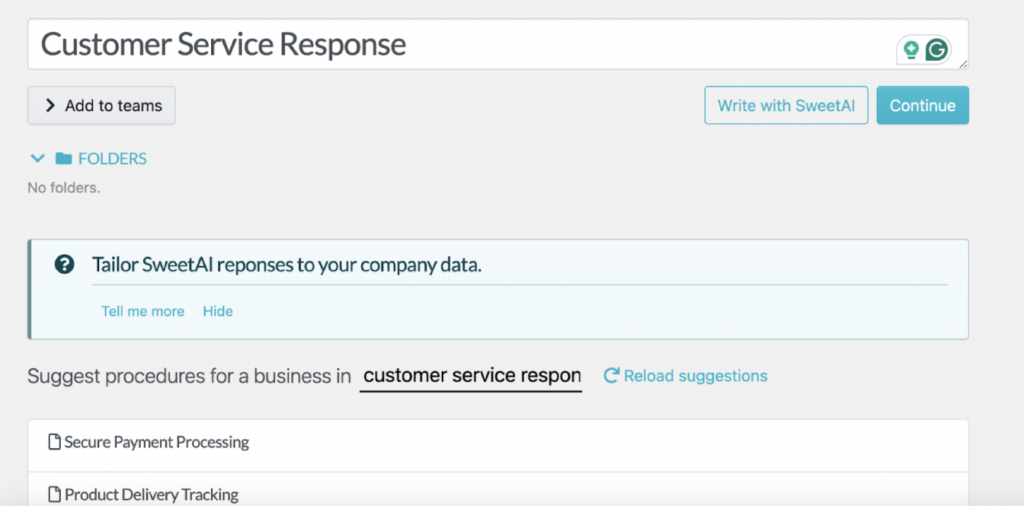
- Add details to your procedure, or use SweetAI to fill in the details.
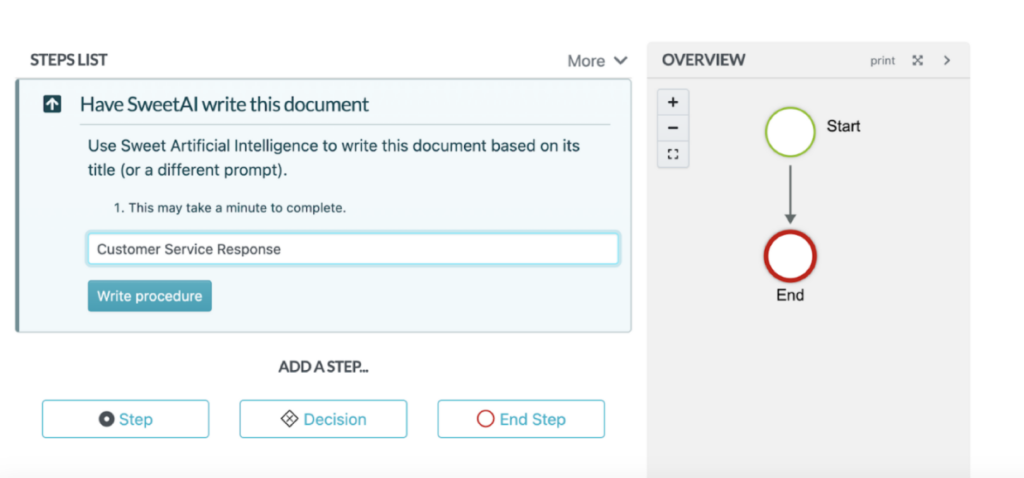
When you need to improve any step of your procedure, you can simply edit the procedure with AI. You just need to give the instructions on how to improve the step. To edit any step in the procedure, tap “Edit this step with SweetAI.”
For project managers who want to use SweetProcess for process management, here’s how to go about it:
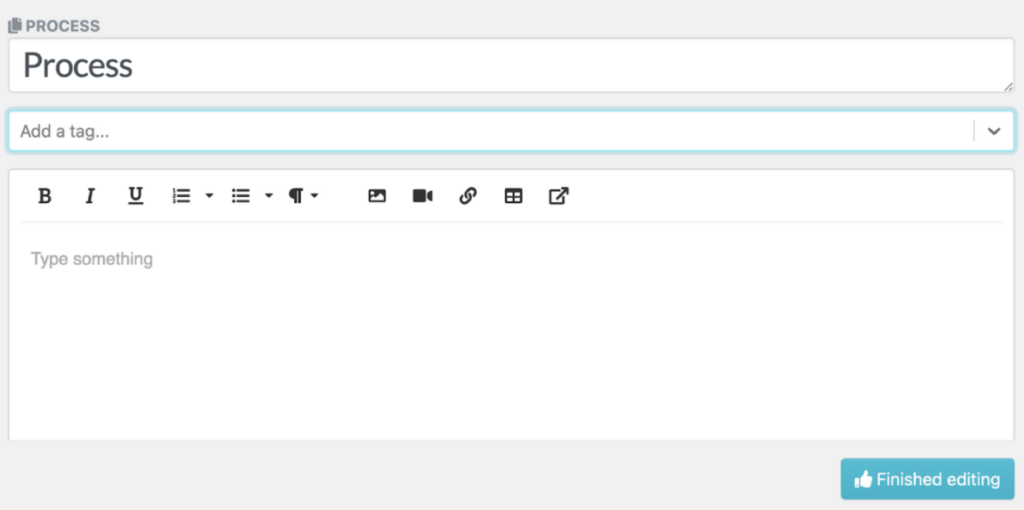
- Select the “Processes” tab on the main menu.
- Click “Create Process.”

- Add the title.
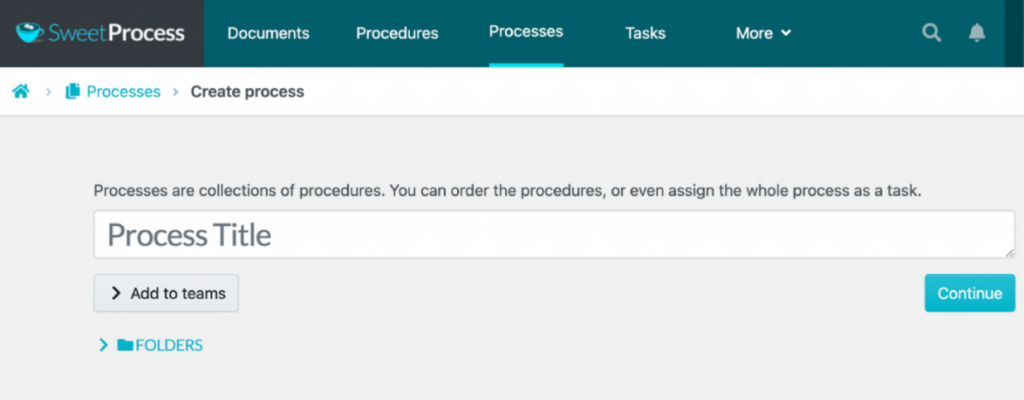
Add all the details you need about the project. You can include images, tags, and videos to make it more comprehensive.
SweetProcess also comes in handy when assigning training tasks to project teams. Follow these steps to assign tasks:
- Click on the “Tasks” button on the main menu.
- Tap “Assign Tasks.”

Choose the team members to whom you want to assign training tasks. Add the task name, the team member’s name, the due date, and the time for easier tracking.
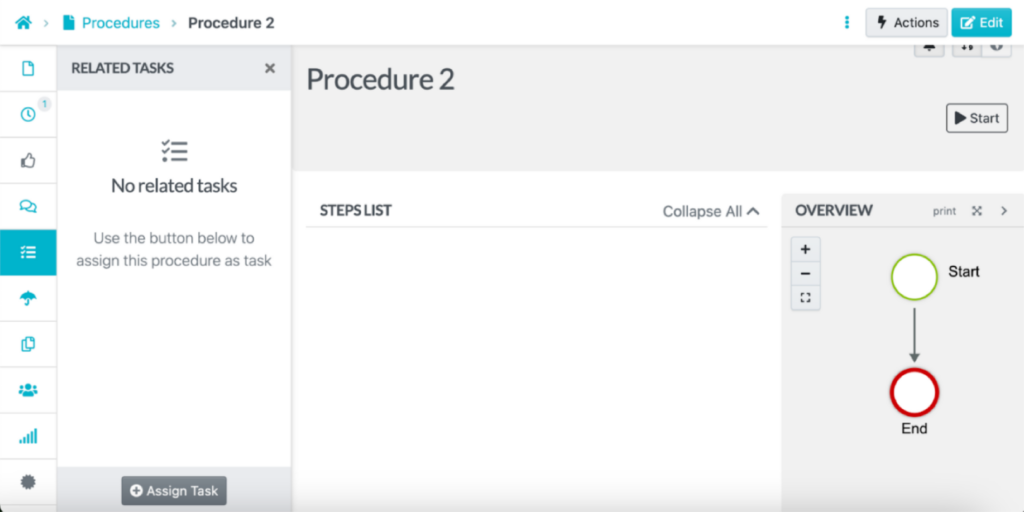
Turn Procedures and Processes into Actionable Tasks
Once you have documented your project process or procedure, you can assign it to specific team members or departments. SweetProcess makes it easy to give access and permissions to specific users for easier management.
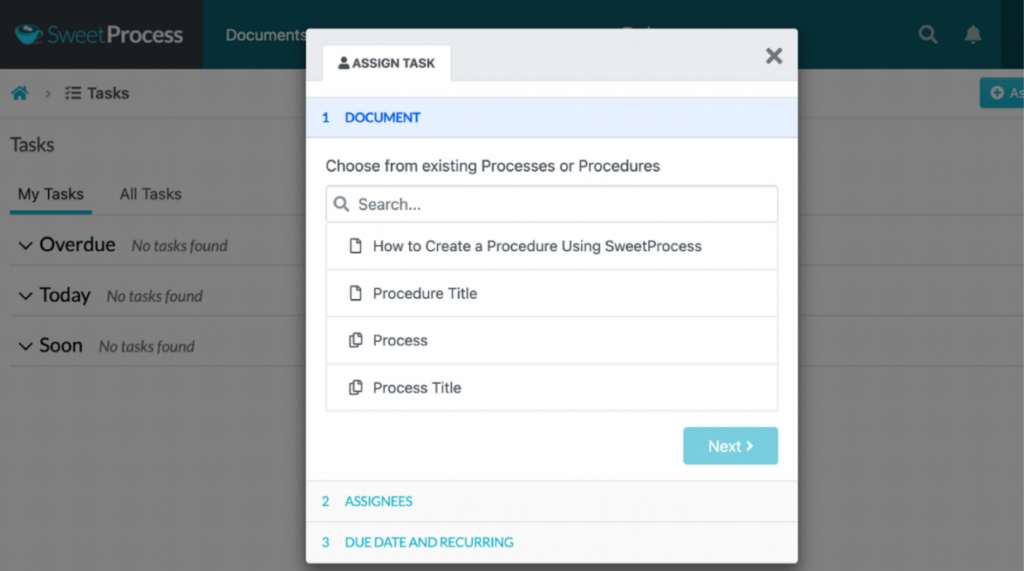
To do this:
- Open your procedure or process.
- Select “Related Tasks” on the menu on the left.
- Click “Assign Task” on the pop-up menu and select the team member.
Collaborate With Team Members in Real Time
As mentioned, your project planning process should be smart and time bound. SweetProcess allows you to achieve this by providing collaborative features that all stakeholders can access.
Here’s how to create a centralized knowledge base for easier collaboration:
- Log in to your SweetProcess account.
- Click “More.”
- Select “Knowledge Bases.”
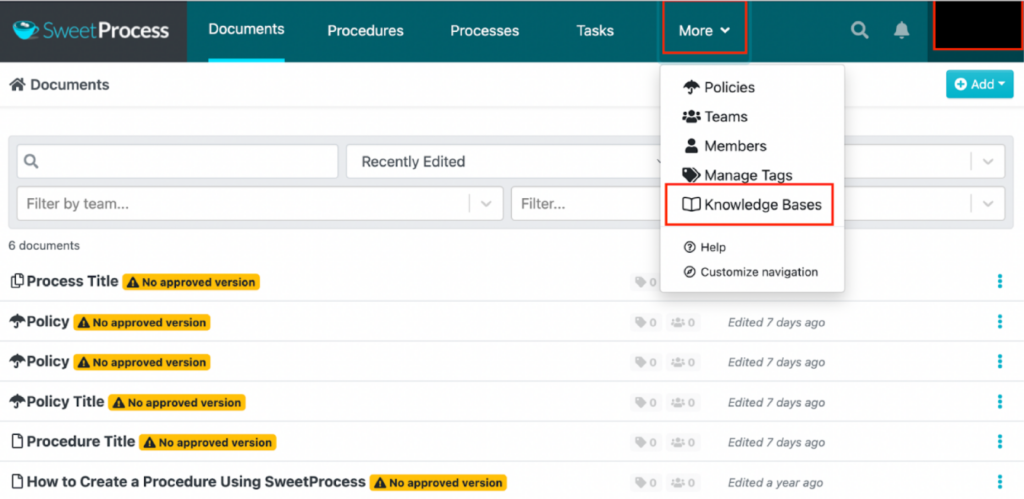
Choose a theme, access permissions, and include a public URL to share it with more people.

Manage Tasks and Track the Latest Activity by Team Members
For your project to run according to the plan, it’s good to continuously track your team members and the latest activity. With SweetProcess, you can manage your tasks by following this guide:
- Select the “Tasks” button on the menu.
- Select “All Tasks” to search which team members are working on which part of the project.

Use the search function to filter your results and find the specific information you need.
Thanks to these features, SweetProcess is the go-to software for project management for multiple businesses. A good example is Sarah Brenner, the director of quality assurance at Belvidere Community Unit School District 100. As one of the company directors, she had difficulties managing projects since all the company information was documented on Google Docs and Microsoft Word.
The team members could not access these documents, which made it hard to assign roles. However, Sarah discovered SweetProcess, which has transformed the company’s SOP documentation process. Since the integration of SweetProcess, all employees can access the documentation and collaborate on key project tasks.
Another success story from using SweetProcess is from the co-founder of Spark Marketer, Carter Harkins. A meeting with the company’s business consultant pointed out a key issue in the business—they were operating without standard operating procedures. Because of this, the employees had challenges collaborating on projects.
This revelation was enough for Carter to find alternative software to reduce the company’s reliance on tribal knowledge. The company adopted SweetProcess, which has provided a proper documentation tool. They now have a knowledge base that project teams can refer to. Project managers and supervisors can also use this tool to assign tasks and track performance.
It’s time to ditch the manual project management tools. Sign up for a free 14-day trial of SweetProcess today and experience the difference a well-structured project management process can make!
7 Key Components of the Project Management Process
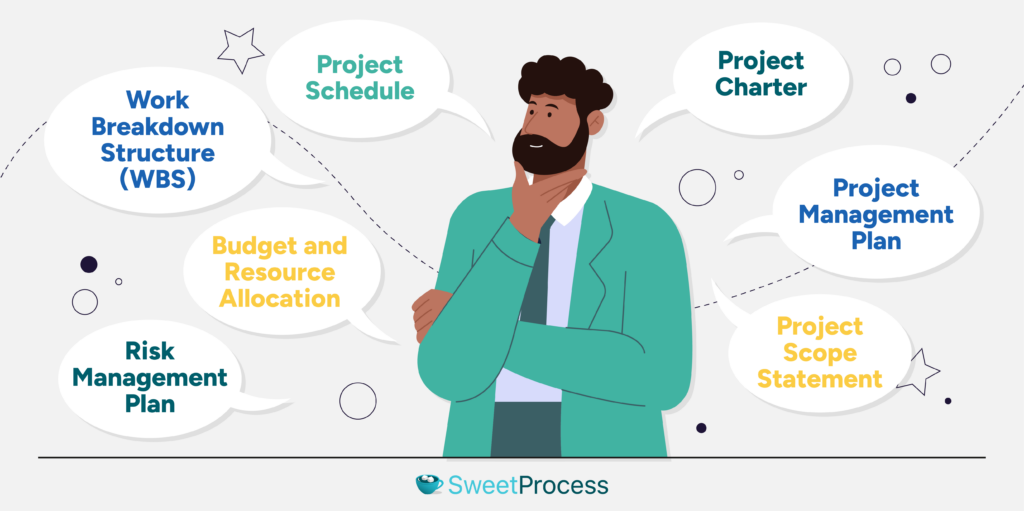
A well-defined project isn’t just about phases—it requires a strong foundation. These components ensure a smooth and successful project execution. Following are the crucial elements that will keep your project on track.
Project Charter
The project charter is the cornerstone of any project. It provides a high-level overview that defines the project’s purpose, objectives, and stakeholders. Think of it as the project’s birth certificate, officially authorizing its existence and giving the project manager the authority to utilize resources. Once you have this charter, you can start planning the rest of your project.
Project Management Plan
While most businesses have regular projects, about 70% of them fail. Some of the projects fail because of lack of proper planning. However, with a project management plan, you have a roadmap to guide the project from the beginning to the end.
This plan covers:
- How the entire project will be managed and tracked.
- Subsidiary plans such as scope, schedule, cost, quality, resource, and risk management plans.
For instance, in a manufacturing or production company, the project management plan would cover timelines, resource allocation, and quality control measures as part of the operations management.
Project Scope Statement
You don’t want your project to be so broad that it becomes hard to accomplish. A project scope statement will help you avoid this situation by clearly defining what is included and excluded in the project. This way, you can avoid adding unnecessary items and tasks that lengthen the project timelines.
For example, if you have a marketing campaign, the scope statement would specify the campaign’s goals, target audience, deliverables such as ads or social media posts, and any limitations, like budget constraints.
Work Breakdown Structure (WBS)
Some projects might be too complex for your team. However, with a WBS, you can provide a hierarchical breakdown of the total scope of work. It breaks down the project into manageable sections, making it easier to assign tasks and monitor progress. Think of it as the project’s blueprint with key deliverables.
Project Schedule
Imagine a project without timelines. This would affect the productivity of your team members. As you plan your project management process, you need a schedule that outlines the timeline. It should cover when each task and milestone will be completed. Ensure that your schedule maps out key phases for a streamlined workflow.
Budget and Resource Allocation
According to a survey, 44% of project managers have problems due to a lack of resources, with 17% attributing this to an insufficient budget. Effective budget and resource allocation are crucial to the project’s success. This process involves estimating costs, securing funding, and allocating resources, including team members, equipment, and materials, to ensure the project can be completed within budget.
Risk Management Plan
This plan identifies potential risks that could impact the project and outlines mitigation strategies. It involves risk identification, analysis, response planning, and monitoring.
For instance, in a construction project, risks might include delays due to weather, supply chain disruptions, or safety incidents. The risk management plan would assess the likelihood and impact of these risks and develop contingency plans to address them, such as sourcing alternative suppliers or implementing strict safety protocols as a part of their safe work method statement.
5 Common Project Management Techniques and How to Implement Them

Now that you understand the phases and components of a project, let’s explore some popular project management techniques you can leverage to bring your plans to life.
Work Breakdown Structure (WBS)
This project management technique allows you to break down the deliverables into manageable components. You can divide them further into smaller tasks, making it easy to assign responsibilities, estimate costs, and track progress.
To implement this technique, you can invest in a project management tool that makes it easy to visualize the hierarchy and relationships between tasks. As the project continues, you can update the WBS to reflect any changes in the project scope.
Scrum
Scrum is an agile project management technique commonly used in software development. It works in short, focused sprints, typically lasting two to four weeks. For instance, you can use this technique if you need your software development team to deliver a set of features in two weeks.
For it to be effective, you need to form a scrum team, which is responsible for outlining all the features needed for the project. Scrum also involves regular team meetings to assess progress and plan the next steps.
Kanban
Kanban is a popular visual project management technique that uses a board to visualize work. During the project, tasks are displayed on a board with columns representing stages such as To Do, In Progress, or Done. Your team can use this technique to set work-in-progress limits to prevent overloading team members.
As work progresses, the completed tasks are moved from one side of the board to the next. The kanban method is particularly useful for managing workflow and identifying bottlenecks.
Gantt
You can also use a Gannt chart to meet your project management needs. This bar chart represents a project schedule, showing the start and finish dates. It is useful for tracking project timelines and dependencies between tasks. To effectively use a Gannt chart, identify all tasks required to complete the project and plan them along a timeline. You can also continuously update the chart to reflect progress and changes in the schedule.
Waterfall
Although 65% of companies use agile project management techniques in their operations, others mix them with approaches like Waterfall. This is a linear project management approach where each phase must be completed before the next one begins. It is best suited for projects with well-defined requirements and a clear sequence of tasks.
4 Fundamental Project Management Process Steps

You have selected the technique; what’s next?
Your business needs to implement the project in the right process. Picking the right choice can take time, but it’s an essential step in ensuring that your project starts with a solid foundation. Below are the four essential steps to guide you.
Evaluate the Scope of the Project
What are you trying to achieve? What are the deliverables? This is where you define the project’s boundaries.
Understanding the project scope helps you establish clear goals and set realistic expectations. This step is vital because it covers you in case of uncontrolled changes, which can lead to delays and cost overruns. A well-defined scope ensures everyone involved is on the same page about the project’s size and complexity.
Figure Out the Needs of Your Stakeholders
Most projects have multiple internal and external stakeholders. These could include clients, team members, sponsors, or end users. All these people are interested in the project’s outcome.
Understanding their needs ensures the project delivers value to everyone involved. Therefore, you should engage with stakeholders to gather their input and priorities, which helps align the project’s objectives with their expectations and secure their buy-in.
Choose a Methodology That Matches the Goals and Scope
There’s no one-size-fits-all approach to project management. Each technique has its strengths and downsides, depending on the nature and project requirements. To choose the ideal methodology, consider factors such as:
- Timeline constraints
- Project flexibility
- Level of stakeholder involvement
For instance, Agile is well suited for projects needing flexibility, while Waterfall is ideal for projects with clearly defined stages and deliverables.
Create Your Project Plan
Creating a comprehensive project plan is the final foundational step in project management. The project plan details how every activity will be executed, monitored, and closed. It includes timelines, resource allocation, budget estimates, risk management strategies, and communication plans.
A well-crafted project plan, also known as a statement of work, ensures that all team members are aligned, roles are clearly defined, and resources are allocated appropriately.
8 Tips for Building a Successful Project Management Process

Have your company projects been failing? You need to examine your entire process. A well-defined process could be the difference between failure and success. Here are some tips to help you set up the project.
Define Project Objectives and Deliverables
The first step in building a successful project management process is defining your objectives and deliverables. With these factors in mind, you can address what the project aims to achieve and the tangible outcomes or products you should expect from the project.
As a project manager, your role involves establishing clear, specific, measurable objectives and deliverables from the outset. Ensure that all the team members and stakeholders have a shared understanding of the project’s goals and expected outcomes. This clarity aligns all the efforts and resources toward achieving results.
Align Project Deliverables With Project Objectives
Let’s say your project objective is to launch a new marketing campaign for better brand awareness. In this case, your deliverable could be implementing a social media content calendar outlining specific posts, videos, and other content pieces to achieve that goal.
Ensure everything you produce contributes to the bigger picture. Each deliverable should directly contribute to meeting the project’s objectives. This alignment ensures that the project stays on track.
Keep Communication Channels Open and Transparent
How does your team communicate? For your project to succeed, you must establish open and transparent communication channels to inform all team members and stakeholders about project progress, changes, and challenges.
Fortunately, there are multiple collaborative tools and software that you can use to manage your project in real time. According to statistics by Project.co, 15% of employees rely on project management tools to communicate with their colleagues and keep up with what everyone is working on. This form of transparent communication is good because it reduces misunderstandings and boosts efficiency.
Establish a Realistic Project Timeline With Achievable Milestones
Creating a realistic project timeline with achievable milestones keeps the project on track. This way, you can plan and prioritize tasks, allocate resources effectively, and monitor progress. Setting clear and attainable milestones enables project managers to provide a sense of direction and momentum.
Additionally, it keeps the team motivated because they can see tangible progress. However, it’s important to review and adjust the timeline as needed to ensure that the project remains feasible.
Provide Necessary Support and Resources to Team Members
A motivated team achieves better results. Therefore, you need to ensure that all the team members have the necessary support and resources needed to successfully execute the project. This includes providing access to tools, information, and training required to complete their tasks efficiently.
Address the team’s needs as soon as possible and remove obstacles to enhance productivity and morale.
Monitor Resource Usage and Adjust Plans as Required
Resource constraints could pose a big challenge for most project managers. For instance, if your project timeline is six months, you need to ensure that your budget covers this entire period. Therefore, you need to regularly monitor resource usage to identify any discrepancies or over-utilization.
This way, you can make informed adjustments to the project plan. This approach ensures that resources are used efficiently and that the project can adapt to changing circumstances without compromising on quality or timelines.
Implement an Effective Monitoring and Evaluation System
Monitor your progress and learn from your past project experiences. The best way is to monitor key performance indicators (KPIs) to ensure the project stays on track and conduct regular project reviews to identify areas for improvement. Think of it as inspecting the house construction at various stages to identify and address issues before they become bigger problems.
Foster a Culture for Continuous Improvement
There’s always room to grow in your projects. During each phase, you need to seek ways to enhance processes, efficiency, and outcomes. This involves regularly reviewing project practices, gathering feedback, and implementing lessons learned from past experiences. Conduct post-project reviews to identify what components worked well and what could be improved.
Structure Your Project Management Process Seamlessly and Efficiently

A structured project management process is the difference between an efficient and chaotic project. Your business needs a clearly defined process with the right objectives and deliverables. Ensure that your team is involved in the entire process for a streamlined process.
You don’t have to do all these tasks manually. You need a tool like SweetProcess to structure and streamline your project management processes. The user-friendly interface and comprehensive features allow you to create detailed project plans, track progress, and manage resources all in one place.
Ready to take your project management to the next level? Sign up for a 14-day free trial of SweetProcess today and experience how easy it is to achieve seamless and efficient project execution. No credit card is required!