Last Updated on October 10, 2025 by Owen McGab Enaohwo

The SweetProcess API access has been a complimentary feature for our users for some time now. Our article is primarily for small business owners who may or may not be expert coders. If you want to customize our software to fit your very specific needs, this is the explanation for you.
API stands for Application Programming Interface. It allows different software applications to communicate with each other, or with a server. Using PayPal, logging into a social media platform, checking the weather on your phone – the API working in the background facilitates all of that.
A webhook is like a subset of an API, set up only to automate the receiving of information whenever a particular event happens. An event could be a day and time every week when you’d expect a specific report to arrive automatically in your inbox. The application at the other end sends the data you requested through the webhook every time your chosen event occurs.
Summing it up:
- When you refresh your inbox to check for new emails, you make a request to fetch all the emails again, and you get what you ask for [API].
- And, you receive a notification every time someone tags you on Facebook because you set up your account that way [Webhook].
This article is based partly on what we already have in our knowledge base.
This is all the information we ask for when you sign up:
Table of Contents
How To Access the SweetProcess API
Automate SOP Workflows with Webhooks
SweetProcess Integration Via Zapier
Example Use Cases of SweetProcess Integrations
How Plink Leadership Firm Integrated SweetProcess into Its Tech Stack
Frequently Asked Questions About the SweetProcess API
What Is the SweetProcess API?

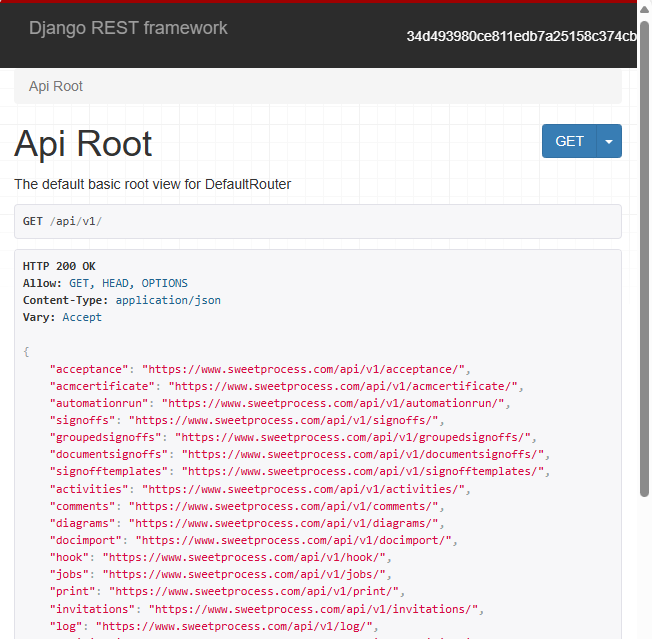
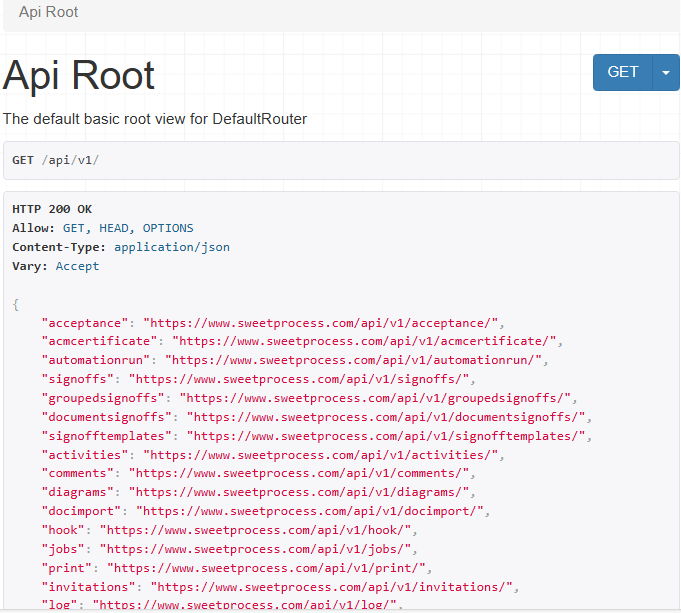
If you visit sweetprocess.com/api/v1/ while logged into your account, you’ll find a list of all the API used to create SweetProcess. You can use them to let your business interact programmatically with the SweetProcess platform and enable automation and integration with other software systems, enhancing efficiency and scalability.
We’ll go into the details of how small businesses can benefit from leveraging the SweetProcess API (and webhooks), which can offer several advantages, but here’s a brief overview:
- Automation of Repetitive Tasks: Creating, updating, and managing procedures, policies, and tasks at the code level.
- Integration with Other Tools: Seamlessly connect SweetProcess with other applications your business uses, such as CRM systems, HR platforms, or project management tools, with data consistency across platforms.
- Enhanced Workflow Efficiency: Improve efficiency by automatically triggering actions in SweetProcess when events happen in other systems.
- Custom Reporting and Analytics: Extract data from SweetProcess to generate customized reports, providing insights into process adherence and team performance.
How Plink Leadership Firm Integrated SweetProcess into Its Tech Stack

Jennifer Schneider, Chief Design Officer at pLink Leadership, calls SweetProcess “Sweet P” – because she loves it so much!
The basic and overwhelming problem that pLink faced was that all their employees were working virtually, and there was a marked lack of consistency in the methodology they adopted to get work done. In the absence of a uniform workflow, efficiency wasn’t optimal in spite of the fact that everyone was not just good, but great at what they did individually.
SweetProcess solved its problem with its considerable resources and intuitive interface that practically plateaus the learning curve. Speaking of our interface, here’s a quote from Jennifer for the aesthetically inclined amongst our readers:
As the chief design officer, I do the graphic design. I found the interface to be visually pleasing—that’s important. It felt very comfortable, and a lot of things I recognized.
But what is pertinent to the present context is that they needed more than SweetProcess. To be precise, they needed to work in SweetProcess while still using Asana and Slack channels. And, of course, that was no problem at all, given how we integrate with other apps. Let’s hear it from Jennifer once again:
I’ve been able to link to Asana tasks. We use Asana for project management or even Slack channels. I made a ‘How to use SweetProcess.’ I tagged it at the very top of the list and put in, ‘If you got any questions, put your question in the Slack channel for SweetProcess’ and there’s a link to that. I find that just being able to use it is tremendously easy.
Do you have a favorite platform you simply can’t do without, but need a process documenting solution in addition? Try integrating SweetProcess into what you regularly use and measure your newfound efficiency. We promise you’ll be surprised in a good way.
How to Access the SweetProcess API
Once you’re logged in, you can access the Interim API Documentation from the help menu or directly from this link.
Here’s how to access the documentation from the default SweetProcess workspace by clicking on the ‘Help’ link (nested under the More tab):
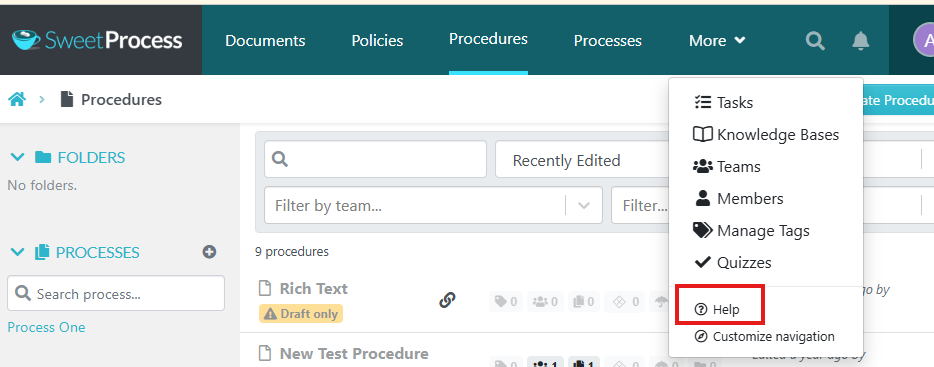
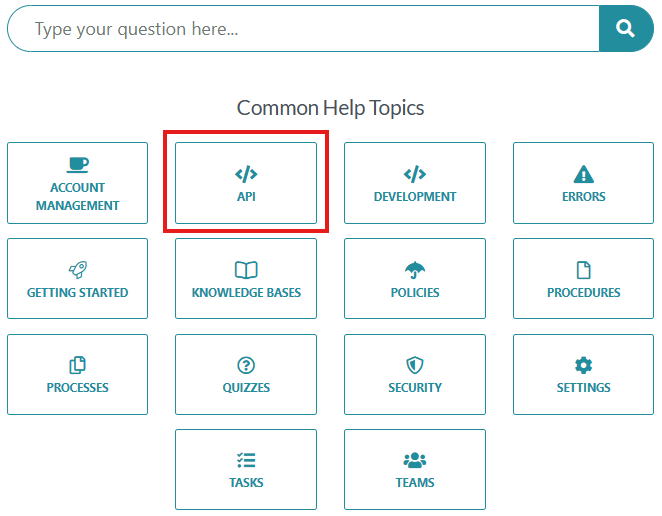
Clicking the ‘Help’ link will take you to our Knowledge Base; please click on the API block to find the Interim Documentation:
From there, you can access the complete list of APIs we have used to create SweetProcess. Here’s a partial screenshot of what that looks like:
If you’re not a SweetProcess user and are hesitant about signing up, please note that we offer complete transparency, and there’s zero obligation on your part.
Just create your account (no credit card required), enjoy the full-fledged SweetProcess experience for two weeks, and if we don’t meet your expectations, simply export whatever work you did and be on your way.
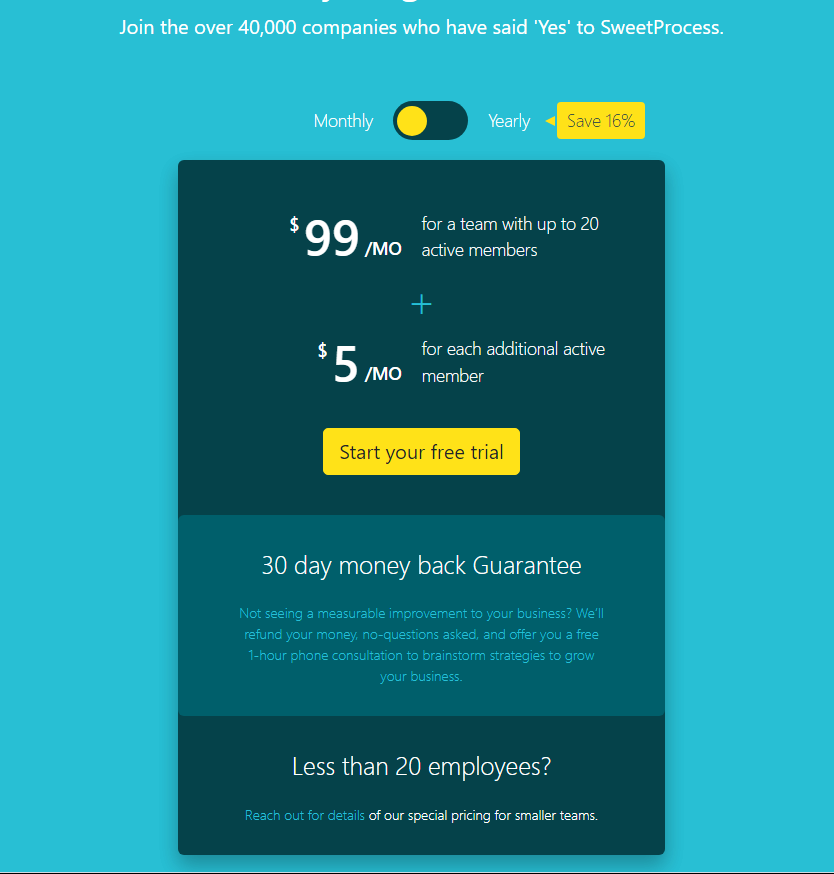
If you decide to remain with us, this is all the plans we offer, along with a 30-day, unconditional money-back guarantee:
Authentication and Access
Let’s look at the following steps you’ll need to take before you can use the SweetProcess API.
Step 1: Use Your Secret Token
The direct URL to creating your token is https://www.sweetprocess.com/accounts/tokens/, and you will find the link in the Interim Documentation.
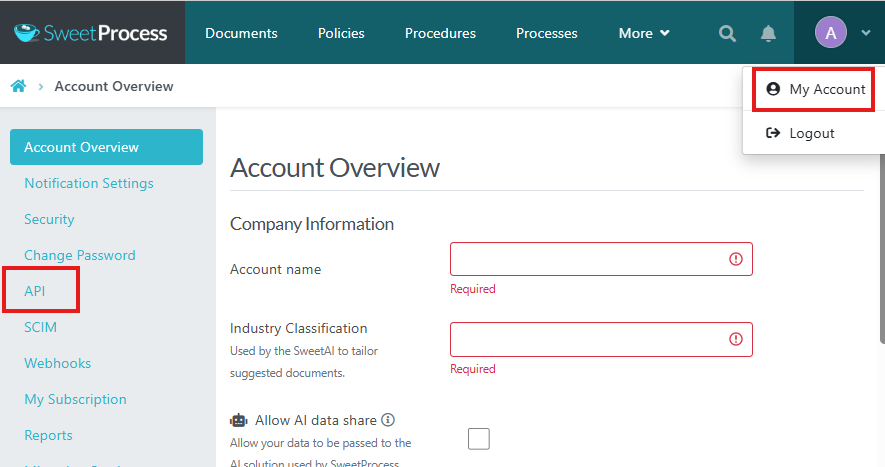
However, if you wish to access it via your workspace, first click on the small triangle beside your account name (top-right) to reveal the ‘My Account’ link and then click on it.
The ‘My Account’ sidebar will appear on the left with the default ‘Account Overview’ tab highlighted. Scroll down a little and click on the API tab.
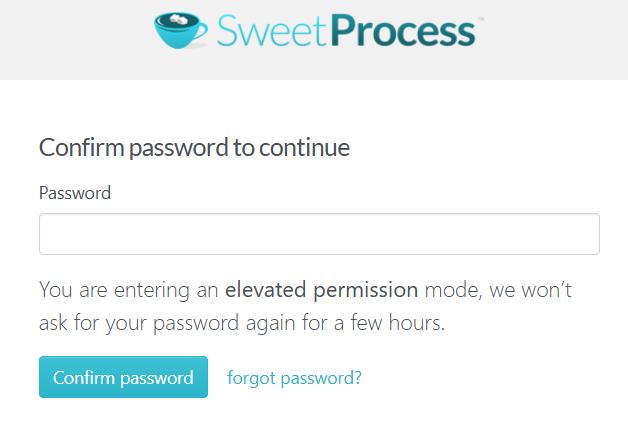
Please note that if you have been idle for a while, SweetProcess might require you to insert your password again to access the API section.
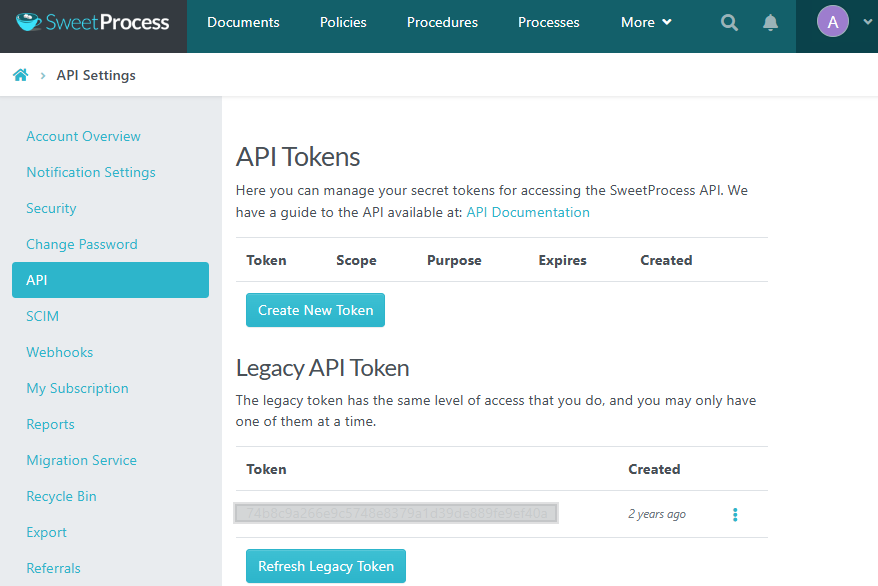
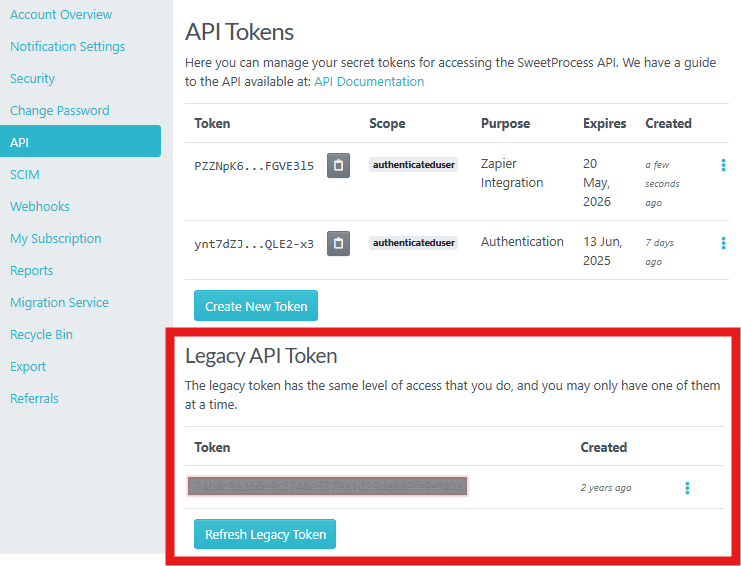
When you click on the API tab, you will find your previous token(s), if any, and the option to create a new token. Scroll down and choose the Legacy API Token:
Step 2: Authorize API Access With the Curl Program or the Python Programming Language
After getting your token, include it in the Authorization header to the SweetProcess API:
Authorization: Token 9944b09199c62bcf9418ad846dd0e4bbdfc6ee4bIf you’re using cURL, this is what it would look like:
curl -H 'Authorization: Token 9944b09199c62bcf9418ad846dd0e4bbdfc6ee4b' https://www.sweetprocess.com/api/v1/procedures/Here’s an example of using Python and the third-party request library:
import requests

response = requests.get(
    'https://www.sweetprocess.com/api/v1/procedures/',
    headers={'Authorization': 'Token 9944b09199c62bcf9418ad846dd0e4bbdfc6ee4b'}
)
print(response.json())
Access Procedures and Tasks
Now that you’re done with authentication and authorization, you can access the existing documentation via API and integrate SweetProcess with other software that may be of use to you.
You cannot work with the API without the following:
- The Endpoints or the specific URLs where you can access the API and make requests,
- The HTTP Methods GET, POST, PUT, and DELETE that are used to interact with them, and,
- Other (required and optional) parameters for API requests.
We’ll discuss how to make use of the available endpoints in the next section.
For the methods and parameters to make the API work, we have the API Root page, which we have shown you earlier.
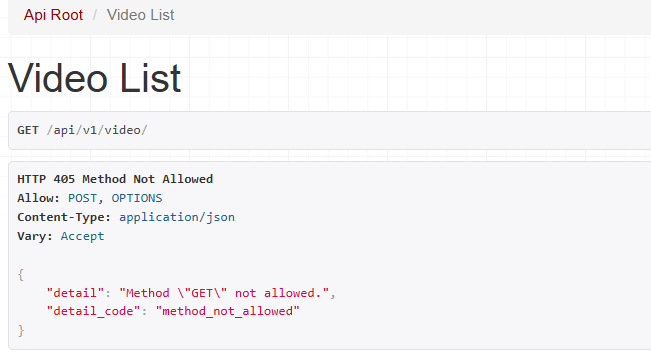
Every API in the list is hyperlinked to its own page. If, for example, you click on “video”: “https://www.sweetprocess.com/api/v1/video/“, you’ll reach the following page, which clarifies that in this instance, you cannot use GET to initiate an API request.
Available API Endpoint

We have endpoints for procedures, tasks, users, and for inviting and removing team members. Let’s look at how you can access and make use of them.
Procedures
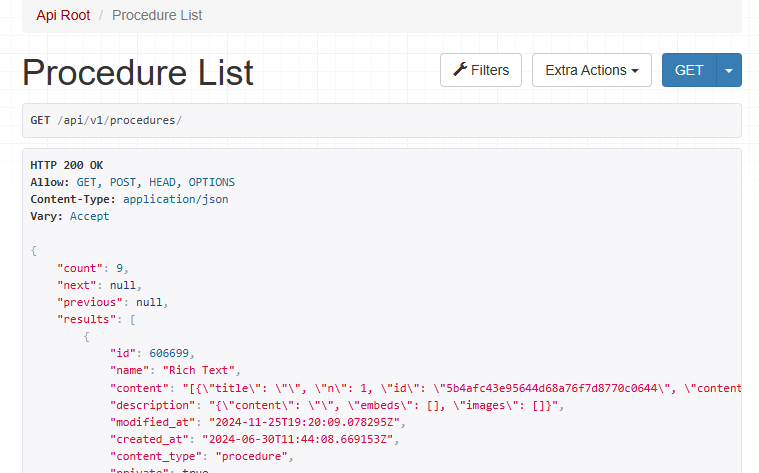
For procedures, the access URL is https://www.sweetprocess.com/api/v1/procedures/, which brings you to this page:
Clicking the Filters tab top-right, will offer a list of options:
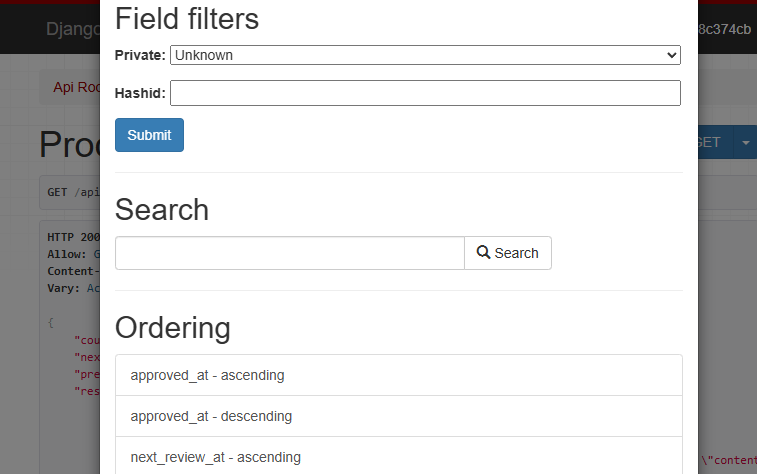
Scroll down a bit (in the Ordering section) and choose the option “modified_at-ascending”, and this is what you get:
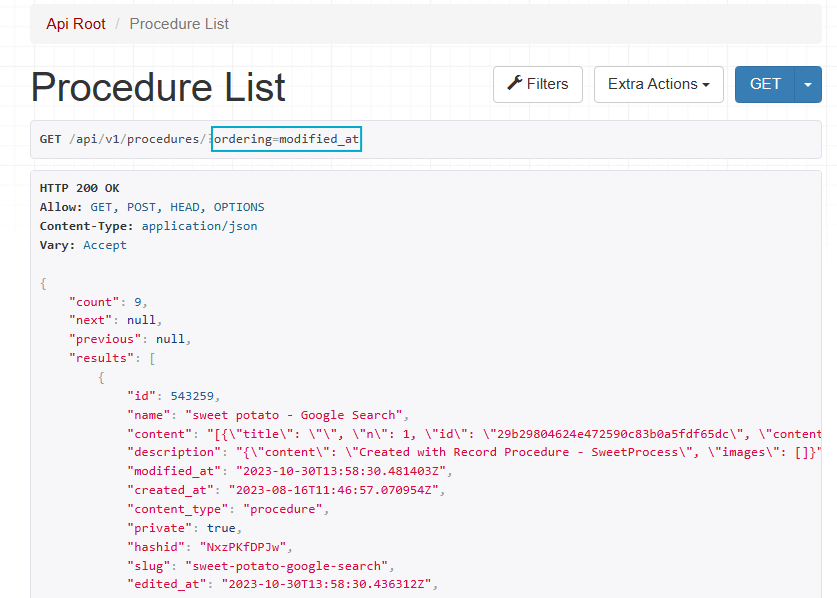
You will get every bit of detail (including hyperlinks to the document locations) regarding all your procedures. In this case, the information is available (or ‘filtered) in an ascending order in the context of when the procedures were modified.
Tasks
For tasks, the access URL is https://www.sweetprocess.com/api/v1/taskinstances/, which brings you to this page:
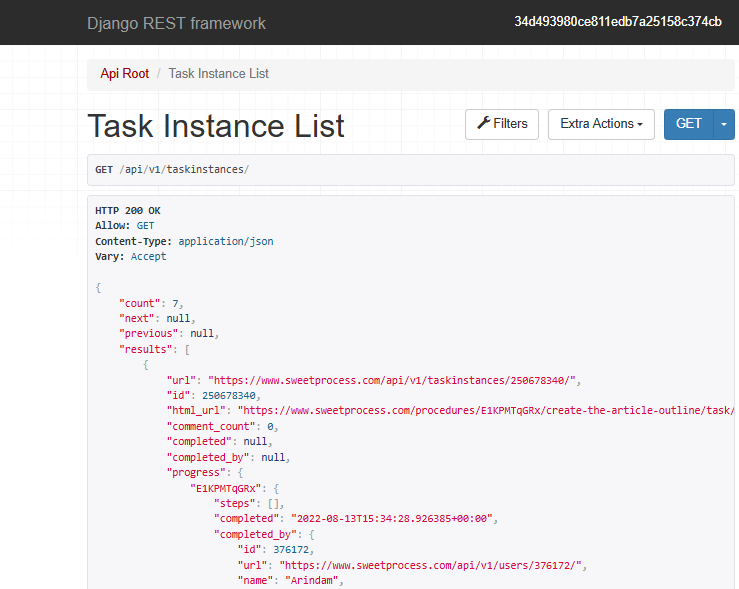
A task instance refers to a task run at a specific time. A Task Template, on the other hand, gives you the details of a recurring task.
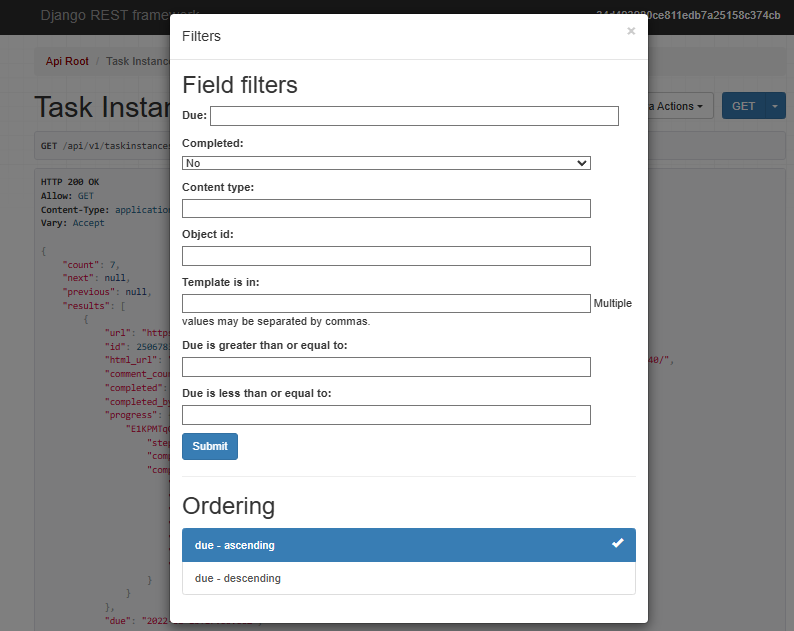
The following options appear upon clicking on the Filters tab:
Permission > API Access
If you do not have a managerial position, all you’ll see are the tasks that were assigned to you or those you assigned to others. The Account Owner can change this permission through the Account Overview section.
Checking the box beside the “See All Tasks” subheading in the Overview section enables every member to view all tasks assigned to the entire team.

Sorting By Date
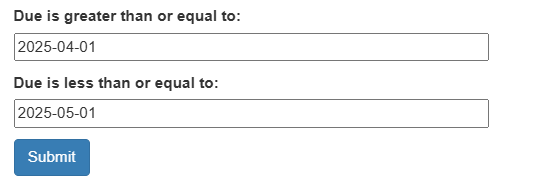
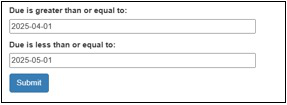
To filter by date, you must enter the “greater than or equal to” and “lesser than or equal to” dates in the iso 8601 format.
So, May 13, 2025, should be 2025-05-13.
And, for returning results from the previous month – let’s say, April 2025, your result will depend upon correctly filling out the date fields:
If you do not filter by date, tasks will appear in the default sequence, starting from the oldest to the newest.
We cannot reverse the default sequence (making it “newest to the oldest”) because not all tasks end, and you could find the API return tasks due in the year 9999.
Other Filters
- Task Instances in a given task template: “template_id”
- The user to whom the task was assigned: user’s API URL (e.g. “https://www.sweetprocess.com/api/v1/users/376172/”)
- Locating a specific document: “content_type” / “object_id” (e.g: “content_type=procedure&object_id=23”)
- Query about task completion: “completed” with “true” or “false” for response.
Users
For Users, there are two endpoints.
The singular “user” endpoint, sweetprocess.com/api/v1/user/ is for the logged-in account of whoever is making the API request.
Currently, this endpoint accepts only PATCH (partial change/update) requests for navigation links to customize the dashboard navigation.
The plural “users” endpoint, sweetprocess.com/api/v1/users/ may be used for
- Inviting a teammate to your account [Method =”POST],
Example:
curl https://www.sweetprocess.com/api/v1/users/ -H 'Authorization: Token 9944b09199c62bcf9418ad846dd0e4bbdfc6ee4b' -H 'Content-Type: application/json' --data '{"name": "John Doe", "email": "john@example.com", "is_super_manager": 0}'- Making a partial update about an existing teammate – like their designation or email, or name [Method =”PATCH”; parameters: “is_super_manager”, “is_super_teammate”, “is_billing_admin”, “email”, “name”].
Example:
 curl -X PATCH https://www.sweetprocess.com/api/v1/users/32010/ \
  -H "Authorization: Token 9944b09199c62bcf9418ad846dd0e4bbdfc6ee4b" \
  -H "Content-Type: application/json" \
  --data '{"email": "new.email@example.com"}'
- Removing a teammate from your account [Method=”DELETE”].
Example:
 curl -X DELETE https://www.sweetprocess.com/api/v1/users/32010/ \
  -H "Authorization: Token 9944b09199c62bcf9418ad846dd0e4bbdfc6ee4b"
Invite Team Members
We have an additional, exclusive URL to invite team members: https://www.sweetprocess.com/api/v1/invitations/
The method used is POST.
Example:
curl https://www.sweetprocess.com/api/v1/invitations/ -H 'Authorization: Token 9944b09199c62bcf9418ad846dd0e4bbdfc6ee4b' -H 'Content-Type: application/json' --data '[{"send_mail":false,"content_type":"team","permission":"view","object_id":118482,"to_user_id":"https://www.sweetprocess.com/api/v1/users/32010/"}]'This adds the existing member 32010 (from the “user id” in the member URL https://www.sweetprocess.com/api/v1/users/32010/) to the team with the id 118482 (“object_id”:118482).
Automate SOP Workflows with Webhooks

If you’re looking mainly for integration with other platforms/applications to automate and manage certain tasks, this webhooks guide should come in handy.
Once you set up a webhook, SweetProcess will communicate with another system of your choice each time an event you specify occurs in your account. If you’re using Salesforce, for example, we could send a report to your Salesforce account each time a task completes in your SweetProcess account.
As we explained earlier, Webhooks are set up to work with “Events”. At the moment, the only event we have built is “task.completed” – whenever you mark any of your tasks as completed, this event is triggered.
Please contact us at support@SweetProcess.Com if you need us to build any other type of event.
In case you’re wondering why, in all these years, no customer seems to have asked for more than this one event that we have, it is because of our Zapier integration facility. We’ll get to that shortly.
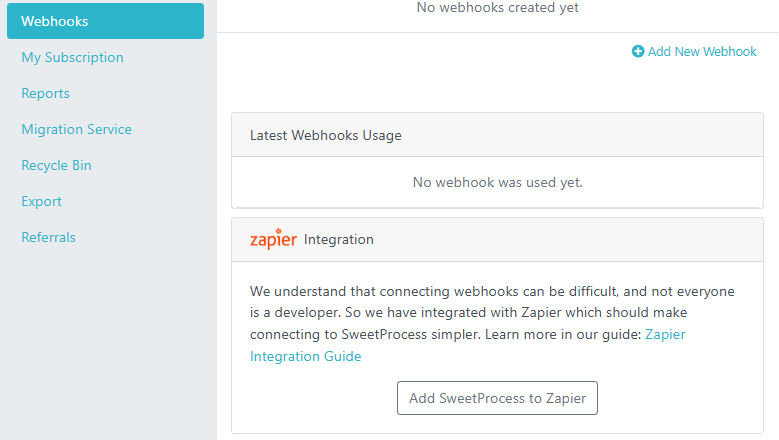
Where Are My Webhooks?
You can directly access your webhooks here: My Webhooks (accessible from “My Account” as in the case of API tokens). You can create new ones and turn off and on existing ones.
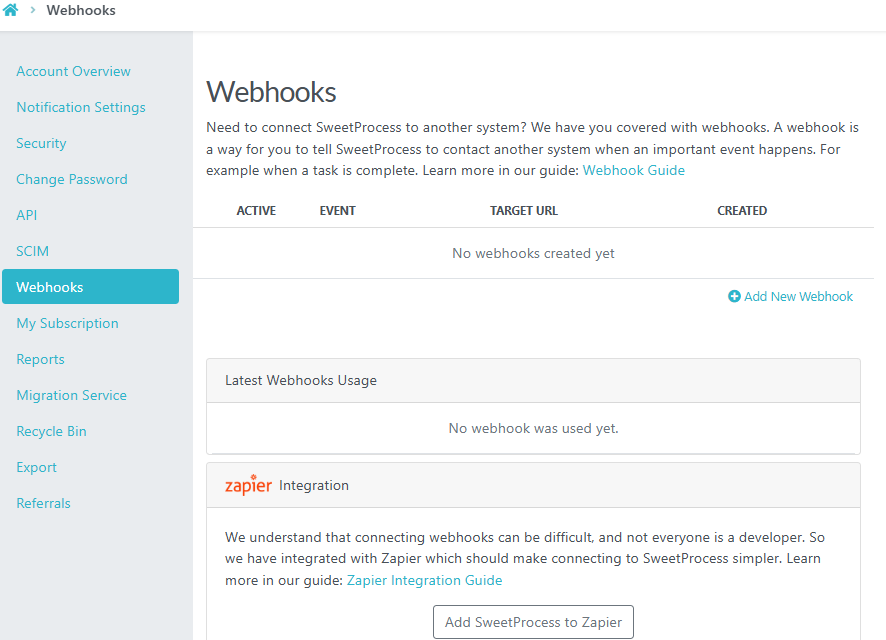
When you set up a webhook, you must assign to it
- an event to listen to and,
- a target URL to which to send the message.
Please ensure the webhook is active and that all the parameters are correct.
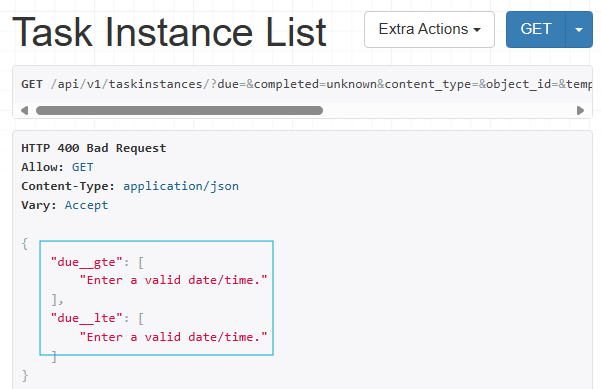
This is especially important since, while an API request with incorrect parameters returns an error message that helps you to identify the error, a webhook will only send a status code or a generic description (“could_not_connect”), with no reference to exactly what may have gone wrong.
Let’s illustrate this further.
In the section on filtering task instances by date, we mentioned that the dates must be entered in the iso 8602 format, which is YYYY-MM-DD. We used the following screenshot to show you the correct date format:
If all other Field filter values were entered correctly with only the date-format being incorrect, your request would have returned this message, which specifies the error components:
In case of a webhook error, things are usually not that lucid. Let’s take the “502 Bad Gateway (Error Code 11200)” error as an example.
You may have seen this while browsing. It means “something” is wrong in the browser to website server communication – which isn’t exactly a “specific” description.
Similarly, if your webhook shows this error, it could mean that your chosen application/platform and SweetProcess could not connect properly.
And that might have happened because, for example, the webhook request wasn’t set up properly to contain a valid “content-type”.
Or, SweetProcess wasn’t able to resolve the DNS name to the target IP address.
It could also mean that the network was bad at the moment the error occurred.
As we said, not very specific.
What Does a Webhook Look Like?
A JSON-encoded message for “task completed” to your preferred URL looks like this:
{"hook":
      {"id": "d85c20d6-89b1-47b5-8399-7f5da1b55507",
       "event": "task.completed",
       "target": "https://example.com/tasks"},
"data": {"id": 1,
         "url": "https://www.sweetprocess.com/api/v1/taskinstances/1/"
         "progress": {
            "a20gha2": {
               "completed": "2030-07-09T00:01:03:22Z",
               "completed_by": "3",
               "steps": [
                 {"id": "200230-2ba1-230b-03fa-2039fde9023",
                  "completed": "2030-07-09T00:01:01:03Z",
                  "completed_by": 3
               ]
            }
         },
         "name": "Weekly Account Checks"
      }
 }}
SweetProcess Integration Via Zapier

In the unlikely event that you don’t know what Zapier is a no-code automation tool that integrates with over 7000 apps. Or is it over 8000 now? It’s like if there’s an app, there’s a zap – that’s Zapier- lingo for an automated workflow.
The good news is that we are in a secure partnership with Zapier.
We are always happy to help you with webhooks if you need help. But you could use Zapier to integrate SweetProcess with other platforms of your choice. We have a complete guide on how to go about it. And we’ll give you a brief overview right here.
Connect Zapier to Sweetprocess Step by Step
If you don’t already have a Zapier account, you could start with their free plan. It provides 100 task automations and unlimited zaps – great for starting out.
Click on the Webhooks link on the left navigation panel to find the option to “Add SweetProcess to Zapier”.
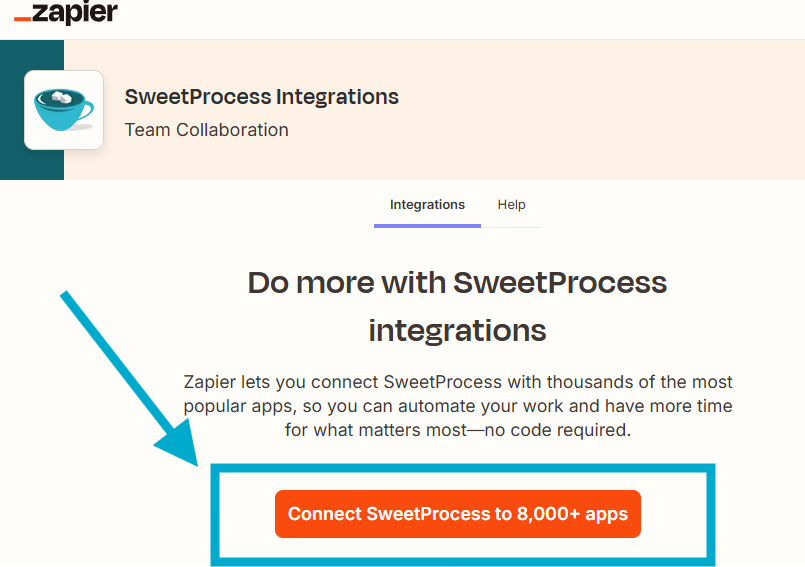
Clicking that button will take you to the Zapier integration page. If you are already logged in to your Zapier account, you will find the option to connect to SweetProcess:
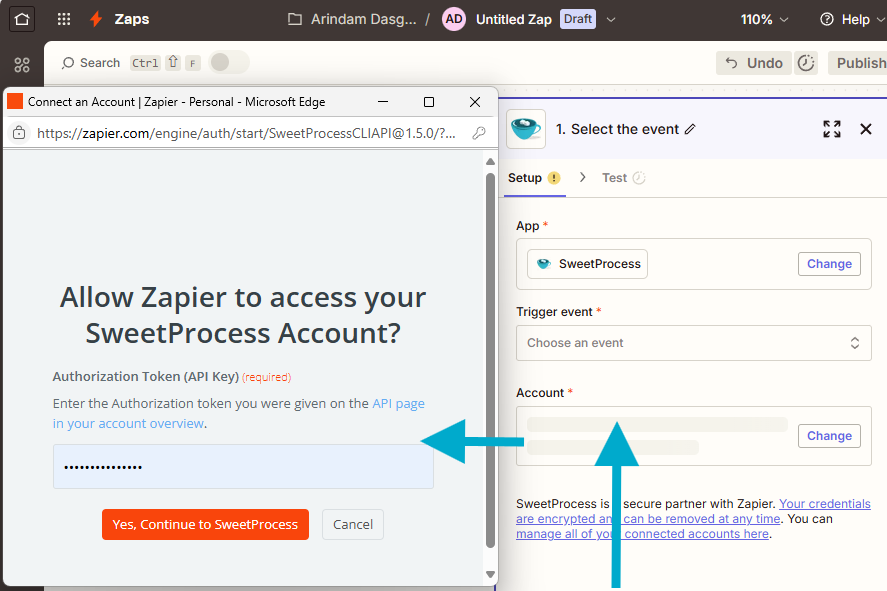
You will be redirected to your Zapier account with a prompt to create your zap, but first, you have to connect your SweetProcess account with the Legacy Token in your account.
So, ignore the zap prompt, which will look like this:
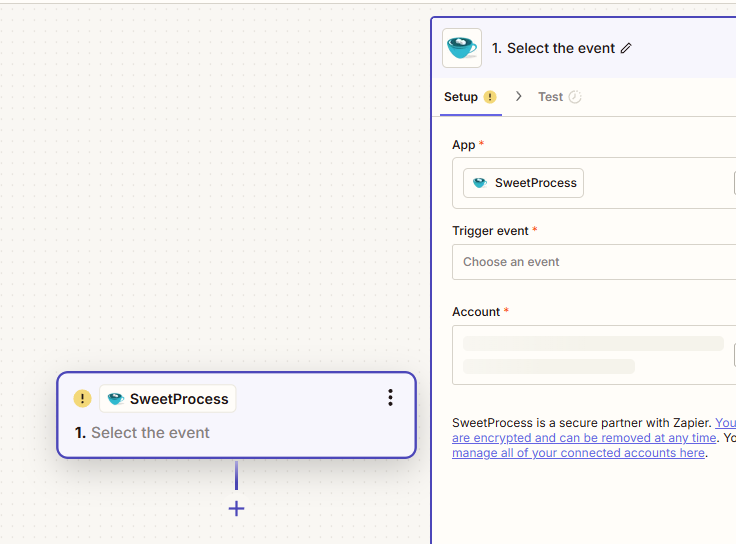
Locate the “Account” text area to the right of your workspace and click on it. Your click will trigger a pop-up window where you can insert your API token:
After your account is connected, you can see your email in the Account text area and now you can go ahead and create your zaps.
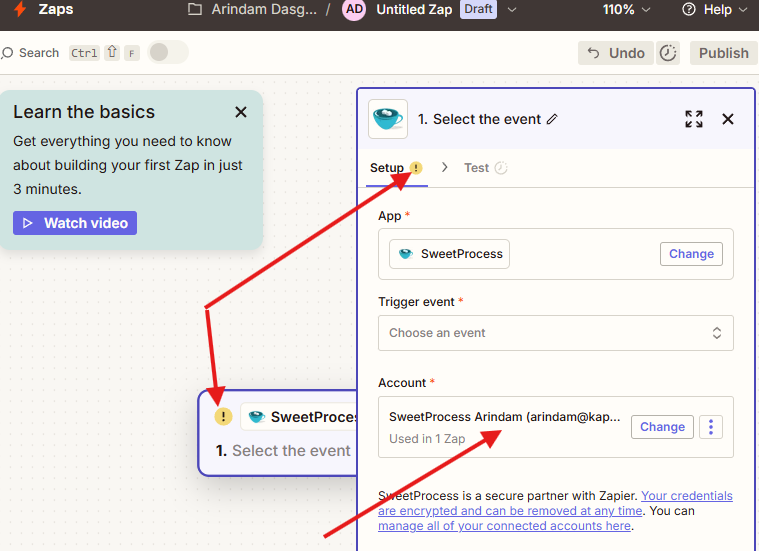
There’s something else we thought we’d point out to save you a bit of possible apprehension – Zapier displays a mark of interjection encased in a yellow circle, which automatically makes you think you’ve done something wrong! Actually, they also use that error status if you haven’t done something you’re expected to do. You are expected to select an event.
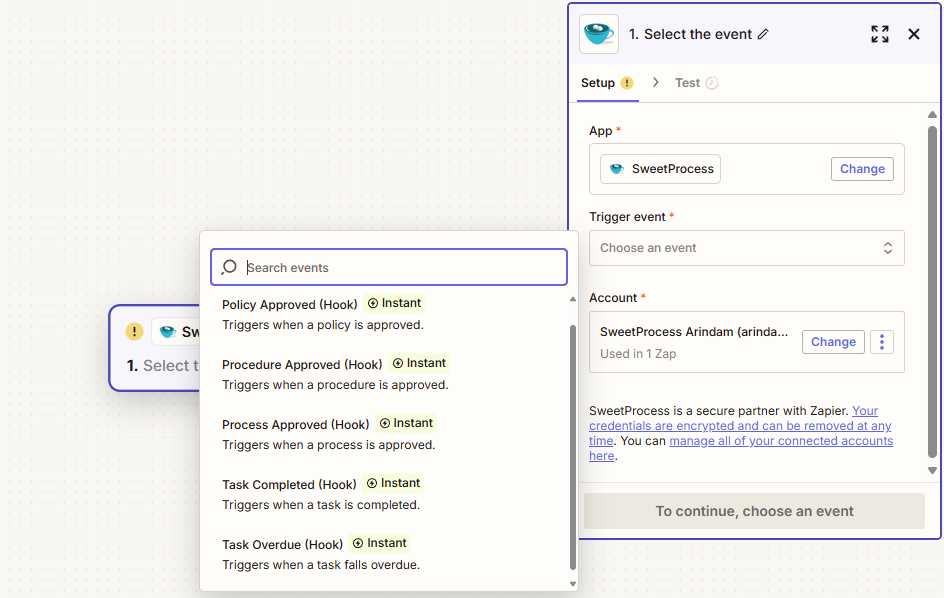
To choose an event, click on the “Trigger event” text area right above the Account area where your name and email are displayed, and you will get a dropdown which looks more like a pop-up showing you all available options:
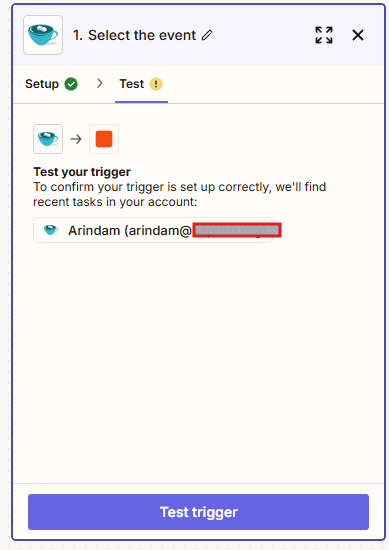
Once the event – “Task Completed (hook)” in this case – is inserted, the Setup tab shows a green checkmark, but now the Test tab has the error status, which is also reflected in the floating step-blurb on the left:
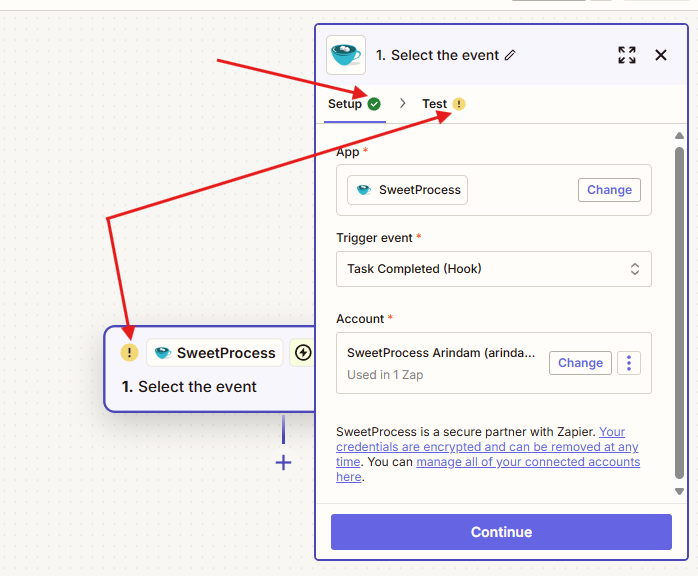
There’s nothing to worry about – Zapier just wants to make sure you’re doing everything right, which includes testing your input.
So, go ahead and click the Test tab, and this is what you are shown:
Once your trigger is tested and found okay, the error status will disappear. If, for some random reason, the test is not found okay, you will be given an option to skip it for the moment and continue with your setup.
There’s no point in going further on this topic when we have a (very) detailed write-up on it right here. In this article, we wanted to give you a heads up on the Zapier integration part with some additional points not included in that write-up. Please take a look at it and let us know if anything about it needs more clarity.
We thought we’d pique your interest by including a brief summary of what comes next in the Zapier Integration Guide.
A Zap to Send an Email to You Upon Task Completion Using the Task Completed (Hook)
Setting up a trigger and creating an action after choosing SweetProcess from the Trigger App list:

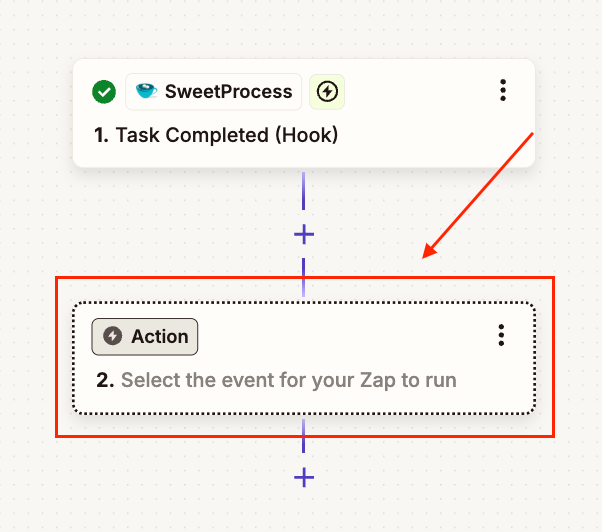
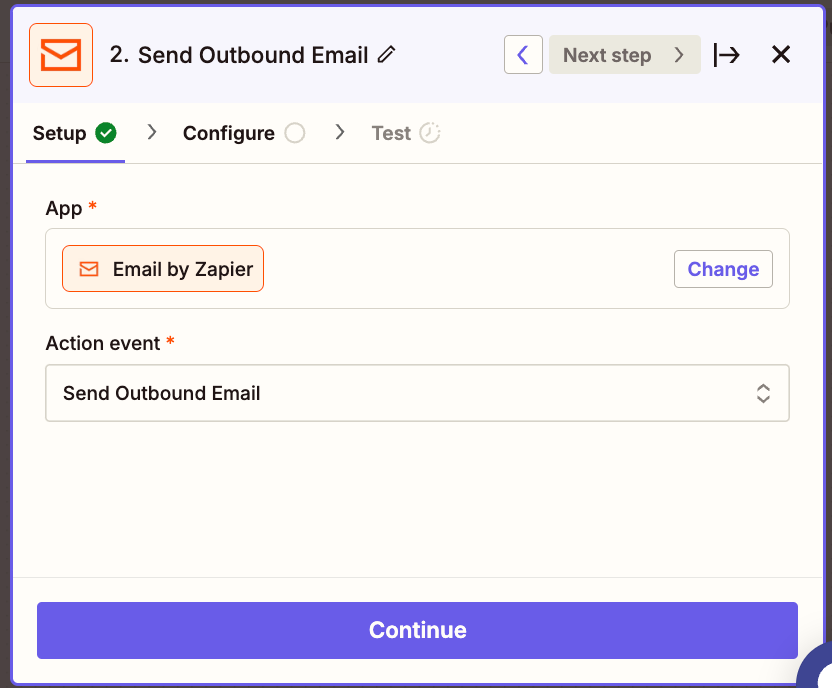
Choosing an action (Send Outbound Email):
Creating a Task Using the Create Task Action for When an Email Is Sent to a Specific Email Address

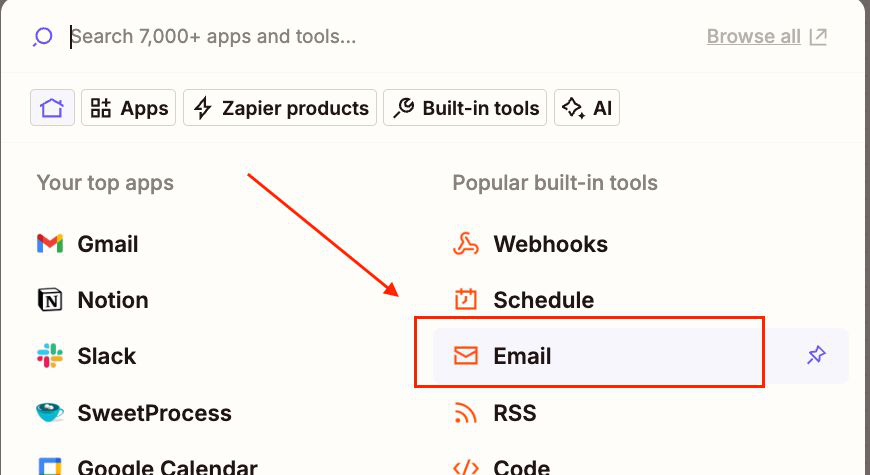
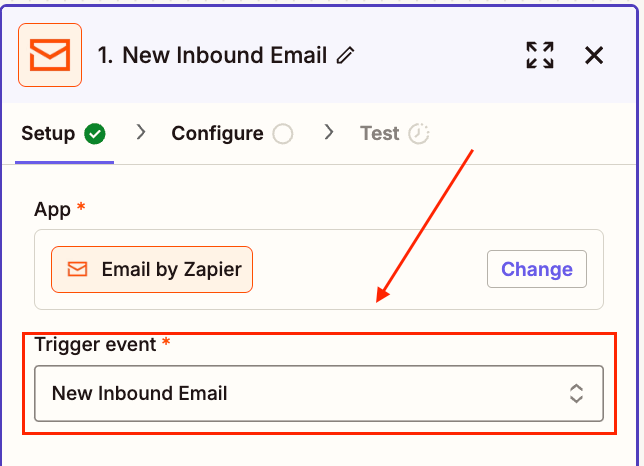
Choosing an app from the Trigger App list:
Configuring the task – for a new inbound mail, this time:
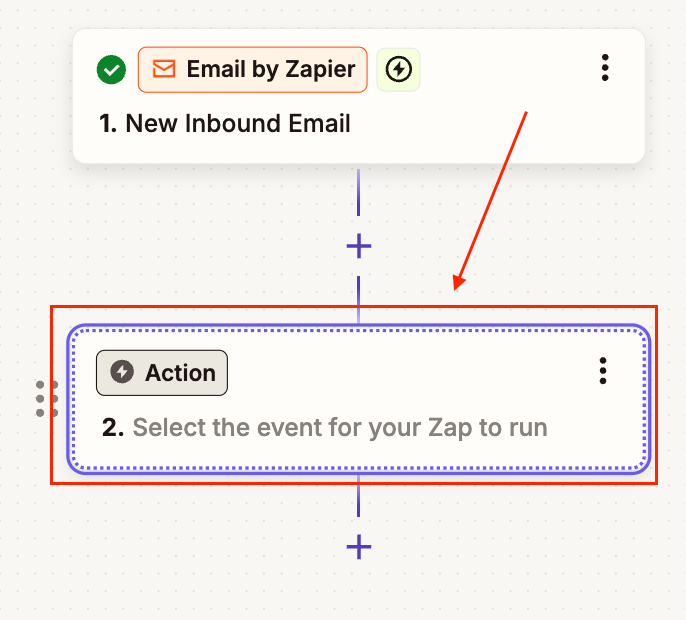
Defining the action after the trigger has been set up:
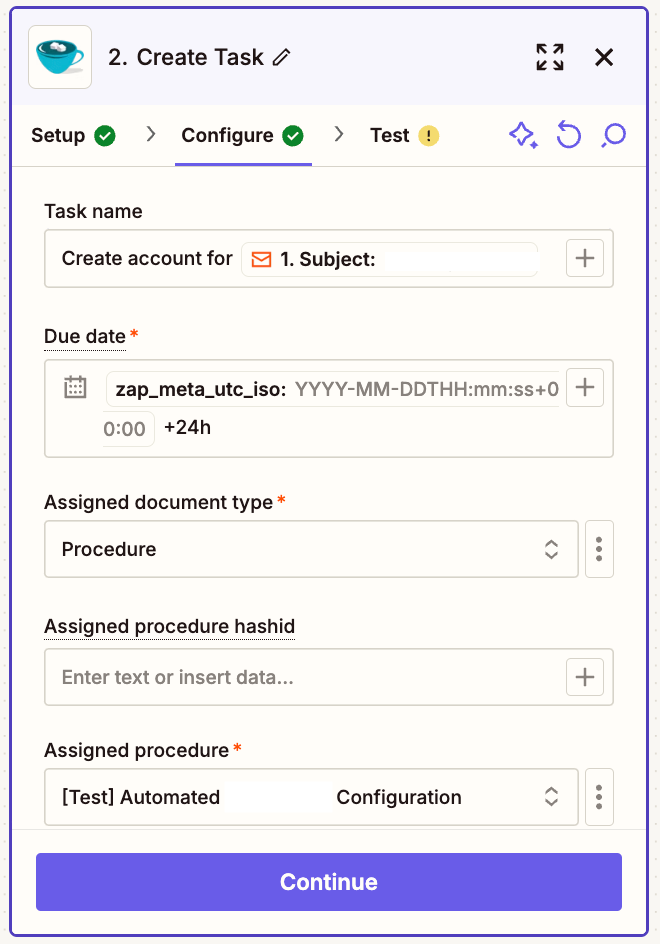
Configuring the email data and creating an appropriate email subject – which will be the task name:
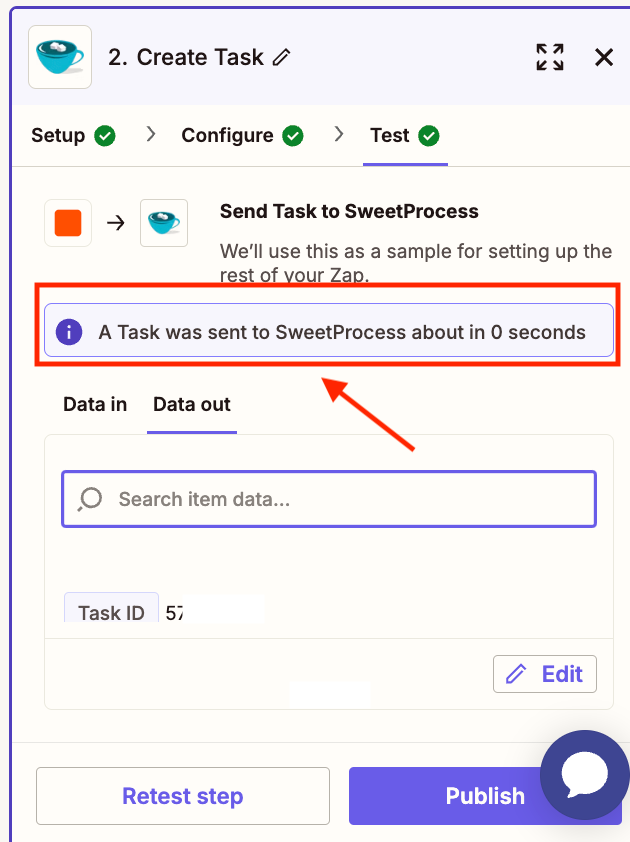
After everything is configured, Zapier sends a task to your SweetProcess account as a test, and then you can publish your zap if things look good (or retest, if they don’t):
Supported SweetProcess actions and triggers
- trigger task complete
- trigger task overdue;
- trigger procedure/policy/process approved; and
- action create task
Explore the Detailed Guide to SweetProcess Integration with Zapier
Frequently Asked Questions About the SweetProcess API

Can I access the SweetProcess API with a free trial account?
Yes, of course. We offer a full-featured trial for 14 days. Click here to dive into SweetProcess now, API and all!
What is the minimum requirement for accessing the SweetProcess API?
You’re probably thinking of different plans with different kinds of access? Here at SweetProcess, ALL our customers have equal access to the SweetProcess API. Just get yourself an account – even a trial account will do.
Can I use the API to create or update SOPs?
Yes, you can, using POST or PUT methods.
Example:
curl -X POST https://sweetprocess.com/api/sops \
  -H "Content-Type: application/json" \
  -H "Authorization: Token xxxxxxx" \
  -d '{
    "title": "New SOP",
    "steps": [
      {
        "title": "Write",
        "content": "Write the article on X"
      },
      {
        "title": "Edit",
        "content": "Edit the article on X"
      }
    ]
  }'
Are additional endpoints coming soon?
We’ll include additional endpoints as and when requested by our customers. If you need any, please let us know (support@sweetprocess.com).
How secure is the webhook system?
Let’s put it this way – anything in SweetProcess is as secure as your SweetProcess account. That’s where your tokens are stored. Tokens cannot be used without an active, logged-in SweetProcess account.
So, the question now becomes, how secure is your SweetProcess account?
Well, we have two-factor authentication for logging in, where you have to download an authenticator app, scan our QR code, and have it generate unique recovery codes.
At this point, to compromise your SweetProcess account, you’d have to ensure that the same thief manages to access both your computer and your phone.
So, the short answer to the original question is that the webhook system is as secure as it can be.
Integrate Your SOPs and Workflows With the SweetProcess API
We have described how we work, and we’ve shown you code snippets and screenshots. If you’re at least a little intrigued, it wouldn’t hurt to see for yourself if we’ve been on point or if this article is just the usual salesy stuff.
Why not ask your developers to poke and prod under our hood, and they can tell you if they like what they see? You don’t need a credit card, and you have no obligations to continue with us beyond the 14-day period.
And if you or your team gets any work done, you can export everything just as a normal, paid account holder can. This is a full-featured trial: you’ll enjoy the exact same features during your trial as any of our regular customers.
Oh, and there’s actually plenty of time to change your mind. We offer a 30-day, unconditional money-back guarantee even when you opt for a paid plan. So, you can effectively extend the trial to a risk-free month of working with SweetProcess. If you don’t consider us a good fit even after that, we don’t want your money, no questions asked.