Last Updated on July 6, 2025 by Owen McGab Enaohwo

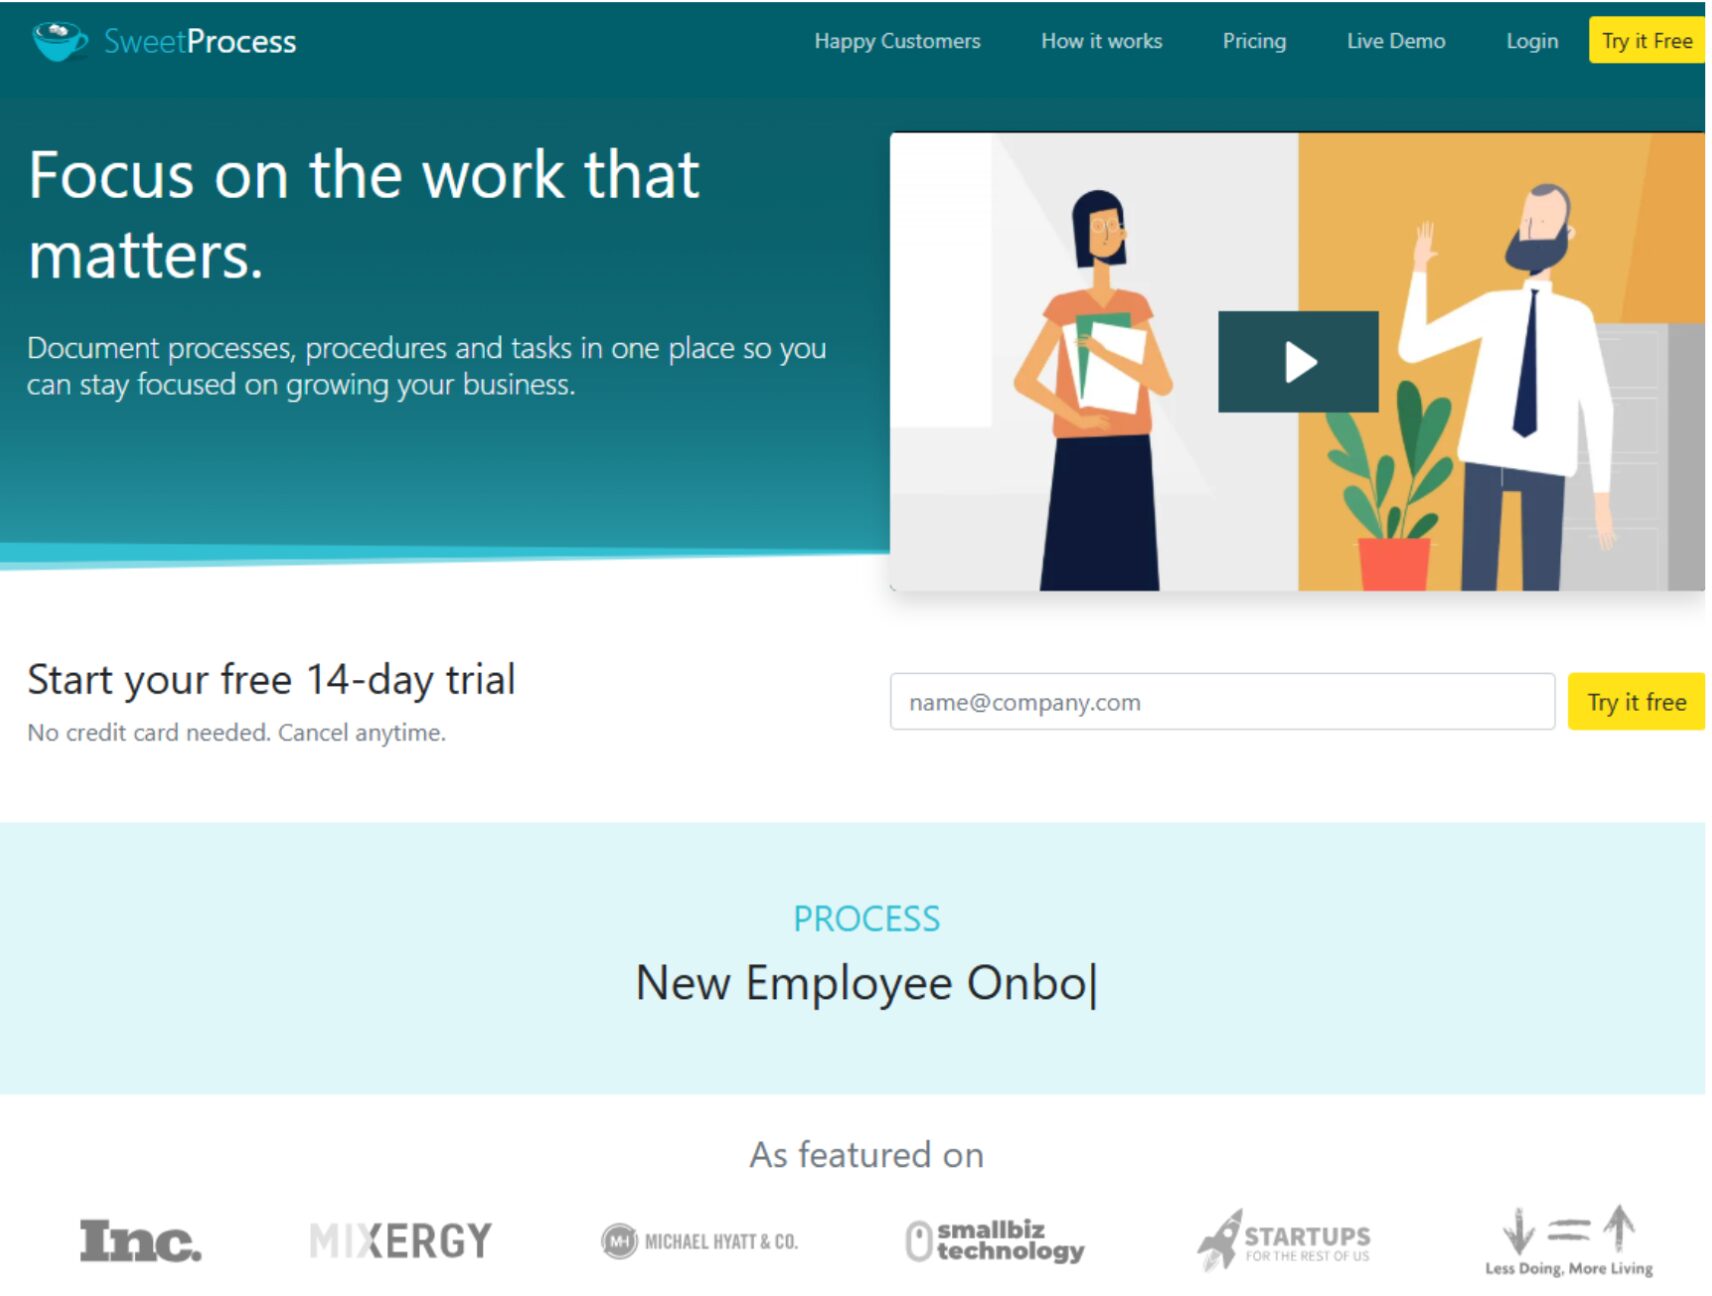
Standard operating procedures (SOPs) are essential for consistency, efficiency, and scaling your business. However, creating and managing them manually in Word documents or scattered tools can be time-consuming and hard to maintain.
That is where SweetProcess comes in.
SweetProcess is an all-in-one platform that makes SOP documentation effortless, organized, and collaborative.
What’s a tutorial without practice, though? You can create your first procedure, process, or policy inside SweetProcess right here, right now for absolutely free.
All you have to do is click here to take advantage of SweetProcess’s 14-day free trial. You don’t even need a credit card to get started.
Table of Contents
Why Use SweetProcess for SOP Documentation and Management?
How To Set Up and Navigate SweetProcess
How To Create and Manage Your Company’s Procedures, Processes, and Policies With SweetProcess
How Companies Use SweetProcess To Document Their Standard Operating Procedures
Document and Manage Your Standard Operating Procedures Using SweetProcess
Why Use SweetProcess for SOP Documentation and Management?

Comparing different procedure and process documentation software tools and considering SweetProcess? Let’s make your work easier. Here are the reasons companies choose SweetProcess over manual documentation or other tools.
Easy-to-Use Interface
SweetProcess is easy to use, even for the below-average tech user. And that is thanks to its user-friendly interface and features like its:
- Intuitive and clutter-free design that makes it easy for even a first timer to use, without any training.
- Responsive and mobile-friendly design that makes it a joy to use, no matter the device: mobile, desktop, or tablet.
- Simple, drag-and-drop editor for quickly creating a standard operating procedure—adding steps, inserting images, embedding videos, etc.
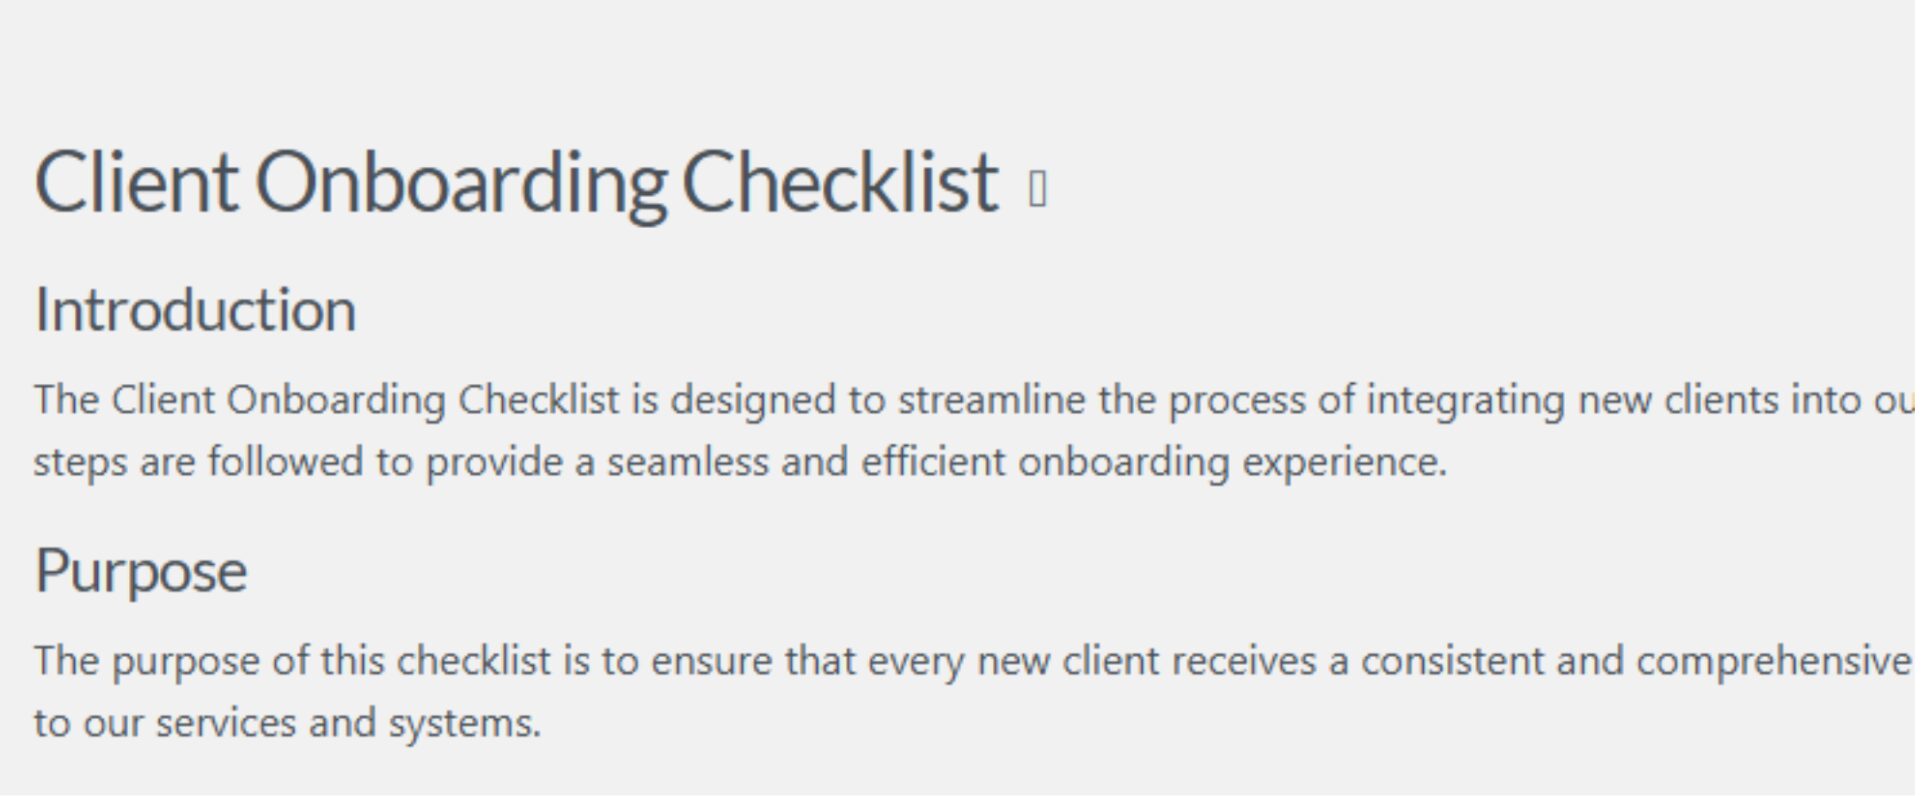
Example: The head of customer success creates a new client onboarding checklist in less than 20 minutes:
Eileen C., a marketing and operations manager, mentioned on the review site G2 that SweetProcess is an easy-to-use organizational software with almost no learning curve.
AI-Powered Documentation
SweetProcess comes loaded with its resident AI, SweetAI.

With SweetProcess Artificial Intelligence, you can:
- Document and edit procedures, processes, and policies automatically in mere seconds.
- Tailor SweetAI responses to your company data so it generates content of the best quality possible.
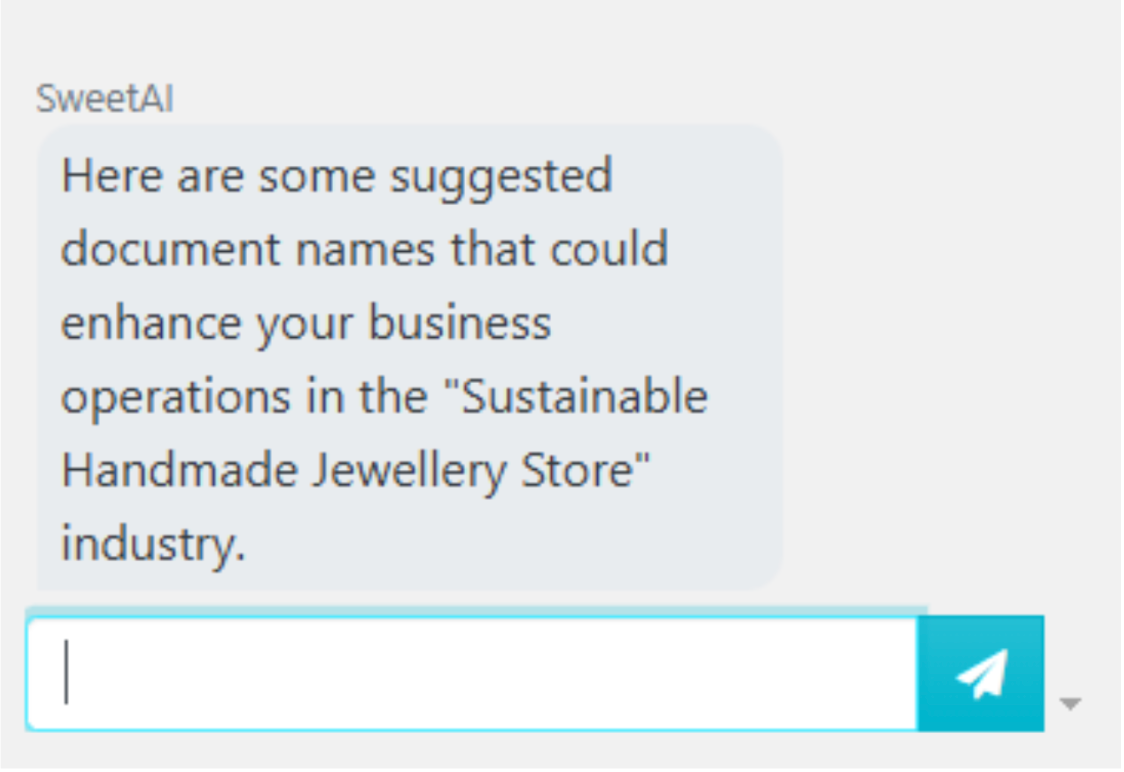
- Get suggestions for procedures and other documents you should create to enhance your business operations.
Use case example: A customer service lead pastes call-handling notes into SweetProcess; SweetAI turns them into a polished SOP in seconds.
Centralized SOP Management
In SweetProcess, all your SOPs are stored in one location for easy management.
- All SOPs are stored in the “Procedures” tab, where they can all be managed as you deem fit
- Organize SOPs by tags, folders, teams, etc, for easier access
- Search function to help find SOPs more easily
- Sort SOPs by time reviewed, approved, or edited, or even alphabetically
- Filter SOPs by tag, team, status, activities, and so on
“SweetProcess is the only program I’d start a law firm with today. If you have the right procedures and you combine that with the right team, there’s nothing that may limit you to how far and wide that you may go.” — Brian King, managing partner at King Law
Streamlined Team Collaboration
With SweetProcess’s team collaboration tools, you can:
- Assign SOPs as tasks to team members, with due dates and reminders.
- Use features like sign-offs and quizzes to know who has completed specific SOPs and gauge their understanding.
- Use features like comments and suggestions to collaborate in real time with team members on specific SOPs.
- Use Procedure Activity to track how team members are interacting with specific SOPs.
How To Set Up and Navigate SweetProcess

Using SweetProcess is very easy. From setting it up for your business to navigating it in creating and managing your process document, you’ll hardly run into any problems when using SweetProcess, even if you’re a technologically challenged person.
How To Set Up SweetProcess
First, go to www.sweetprocess.com and click the “Try it Free” button to create a free account.
You’ll be taken to a simple sign-up form. Fill it out, affirm that you’ve read and accepted the Terms of Use and Privacy Policy, and click the “Start Free Trial” button.
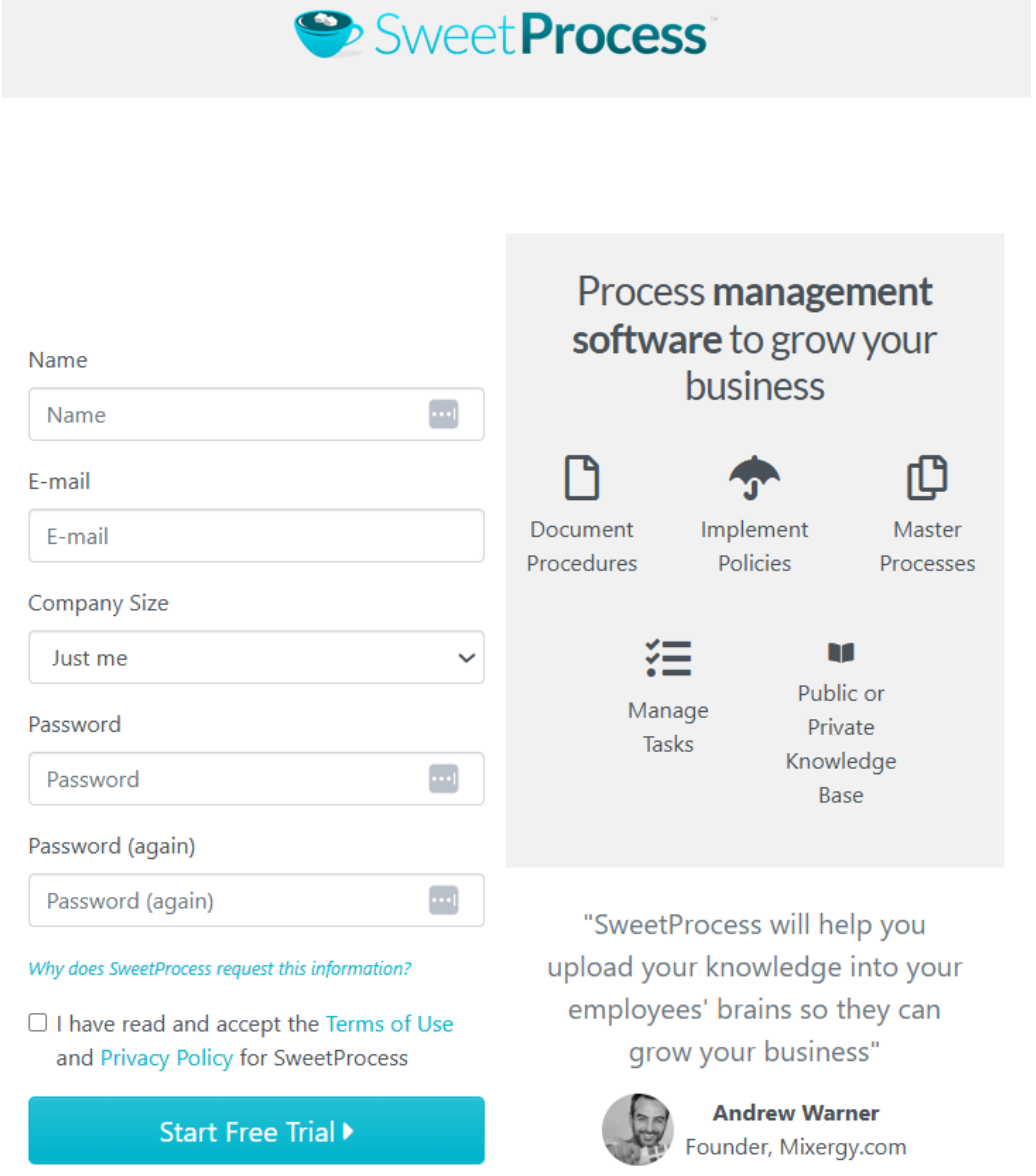
Doing this will give you 14 days of unrestricted access to SweetProcess and all its nifty features for free.
Next, you’ll be taken to an onboarding page where you get to set up your SweetProcess account.
In this section, you can get customized procedures and policies based on the information you give SweetAI, the resident AI of SweetProcess, or upload your existing procedures and policies.
And you can skip this first step altogether.
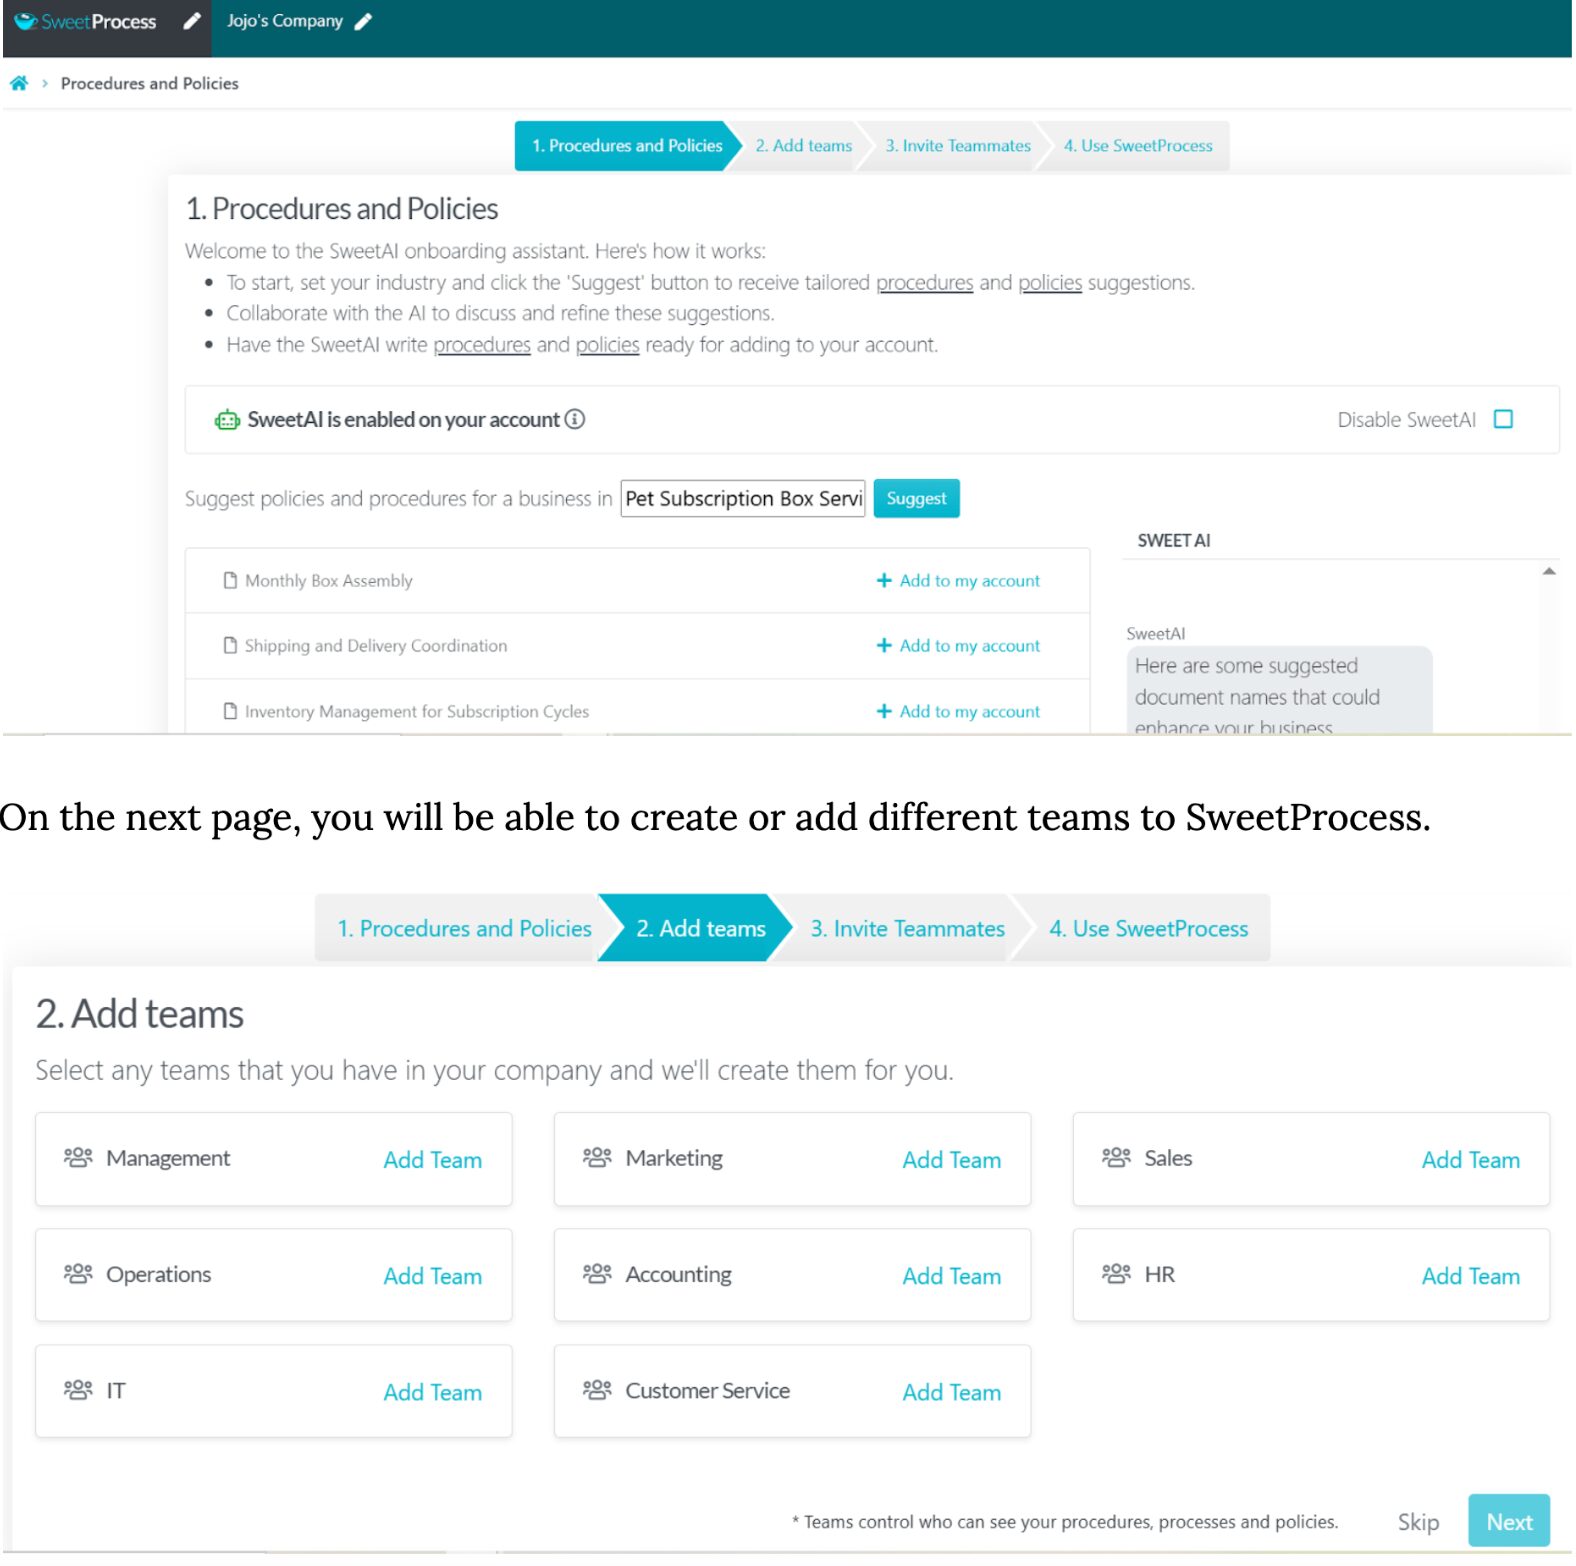
On the next page, you can invite teammates into your SweetProcess. The invitation goes straight to their email.

Next, you’ll be taken to your SweetProcess home page and your documents page. Here you can find every process, procedure, and policy you create inside SweetProcess.
Now that your account is set up, you can begin using SweetProcess to create and manage your company processes and procedures.
How to Navigate SweetProcess
Navigating SweetProcess is very easy. It is user-friendly and intuitive.
From the SweetProcess website, www.sweetprocess.com, click on the “Log in” menu.
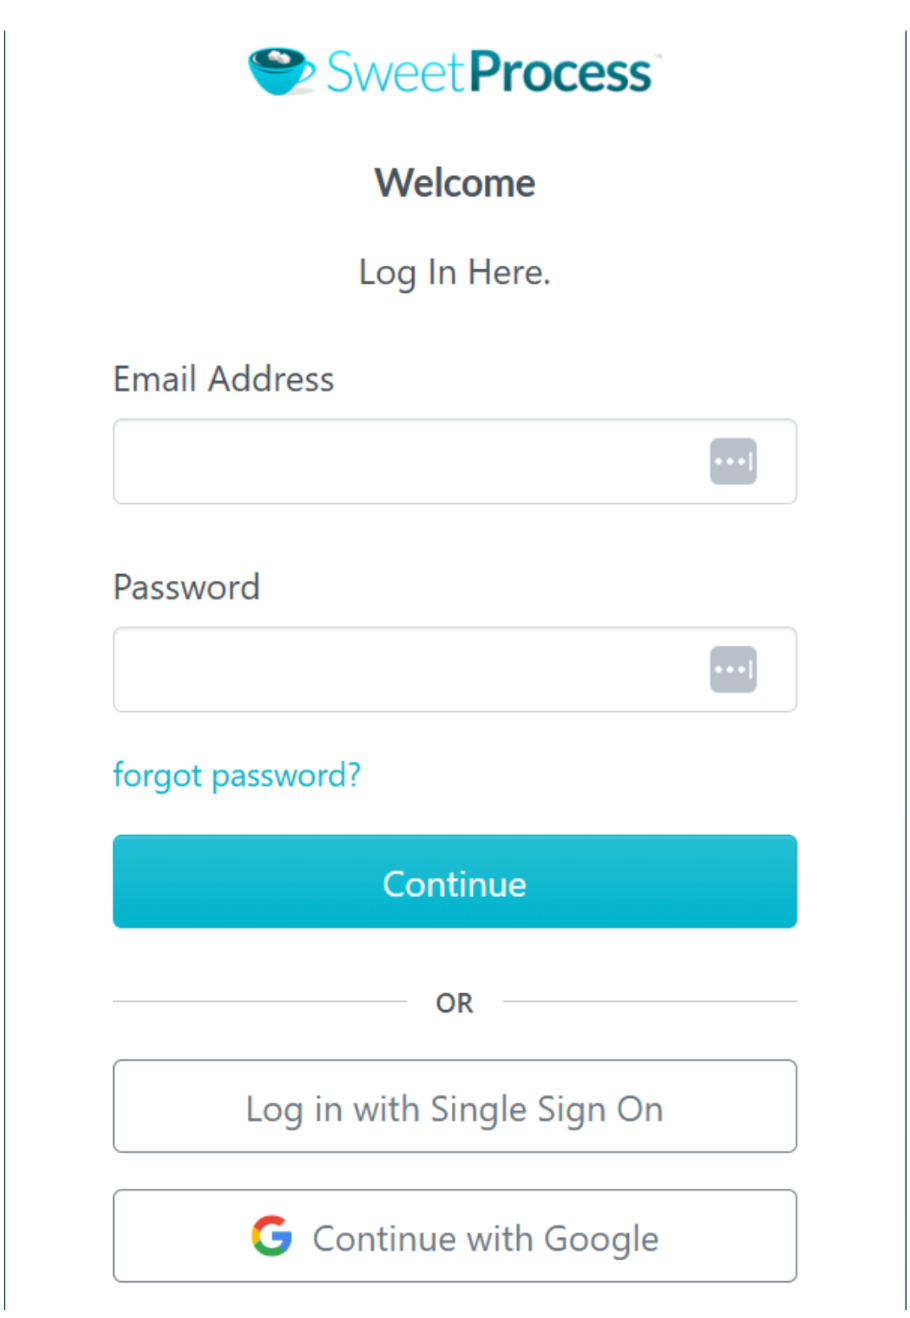
Simply fill in your credentials and click “Continue.” You’ll be taken to your SweetProcess homepage.
Whichever page you’re taken to after logging in, you have the navigation menus at the top to get to any part of SweetProcess with which you want to work.
For menus that are not on the navigation menu, simply click on the “More” drop-down menu, and you’ll see everything else.
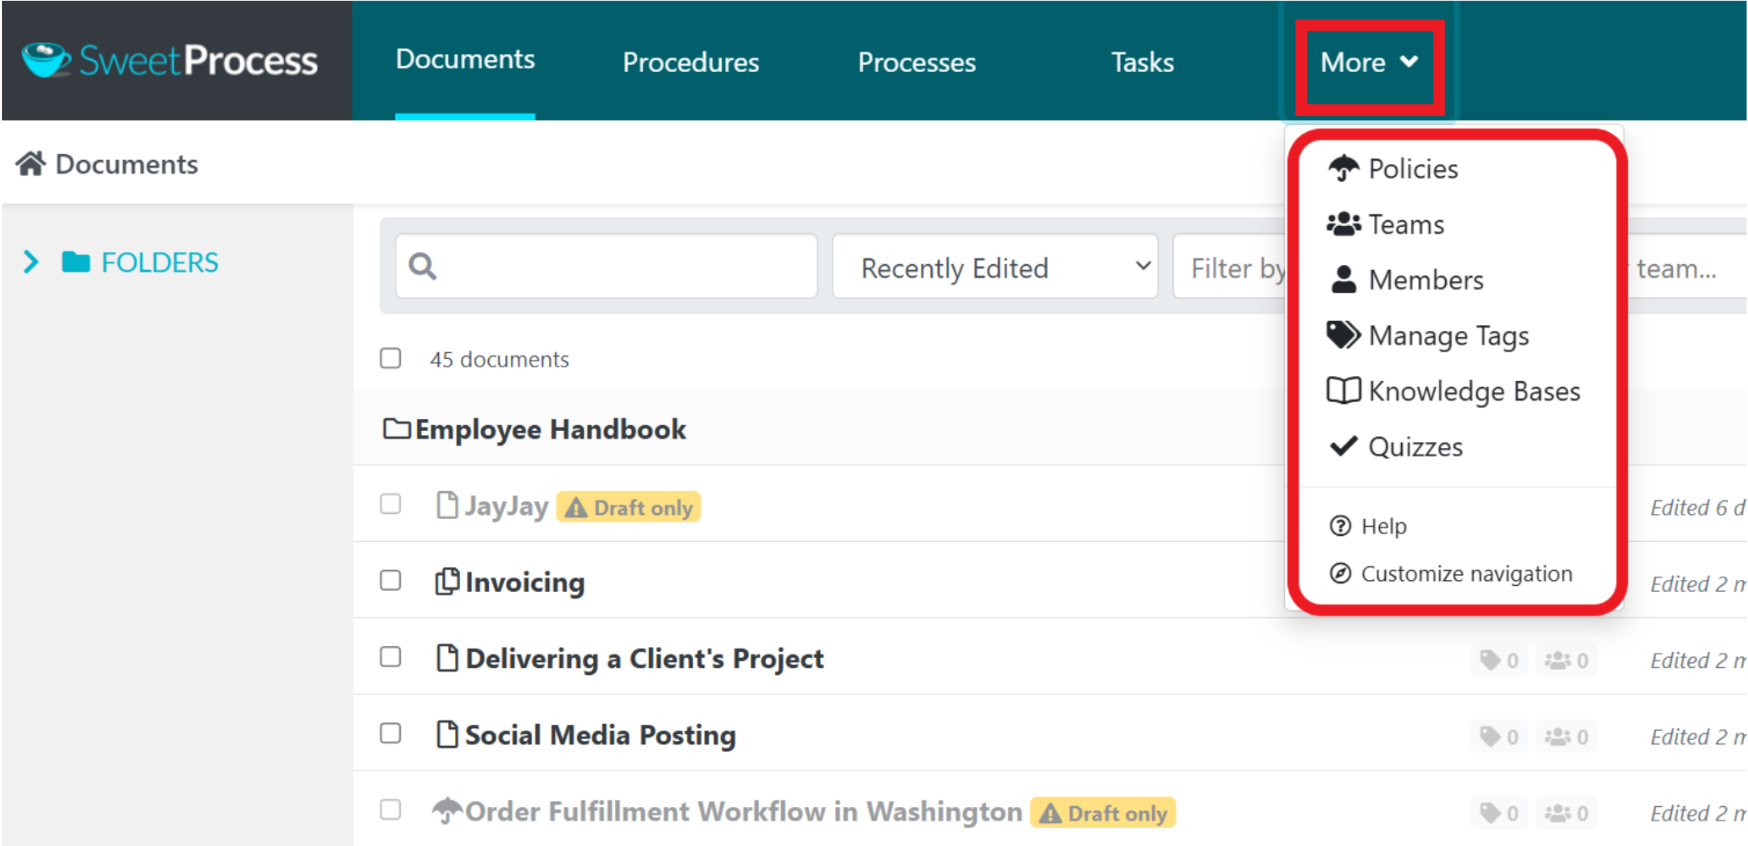
You can customize your navigation and arrange your menus however you like.
Inside SweetProcess, you can create your procedures, processes, policies, and other essential documents to streamline your business operations. You can also build your team, add members, and assign tasks to them individually or as a group.
You can create knowledge bases and quizzes to impart knowledge to your team members and gauge their understanding of the information.
You can easily do all these directly from the navigation menu, and each tab you open gives you even more tools to help manage and grow your business.
For example, when you open the “Procedures” tab, you’ll be able to create new procedures and manage existing ones.
This is a good place for you to pause and create your SweetProcess account, if you haven’t done so already, so that you can follow the comprehensive tutorials coming up next, step by step. It’s not just theory; it’s practical guidance.
How To Create and Manage Your Company’s Procedures, Processes, and Policies With SweetProcess

There are a myriad of things you can do with SweetProcess. However, at its core, it’s best for effectively creating and managing your company’s procedures, processes and policies.
How To Create a Procedure Using SweetProcess (Manually and Automatically)
Here’s how to create your procedures inside SweetProcess.
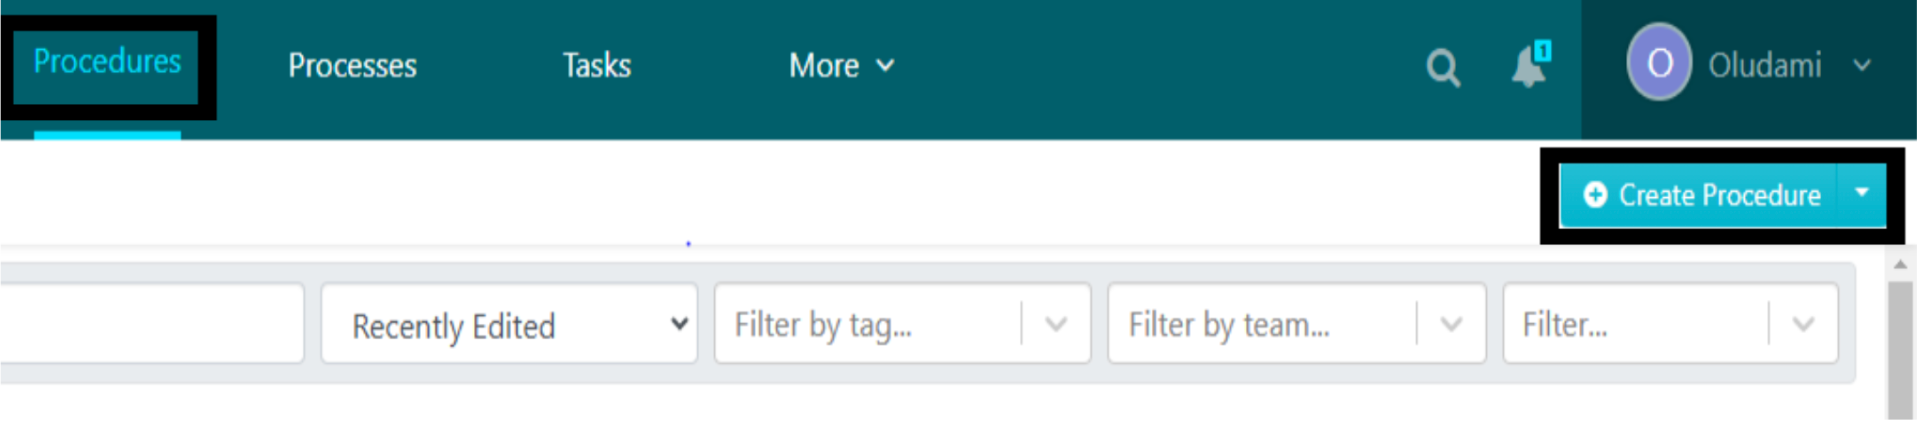
- From the SweetProcess header, click on the “Procedures” menu.

2. Click “Create Procedure” at the top-right corner of the page.
3. On the next page, you’ll see SweetAI’s suggestion tab. You can simply type in your industry and get related procedure titles generated by SweetAI.
Or you can ignore it and instead scroll back up to enter your procedure title in the title bar.
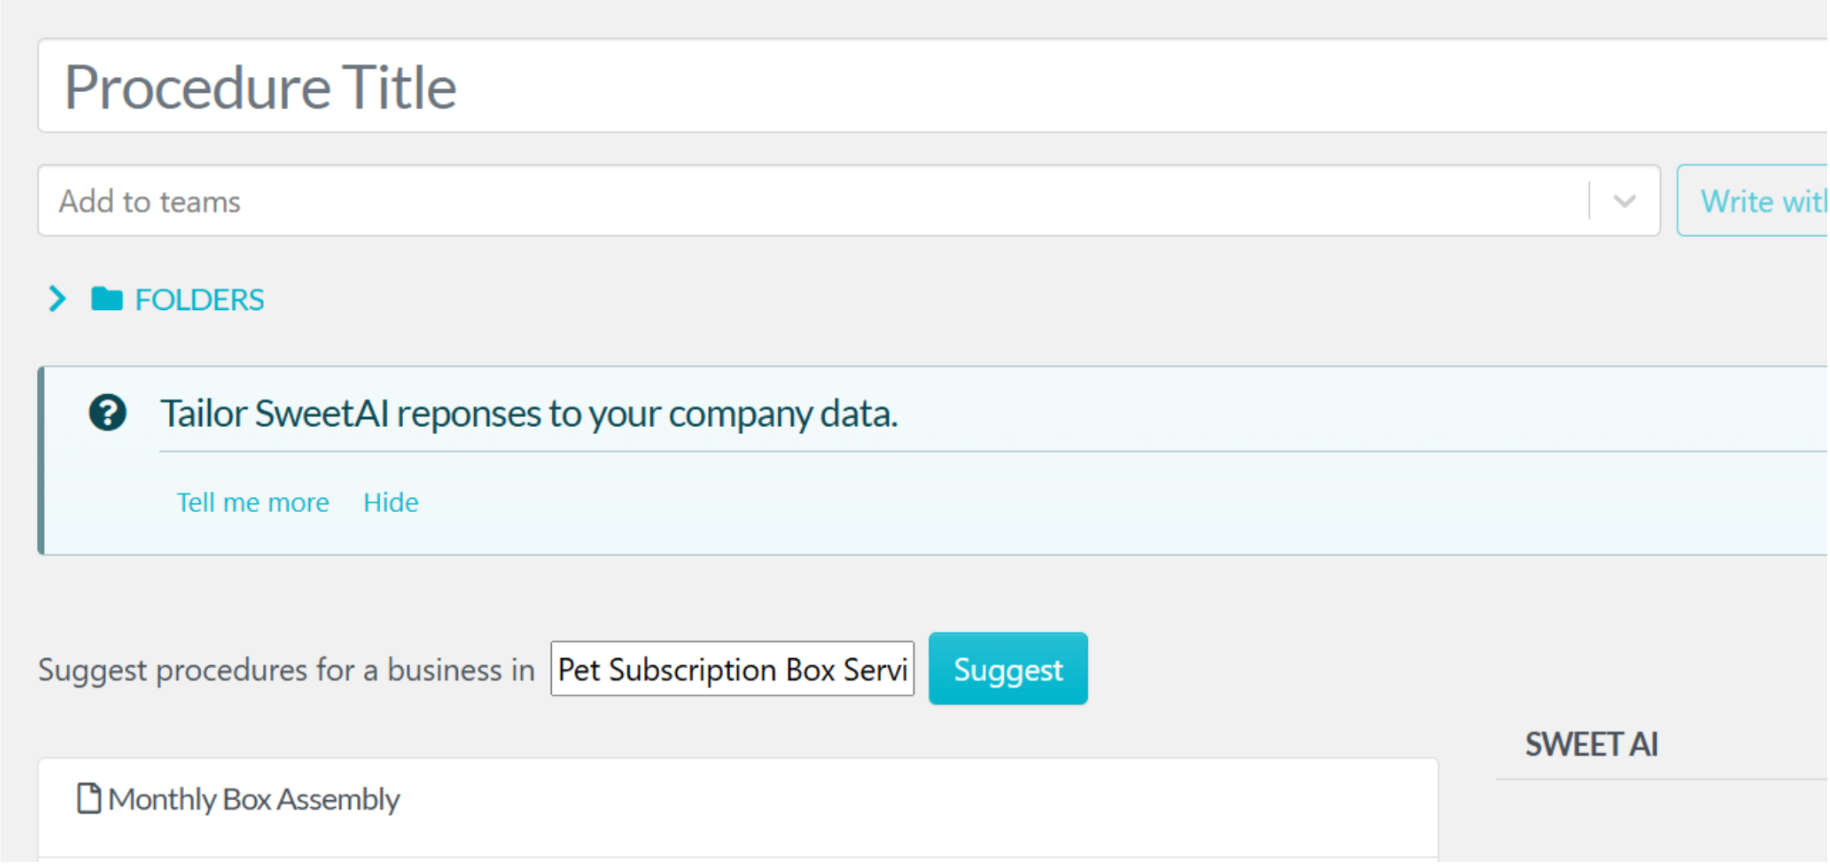
4. Next, you can either click on “Continue” to get to the editor and input your company procedure content, or click on “Write with SweetAI” to get your procedure content automatically generated by AI based on your title.

If you decide to write with SweetAI, here’s an example of what you’ll get:
You can then edit the AI-generated content as you wish.
5. If you choose to create your procedure manually and click on “Continue” instead, you’ll be taken to a page where you can draft your procedure.
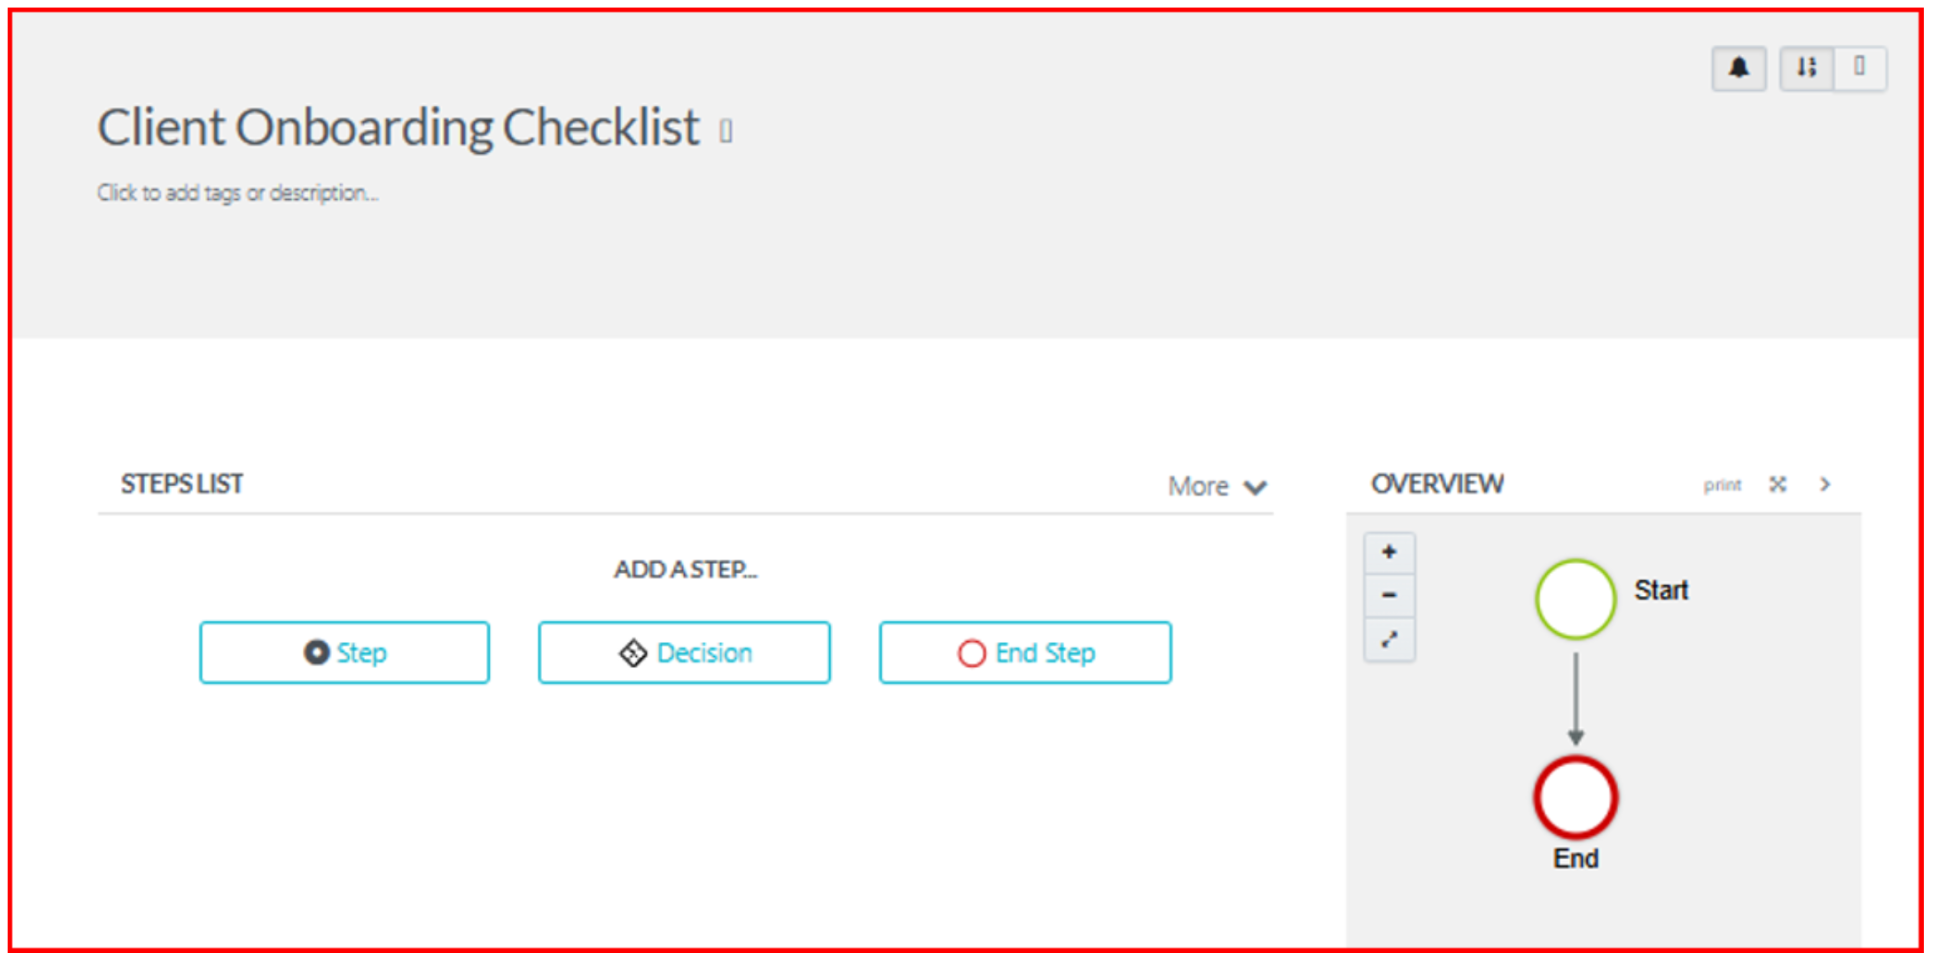
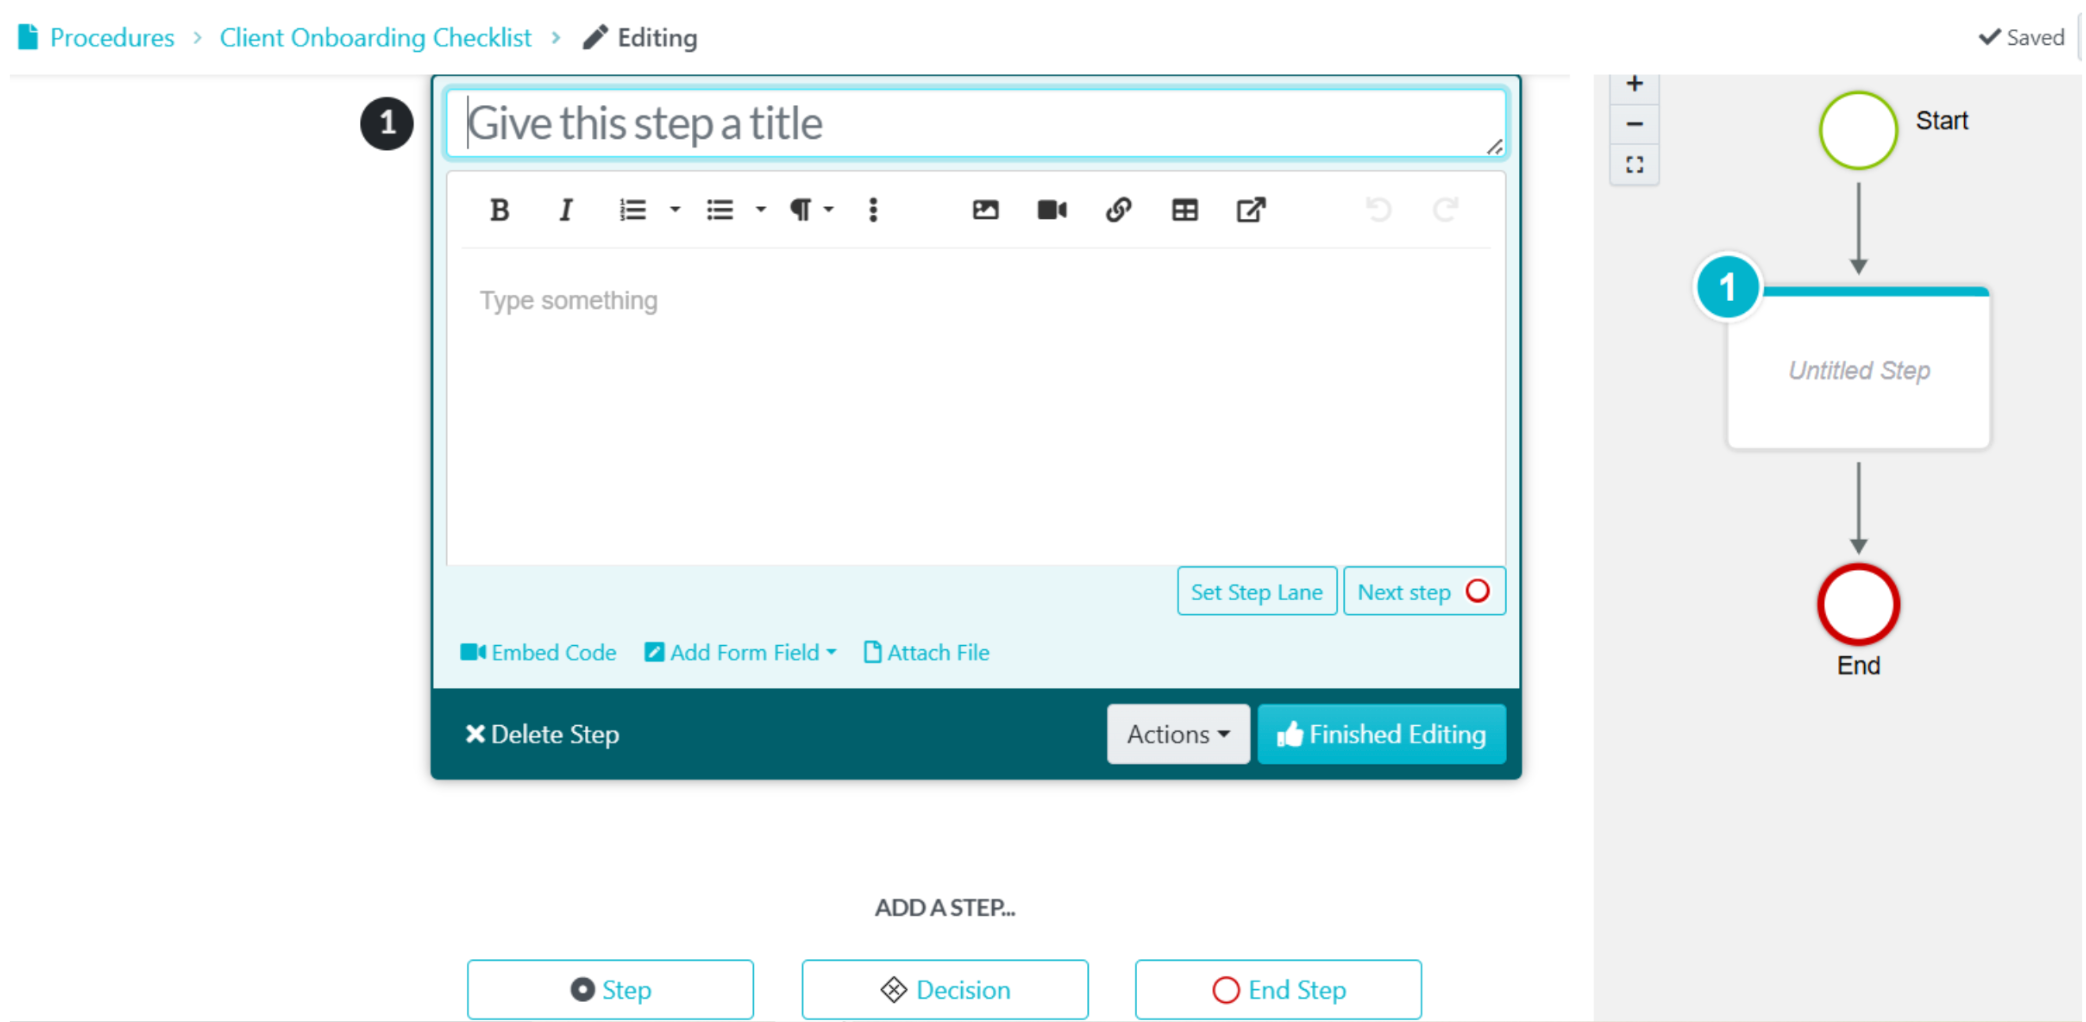
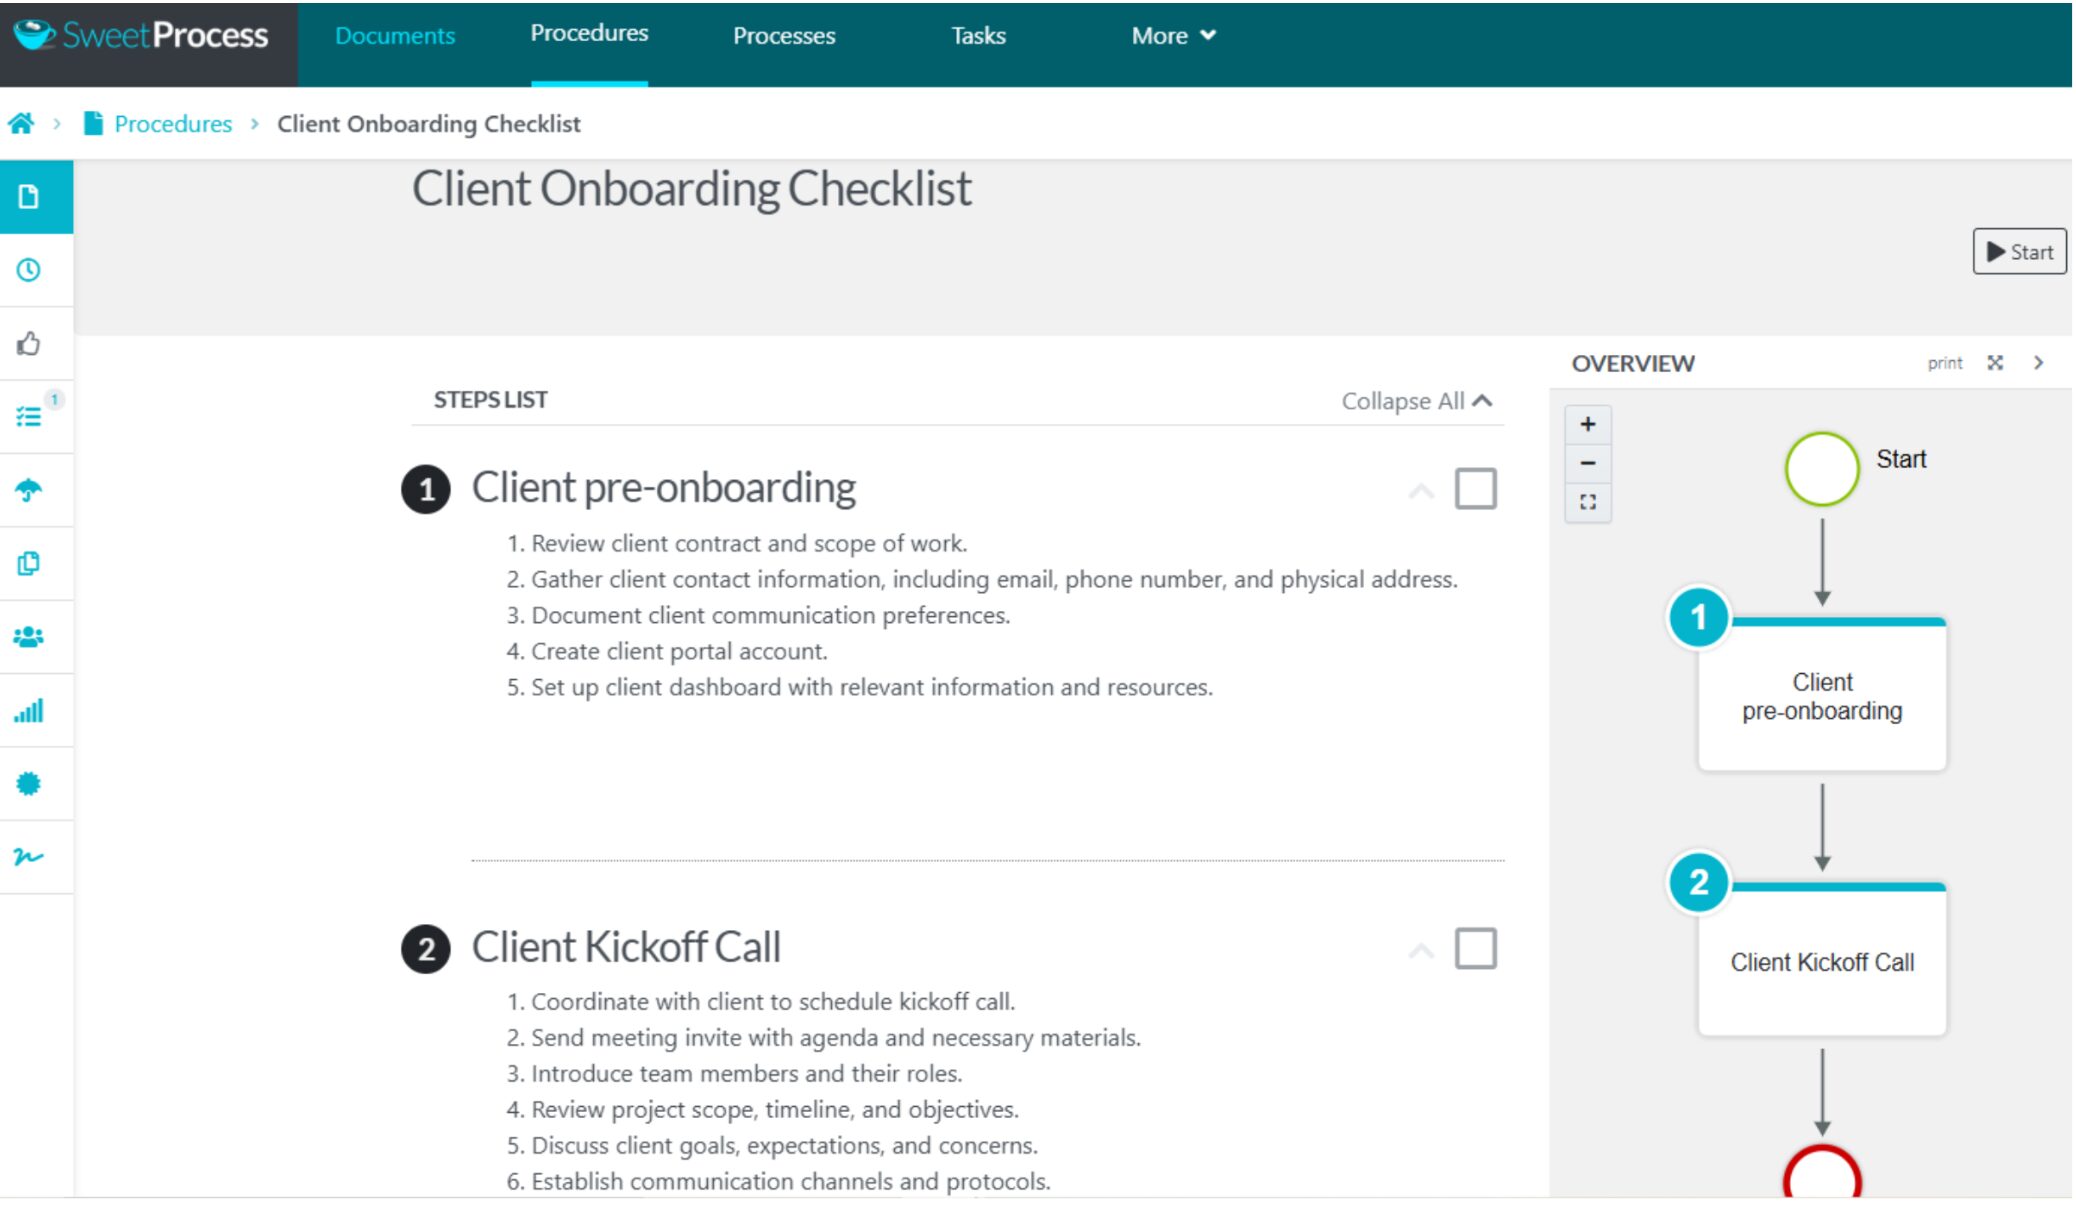
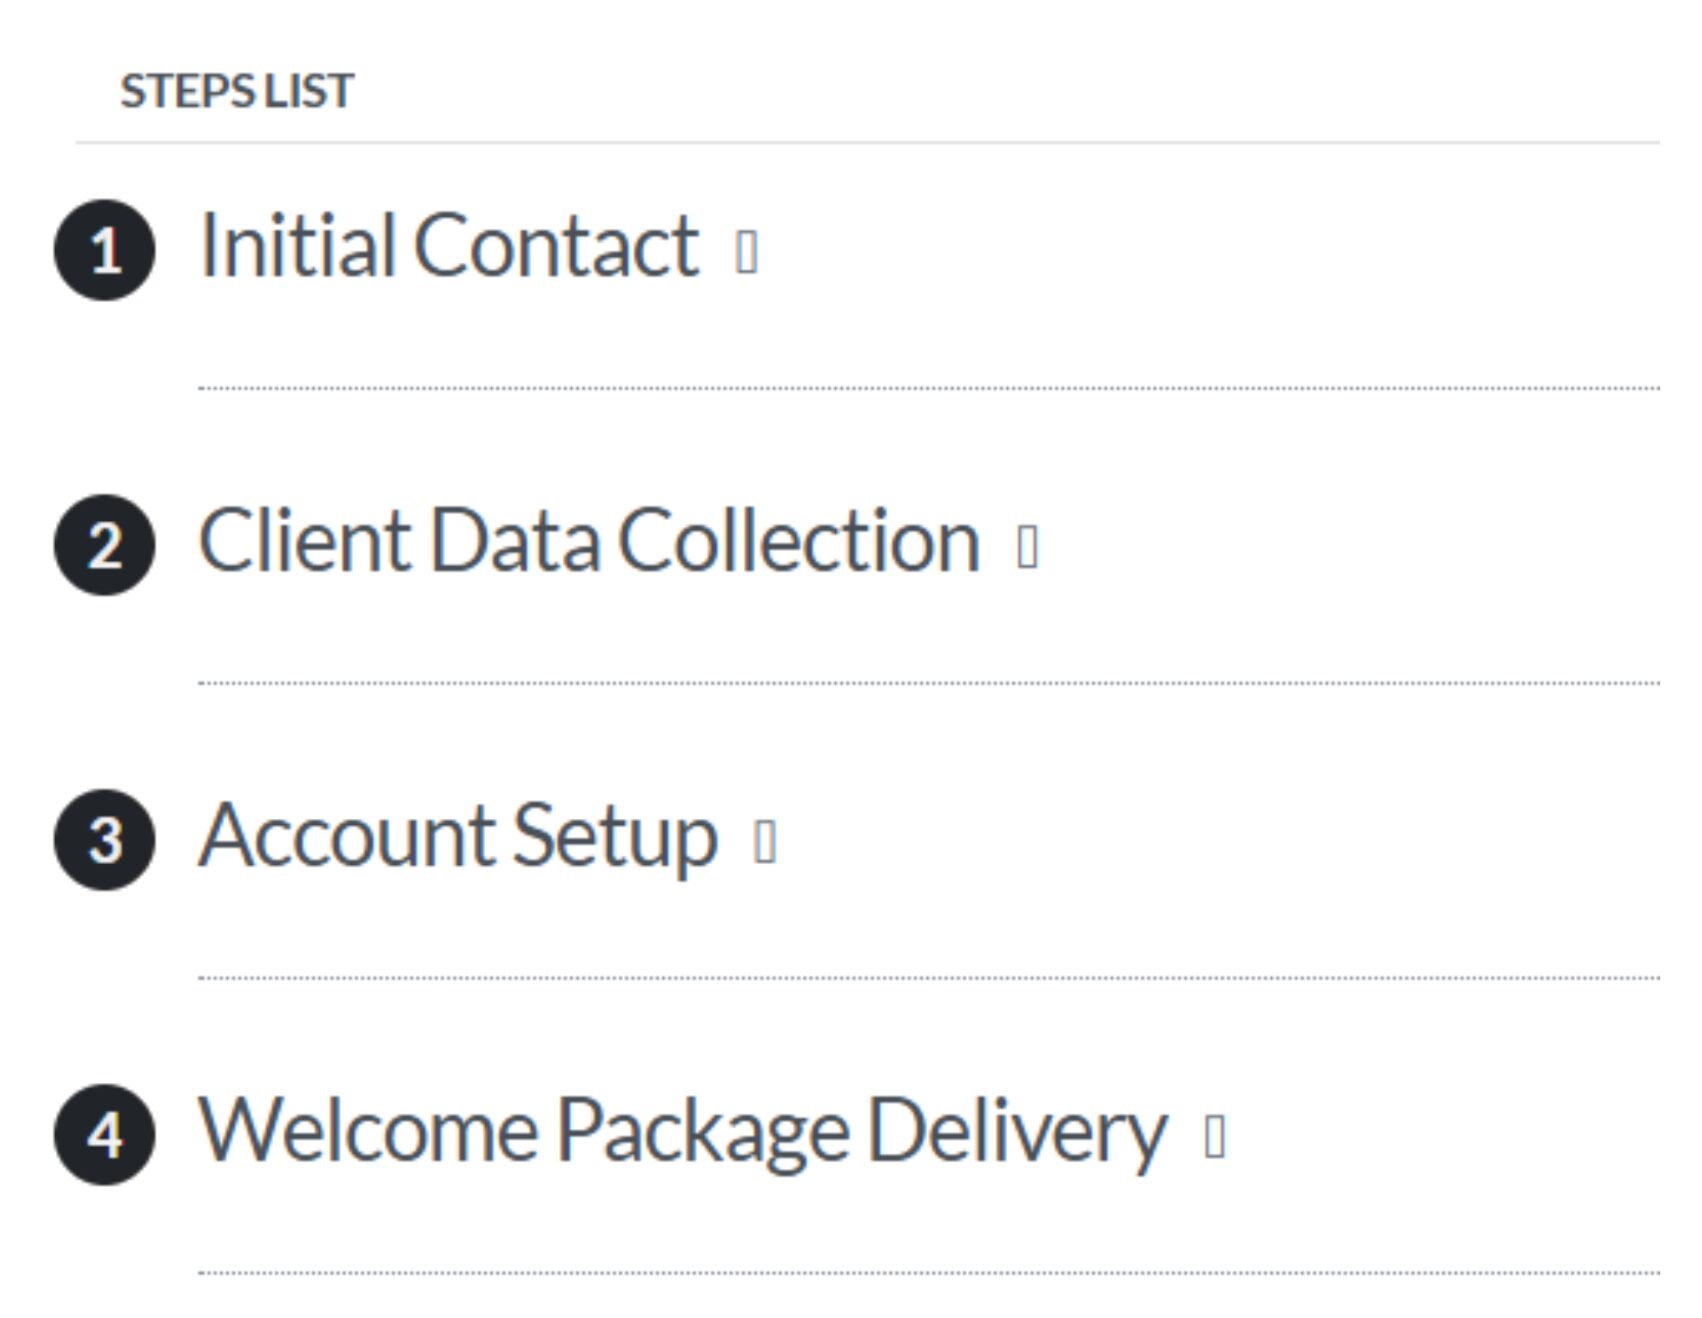
6. First, click “Step” to add the first step to your procedure. A box will open where you can give your step a title and enter other details. You can also attach images, videos, tables, links, etc. Click on “Finished Editing” when you’re done.

7. Keep clicking on “Step” to add as many steps as you want to your procedure. You’ll see your steps list when you’re done adding all the steps and their content. Each list can be managed by clicking on the three vertical dots beside it; you’ll be able to move the step, delete the step, duplicate the step, etc.
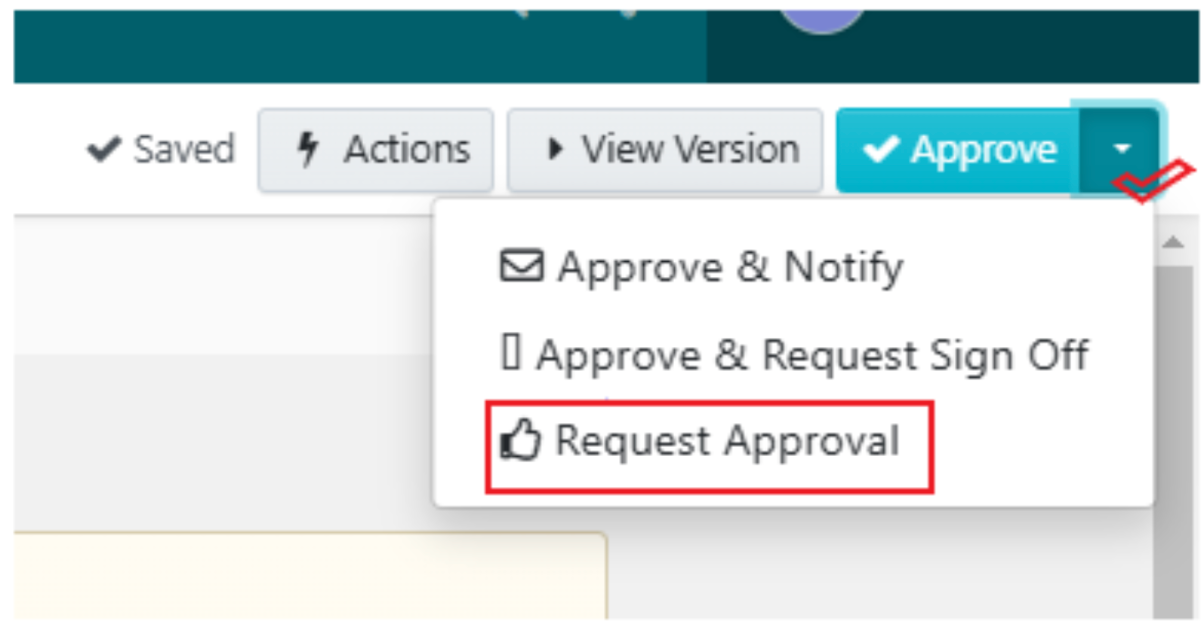
8. Once you are done editing, click the “Approve” button at the top-right corner of your screen to make your procedure live, provided you have the necessary permissions. If not, click on the drop-down icon beside the “Approve” button and click on “Request Approval” so that whoever has permission can approve it.
How To Document Your Business Processes With SweetProcess
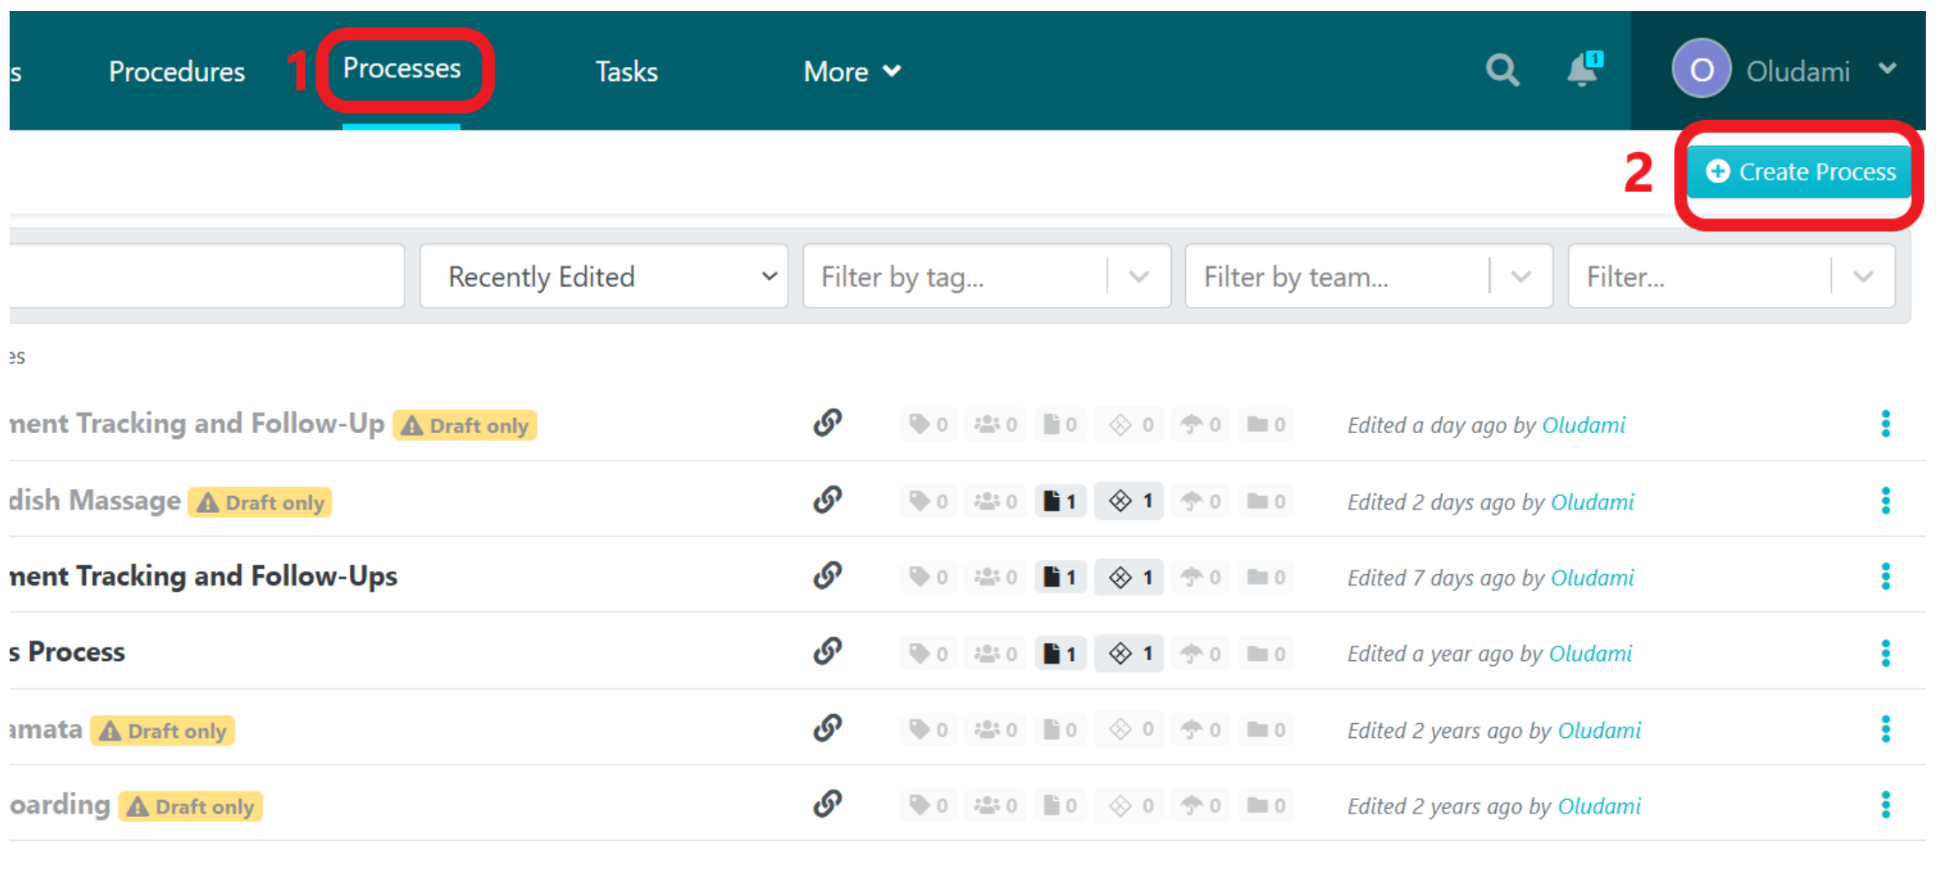
1. From the SweetProcess home page, click on the “Processes” tab and then click on “Create Process” at the top-right corner of the next page.
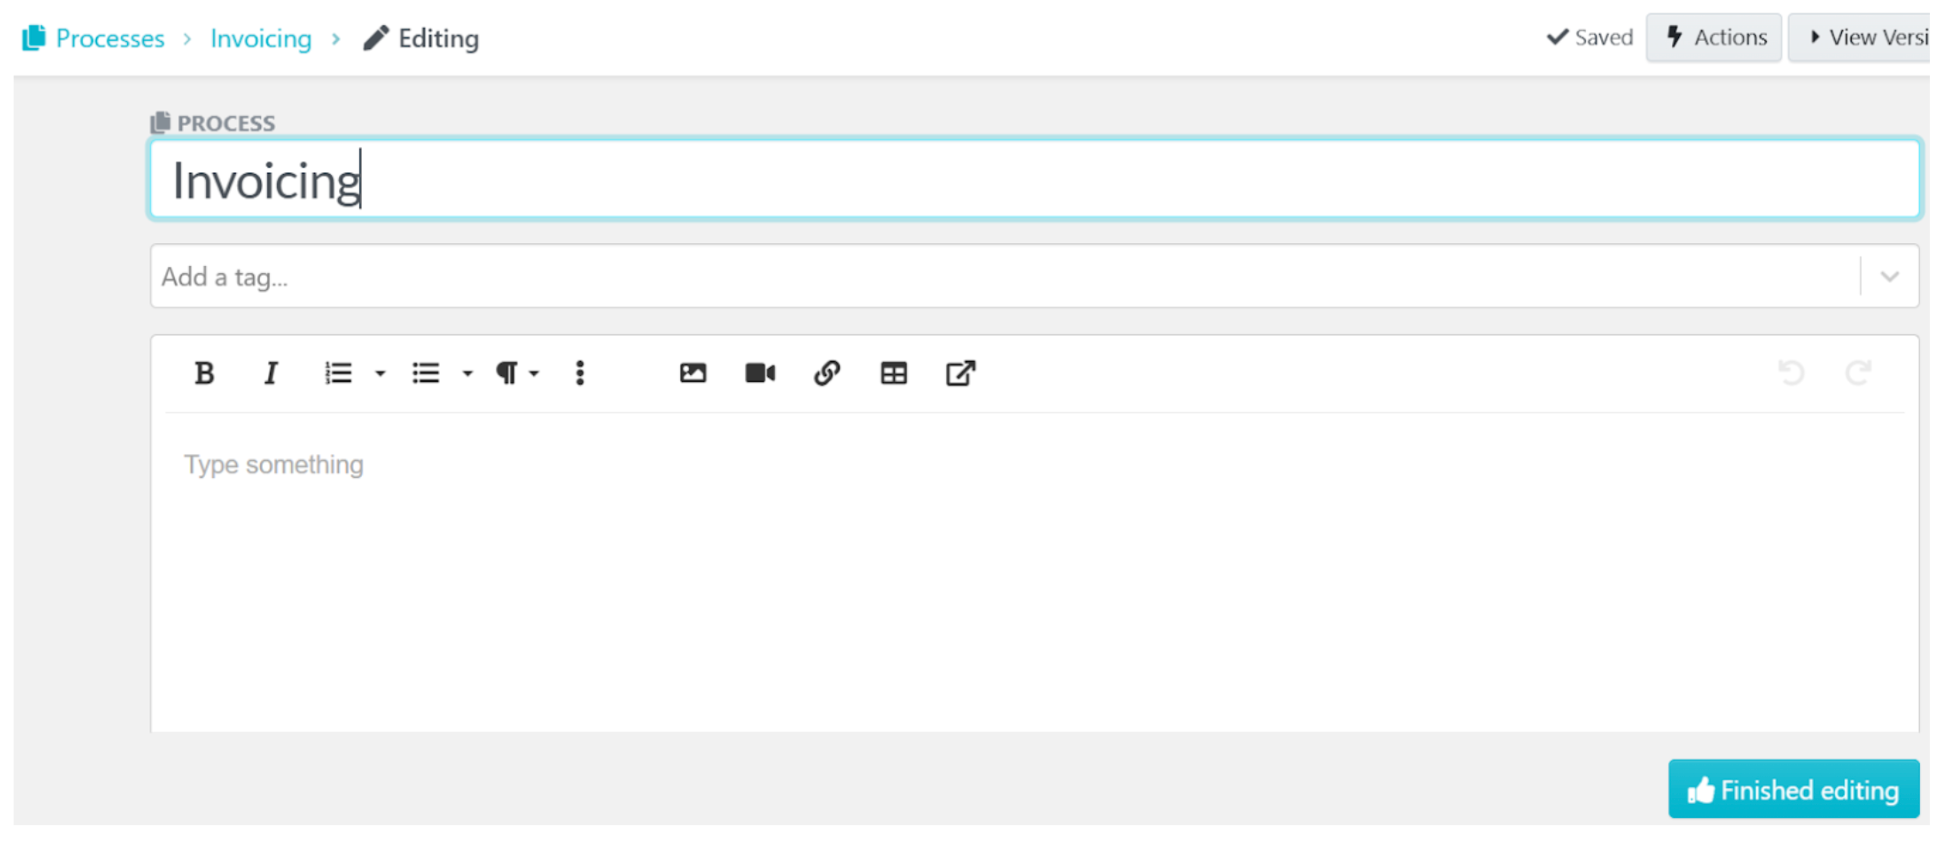
2. Next, enter the title of the process in the “Process Title” bar.
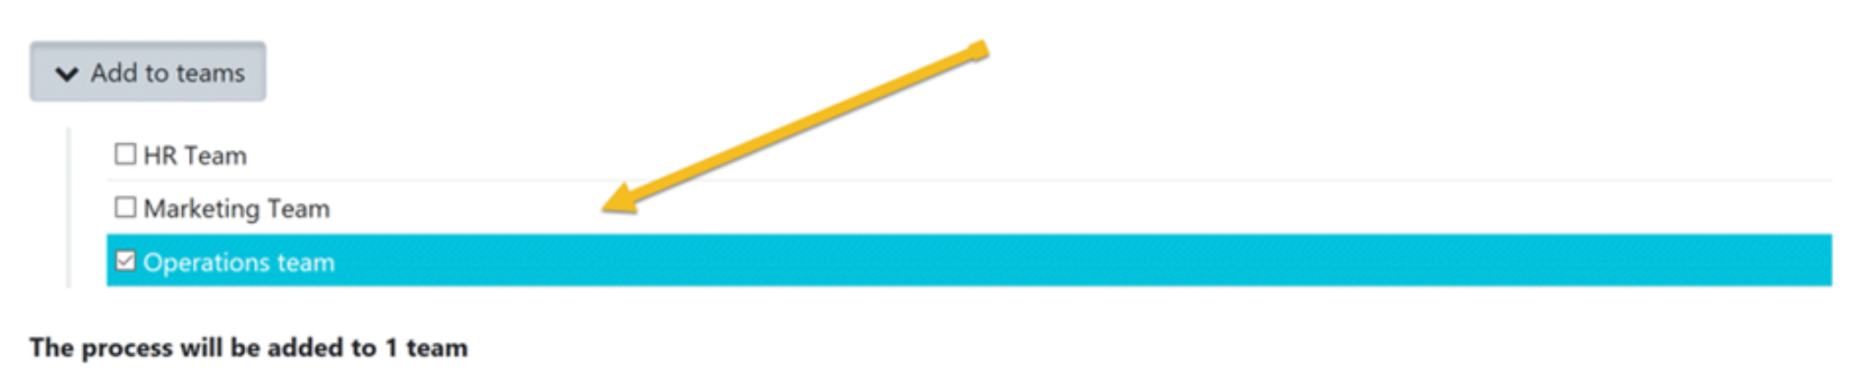
3. You can add a team or multiple teams by ticking the box under the “Add to teams” drop-down menu.
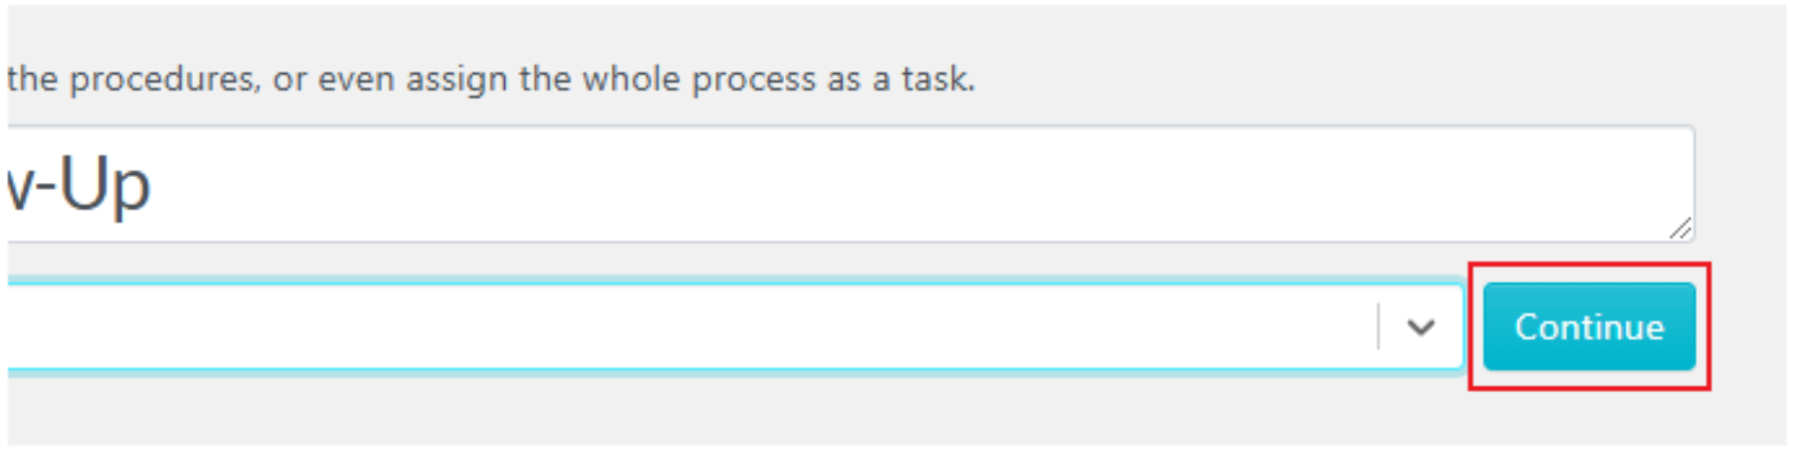
4. Click on “Continue” to be directed to the editing page.
5. On the next page, you can click on the process title to edit it and format the description to your preference. You can add pictures, videos, tables, or links. When you’re done, click on “Finished Editing” to save changes.
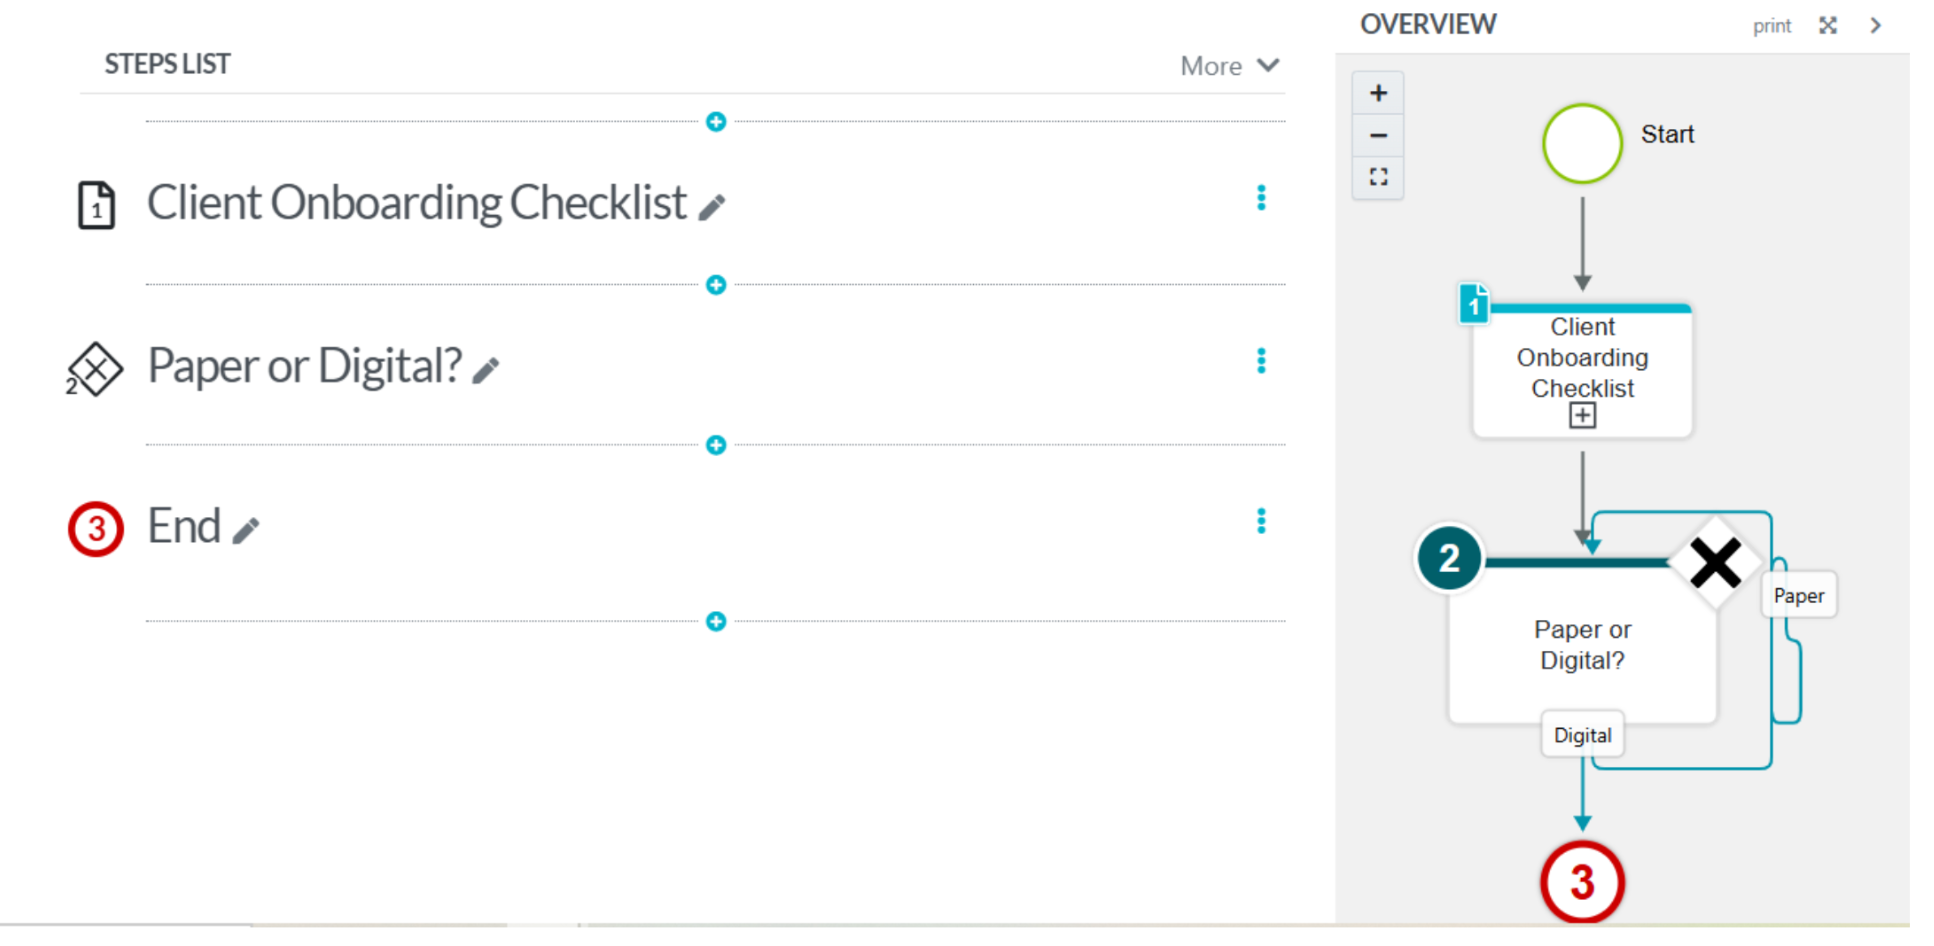
6. Next, start creating your process by clicking on “Add Step.”
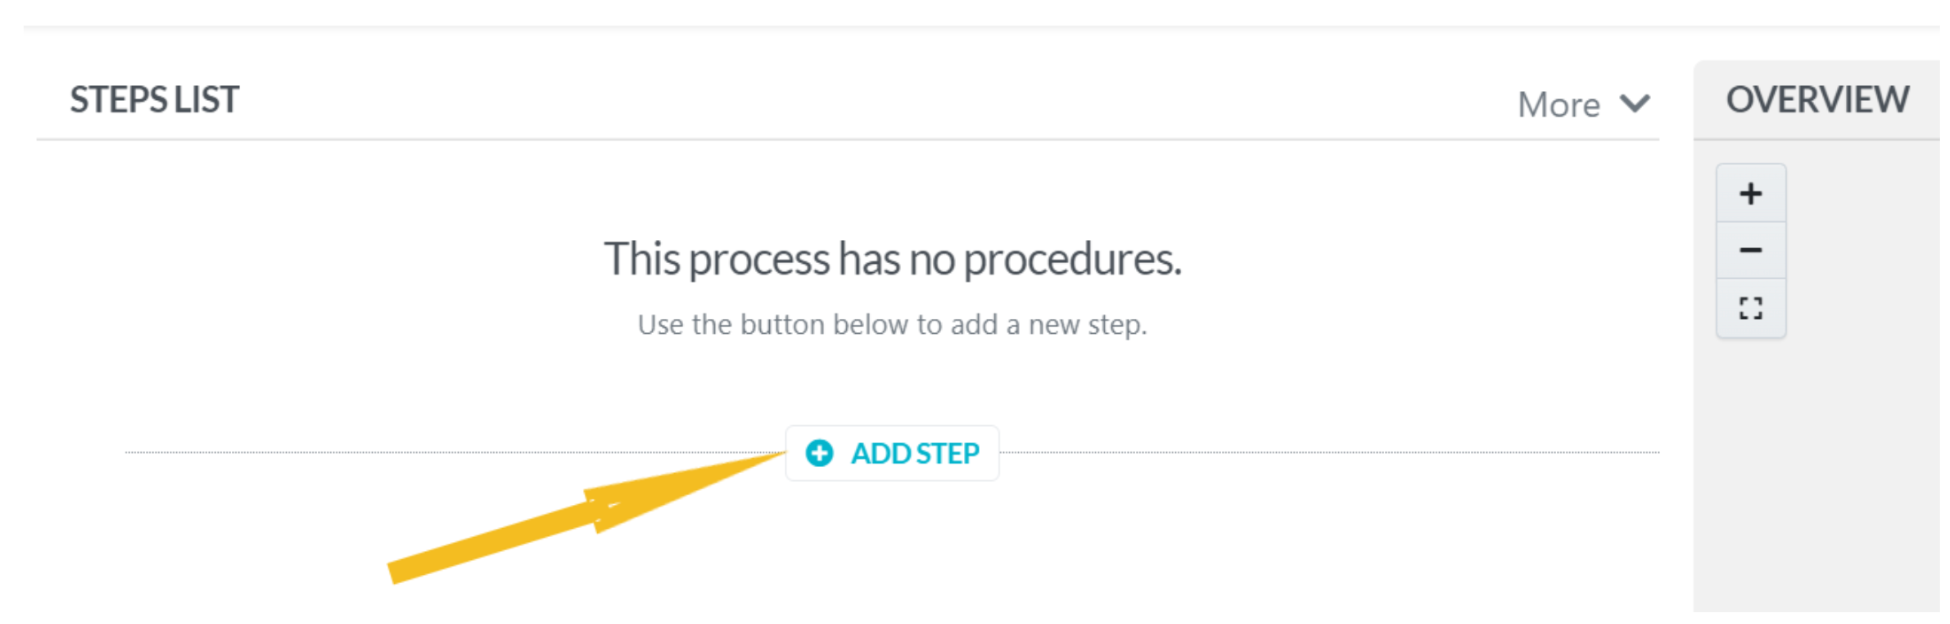
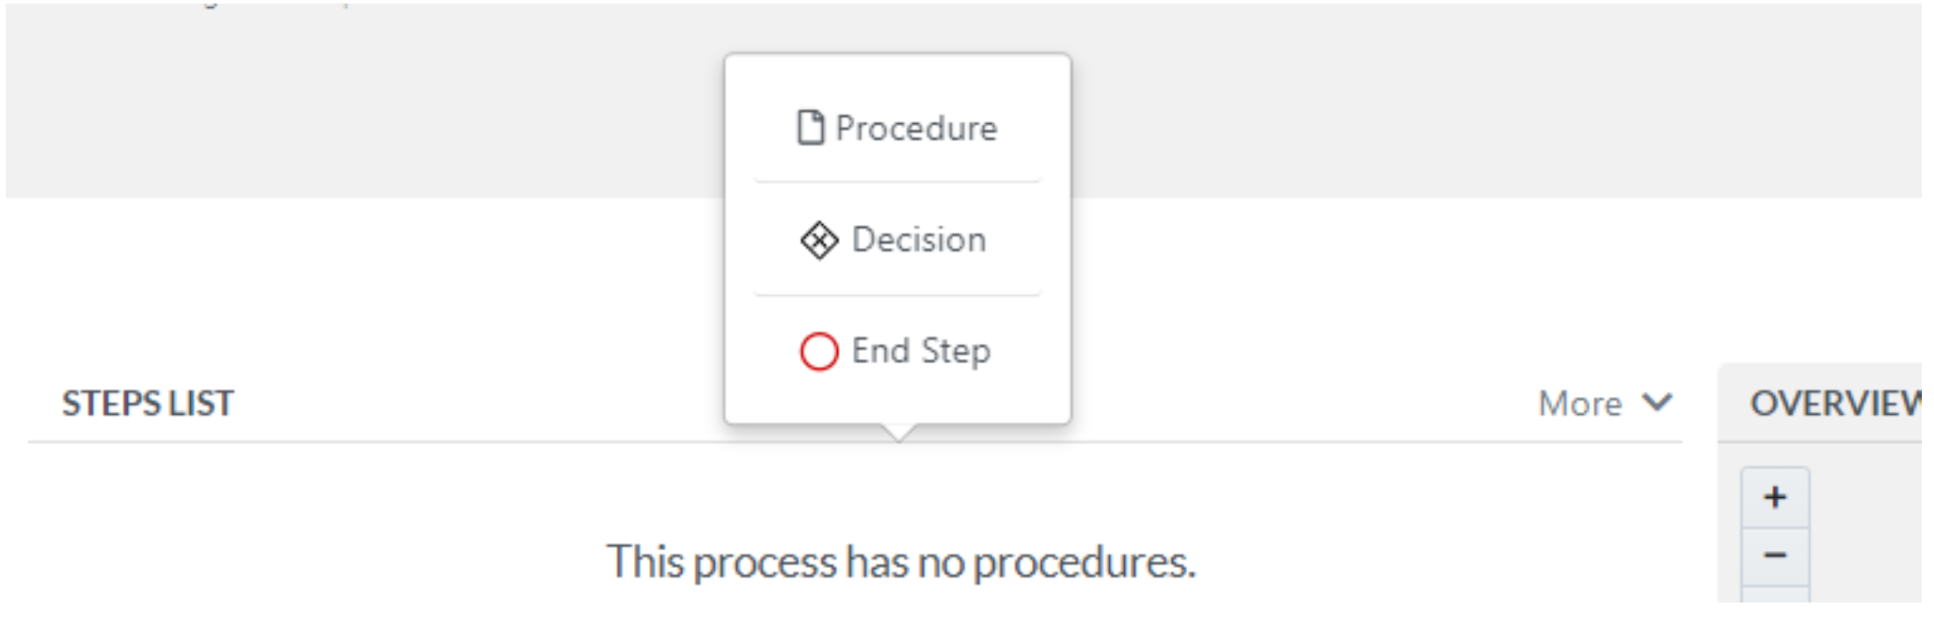
7. Choose your preference from the pop-up options based on the process you want to create. Your process steps can either be a procedure or a decision. Click on “Procedure” to add a procedure or click on “Decision” to add a decision to the steps.
8. If you choose “Procedure,” a box opens up where you can search for and select an existing procedure or create a new one if you don’t have a procedure.

9. If you choose “Decision,” an editor box will open where you can enter details of your decision.
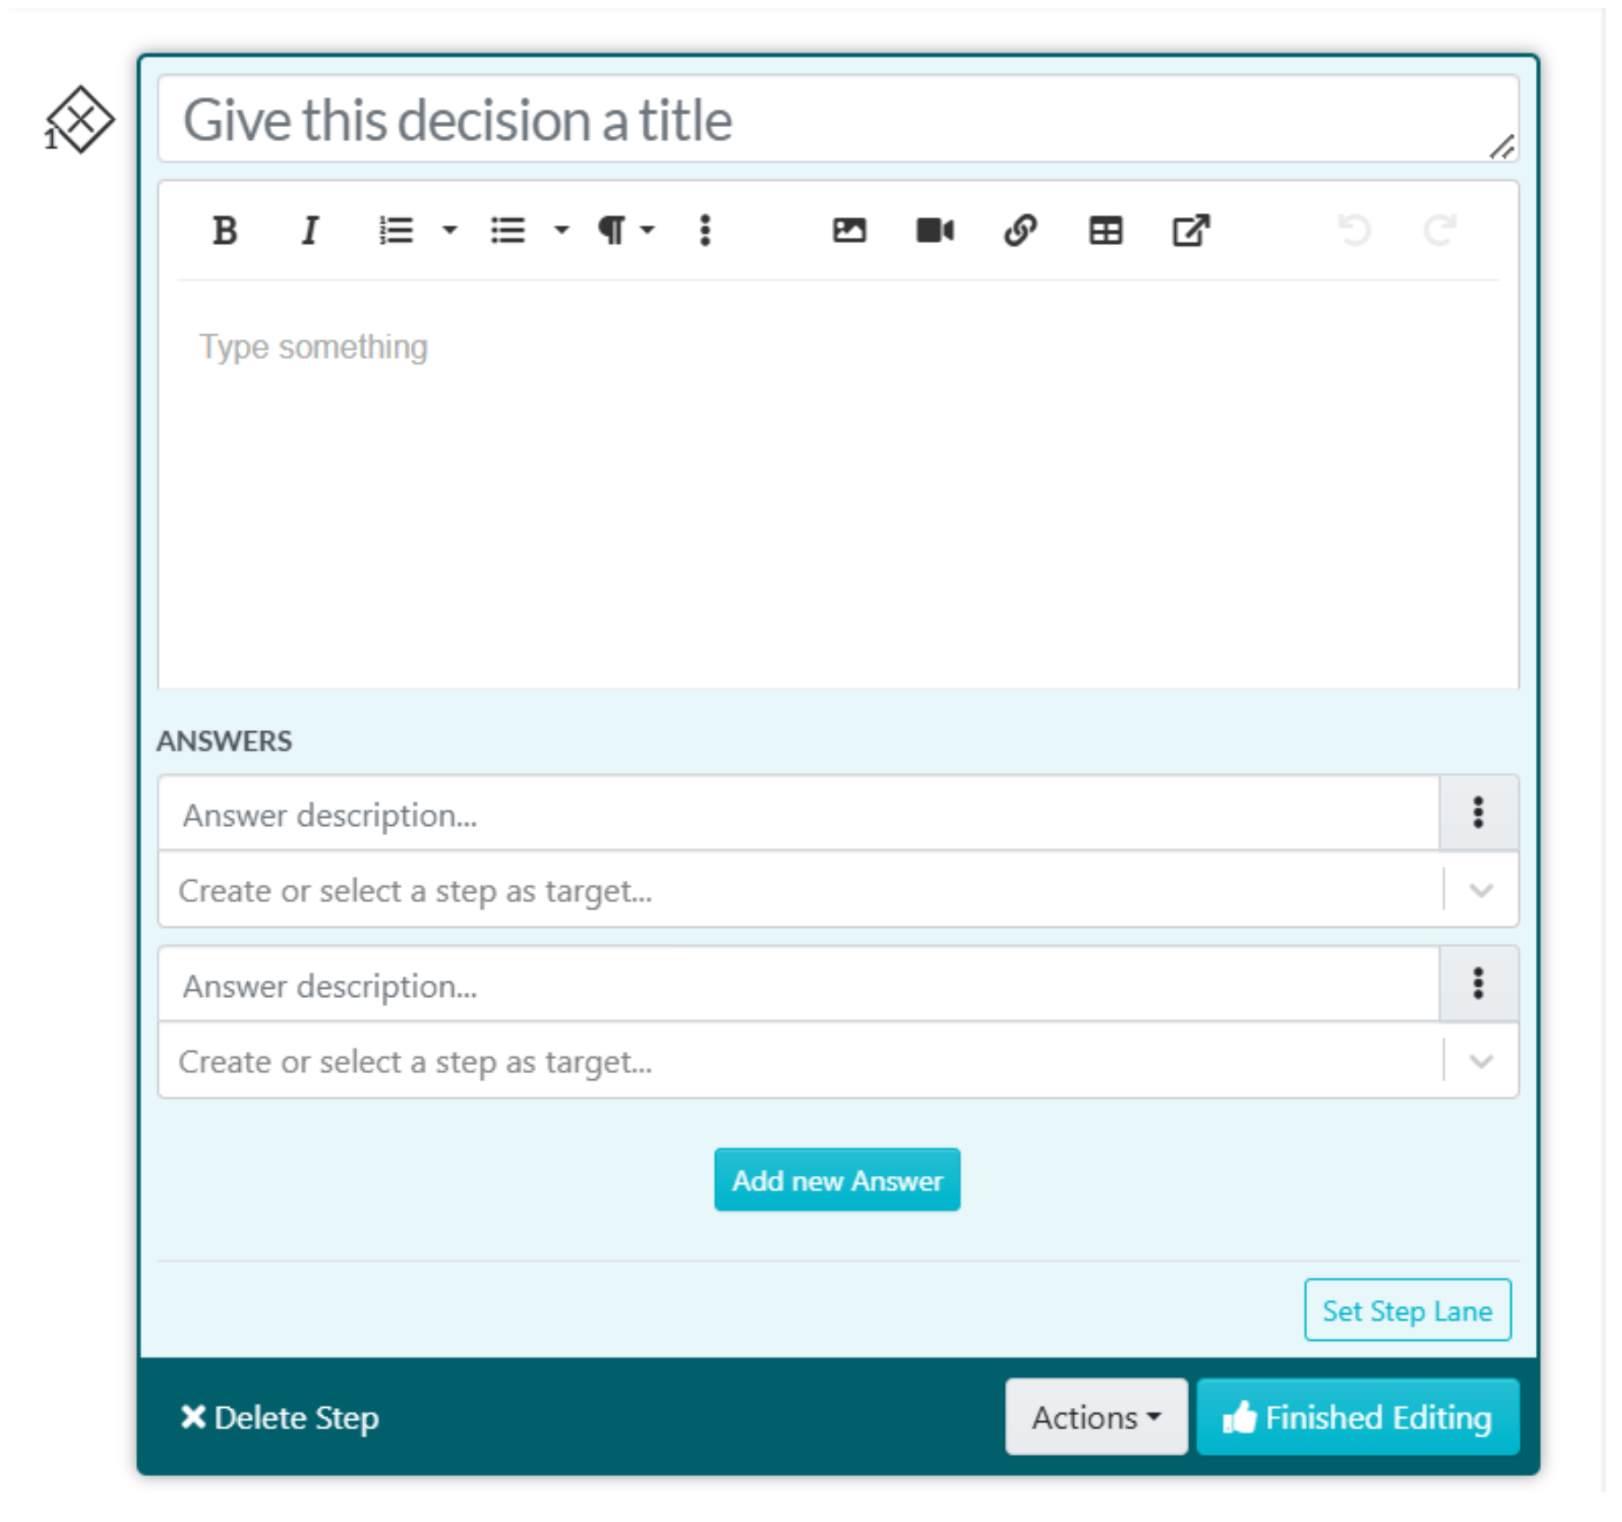
The “Decision” option is used to add conditional logic to a procedure. This is also known as branching or yes/no. When someone reaches the decision point of the procedure, they get to choose from the options you created, and based on the option they choose, they will go down a specific path/branch.
Enter the options in the “Answer description” field, and then select or create the step that the option leads to.
Click on “Finished Editing” when you’re done creating the decision.
10. You can add more steps to the process, be it a procedure or a decision. When you’re done, you’ll see your list of process steps.
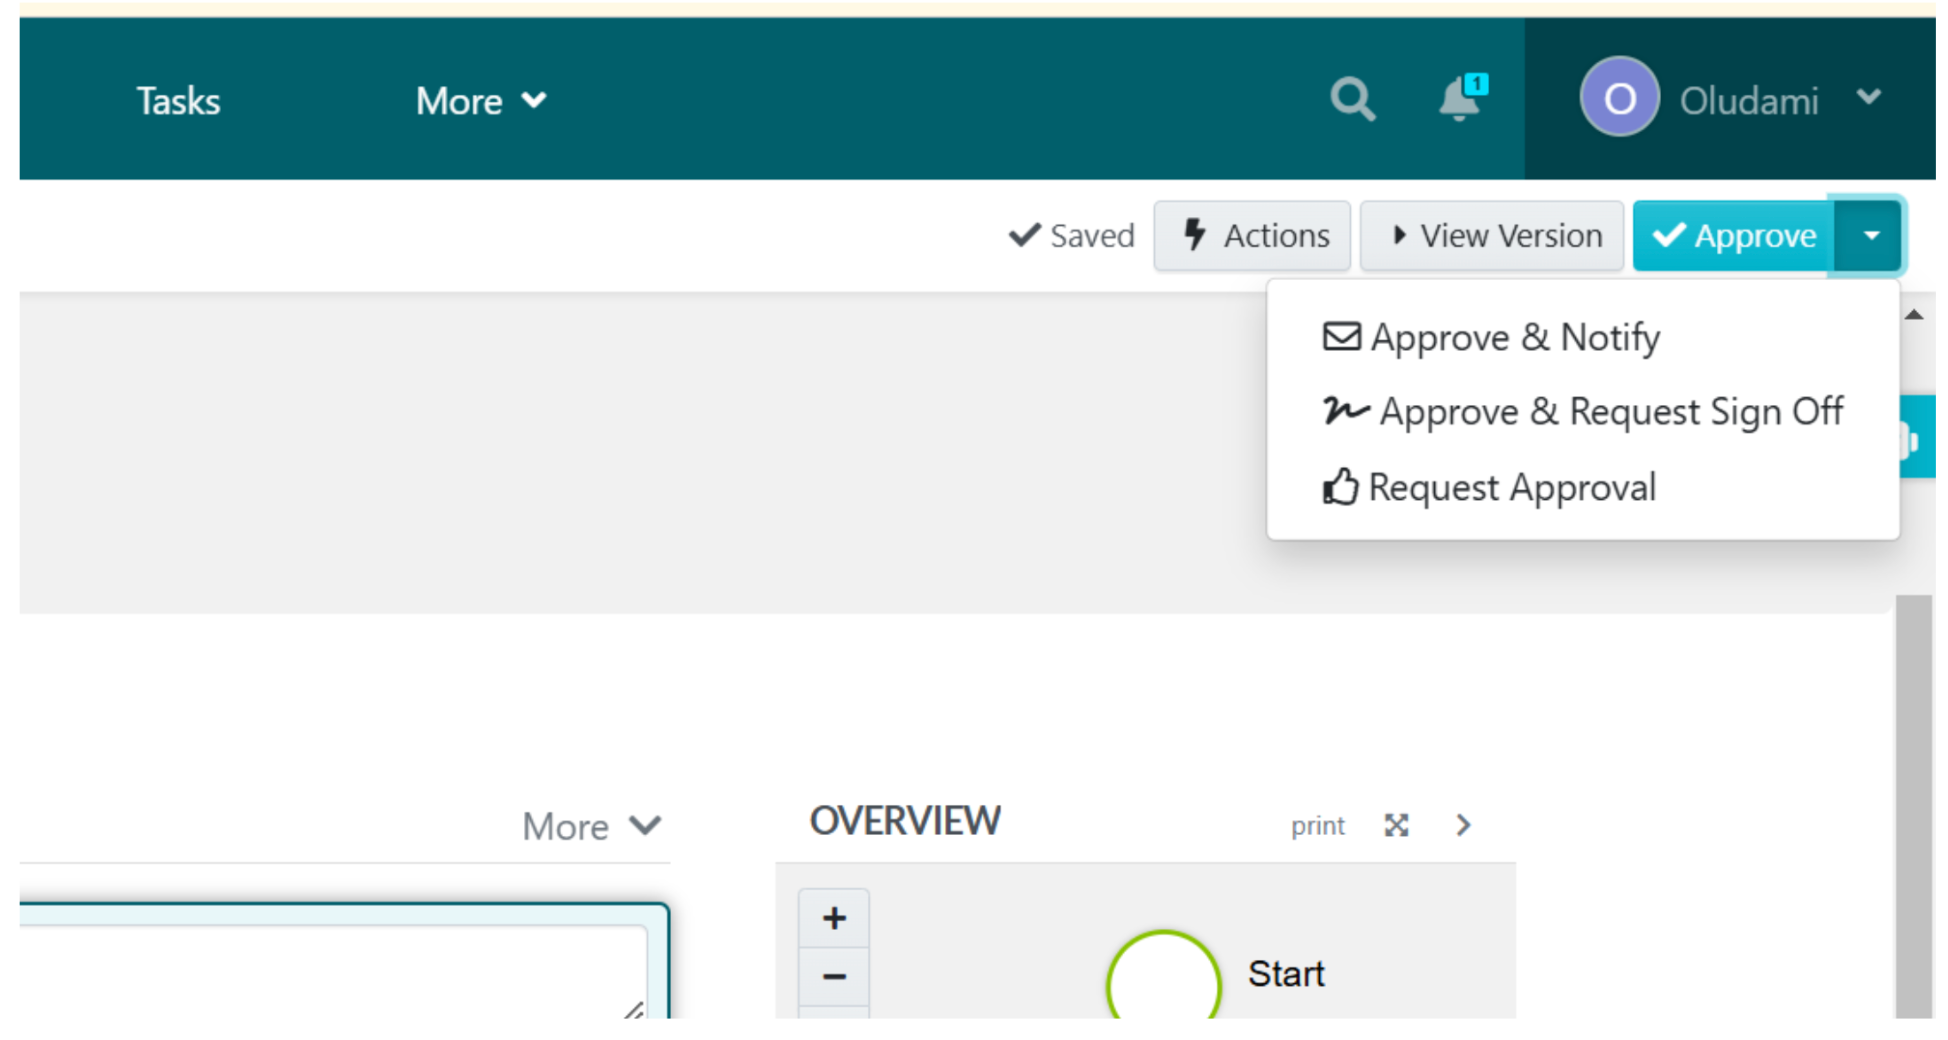
11. When you’re satisfied with the process you created, approve it or have someone with authority approve it.
How To Write Your Company’s Policies With SweetProcess (Manually and Automatically)

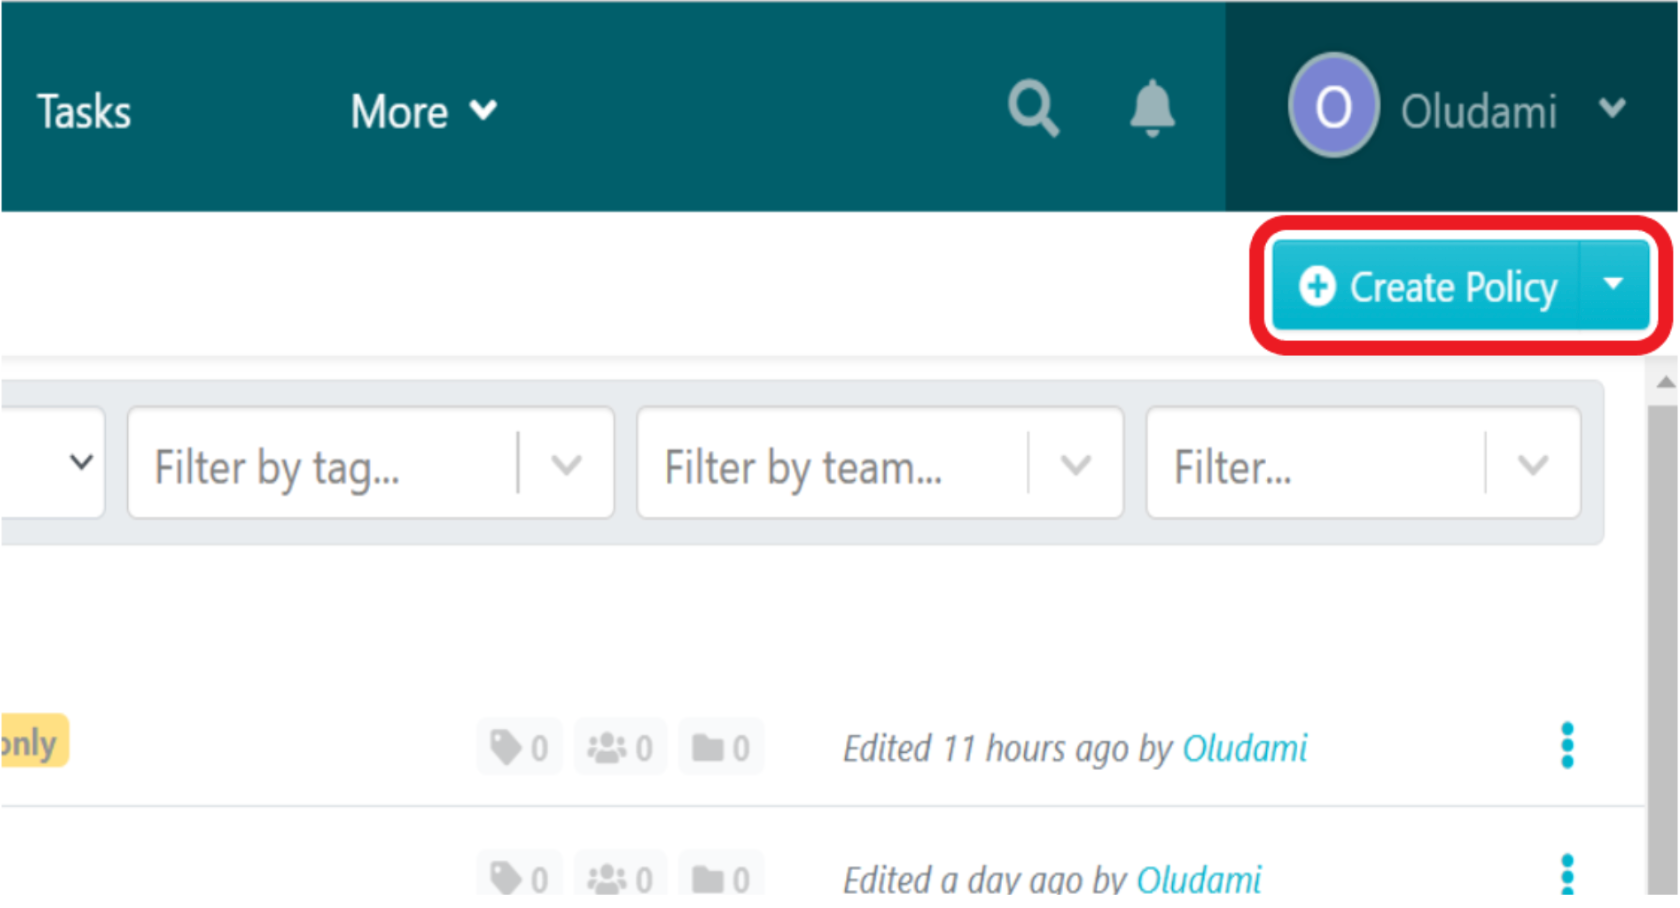
- From inside your SweetProcess account, head to the navigation menu (or “More” menu) and click “Policies.”

- Next, click “Create Policy” in the upper-right corner of the screen.
- On the next page, enter your policy title and then either click on “Continue” to create your policy manually or click on “Write with SweetAI” to automatically generate your policy.
- You can also add the policy to teams and folders on the same page.
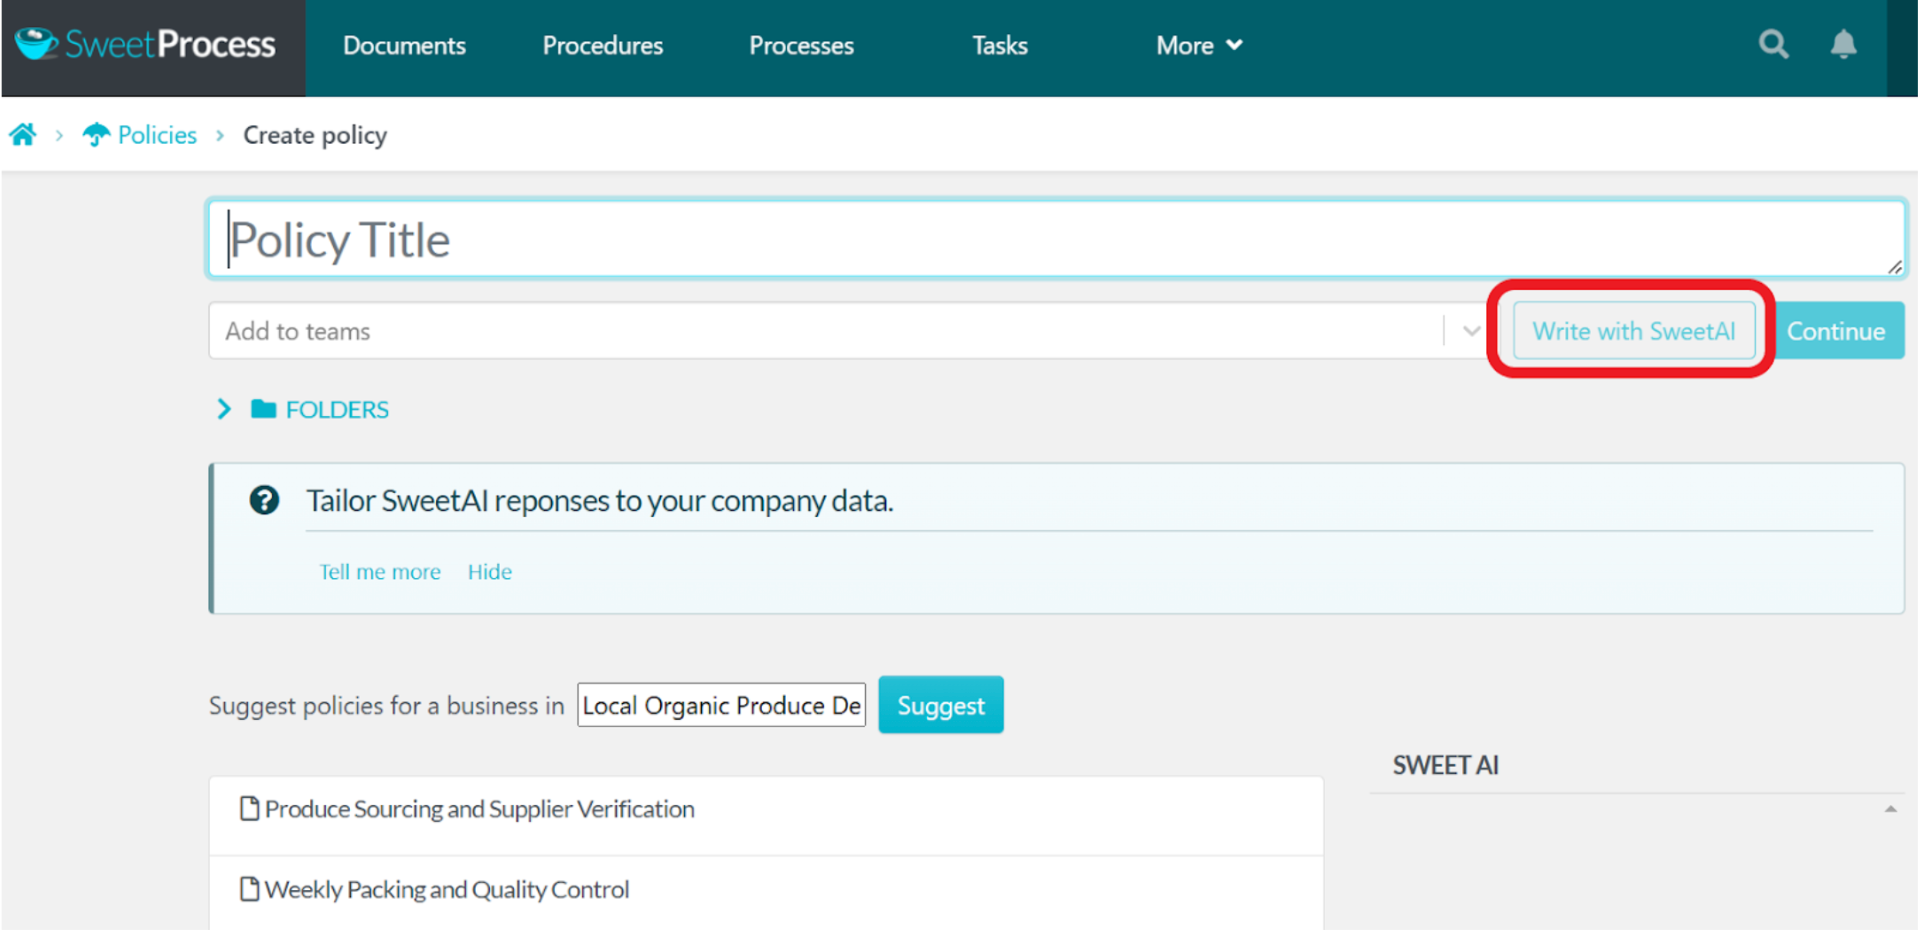
- To create your policy manually, click “Continue” instead of “Write with SweetAI.” You’ll then be taken to the policy page where you can edit the policy to add content.
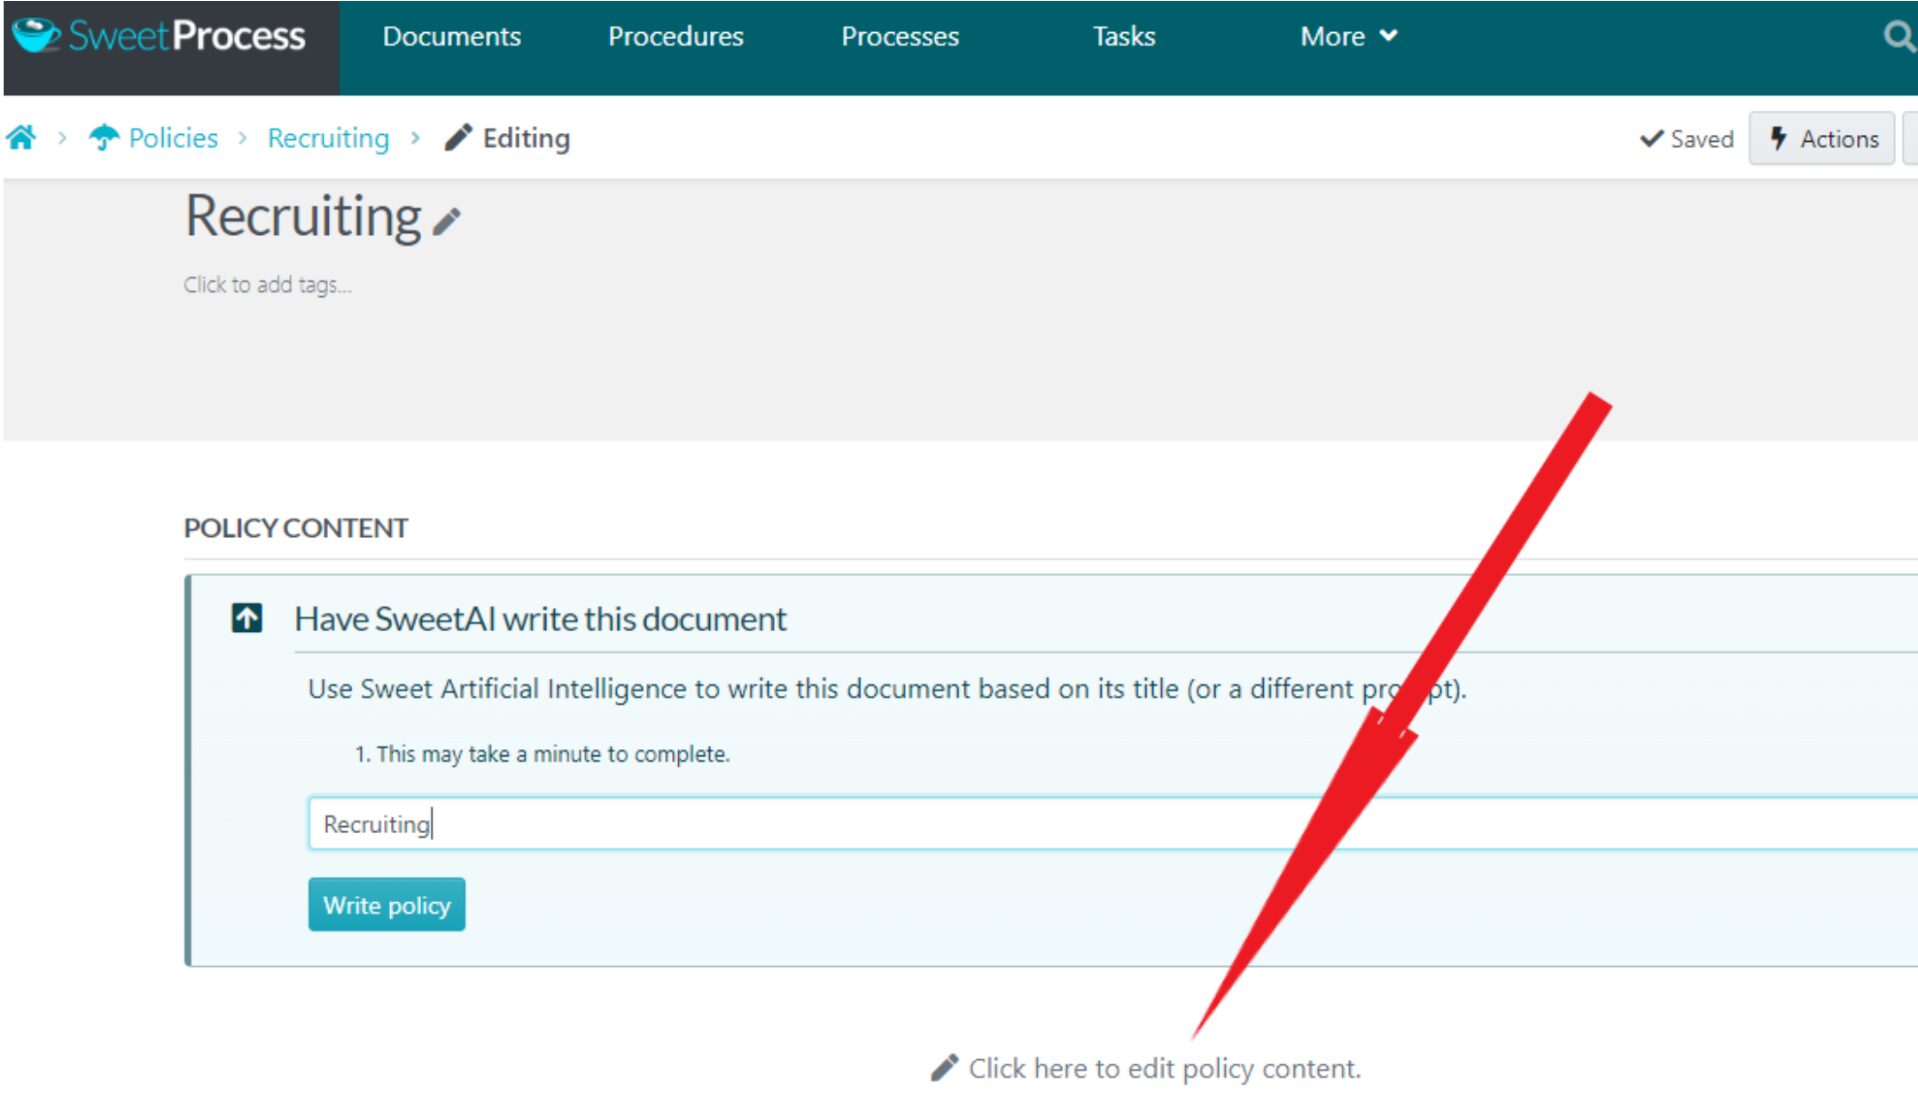
Note, however, that on the policy page, you’ll still get a prompt encouraging you to have SweetAI write your policy. You can ignore the prompt and click “Click here to edit policy content.”
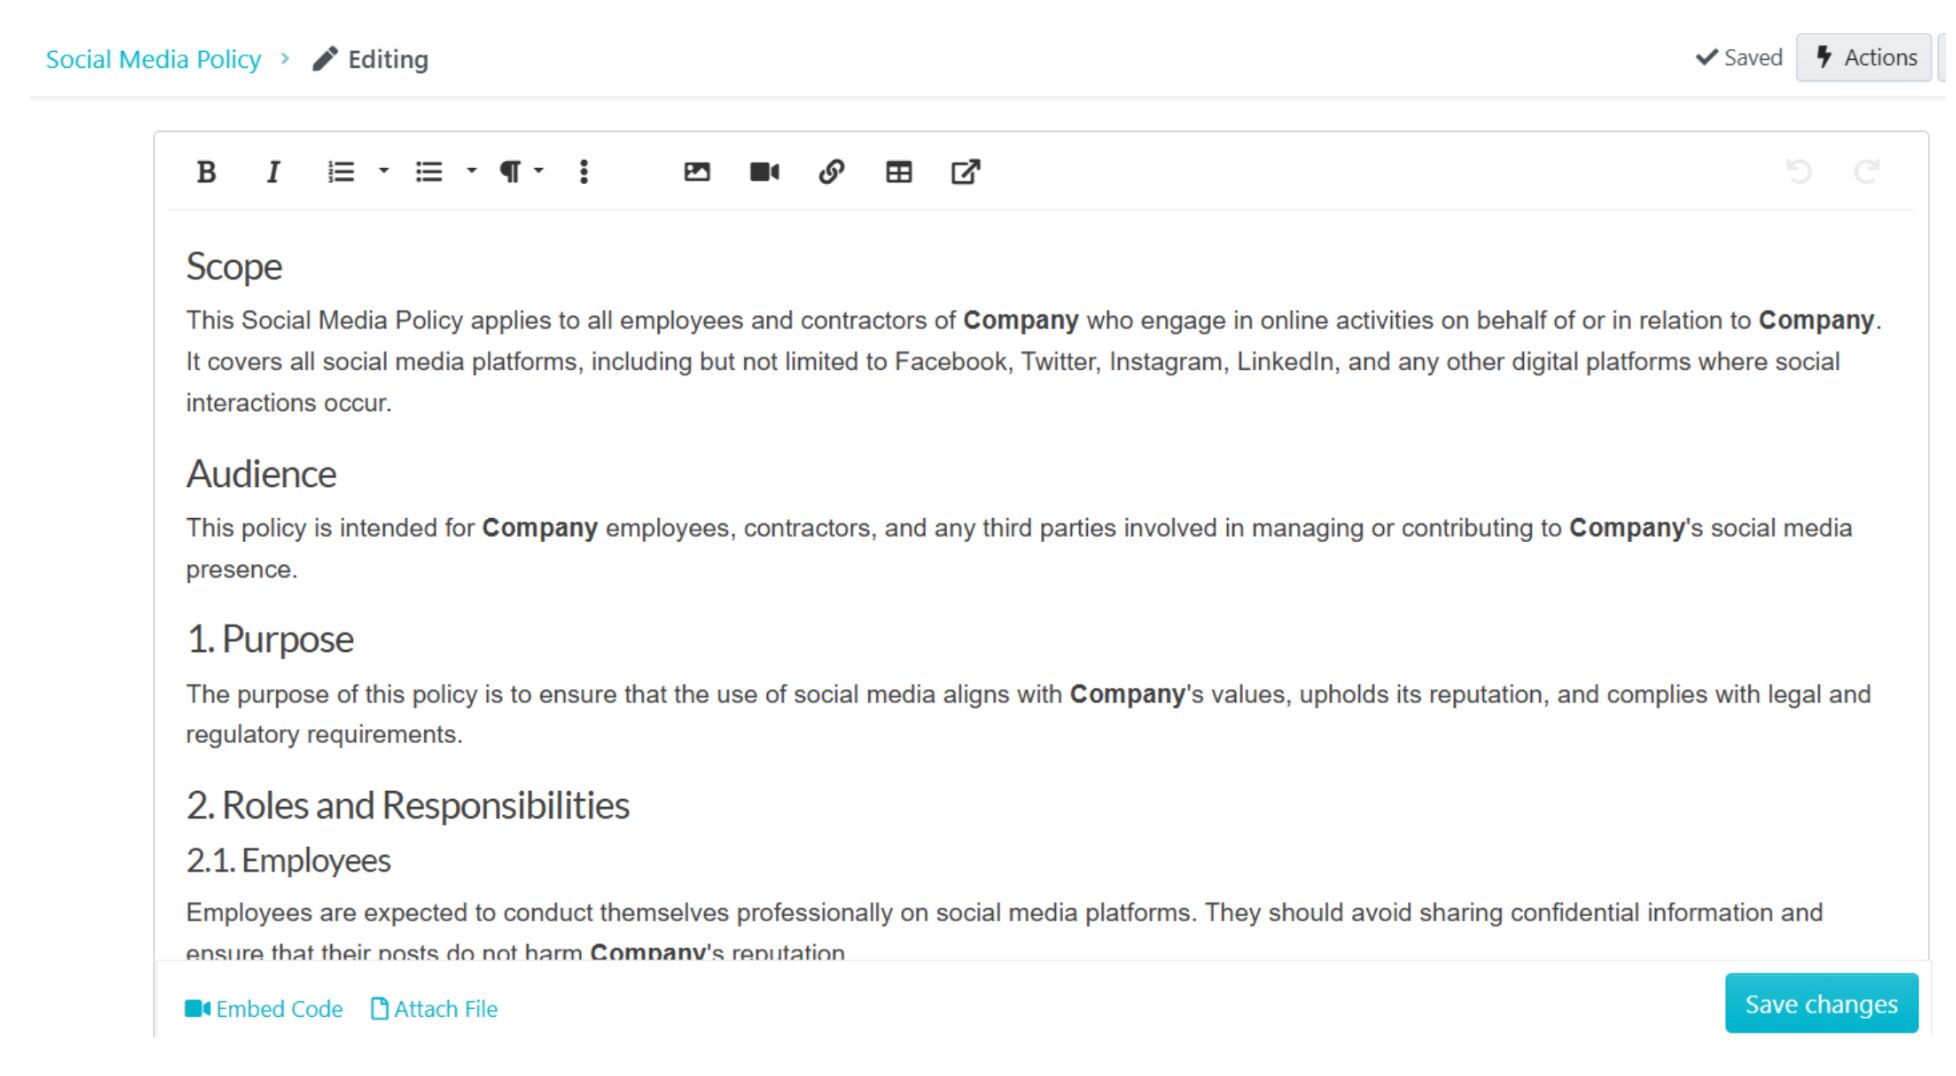
- This action immediately opens the content editor, where you can write or paste your policy content.
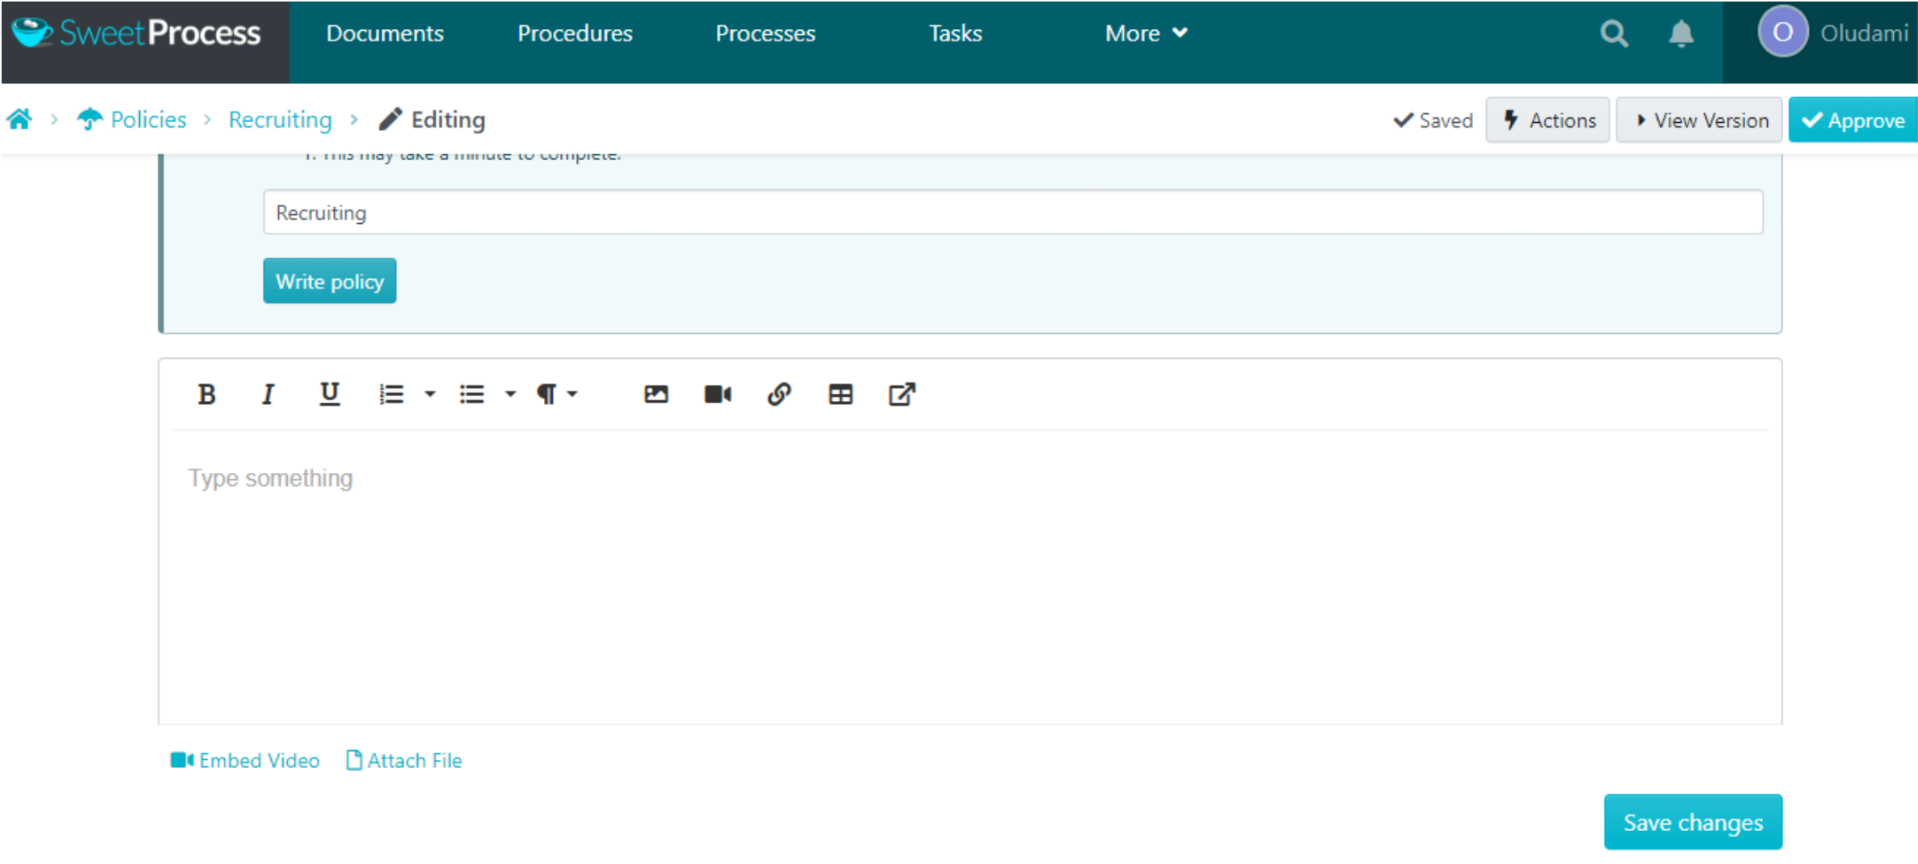
With this editor, you can include pictures, videos, links, and tables. You can embed videos or attach an external file to the policy.
7. When done, click the “Save changes” button to save your policy content.
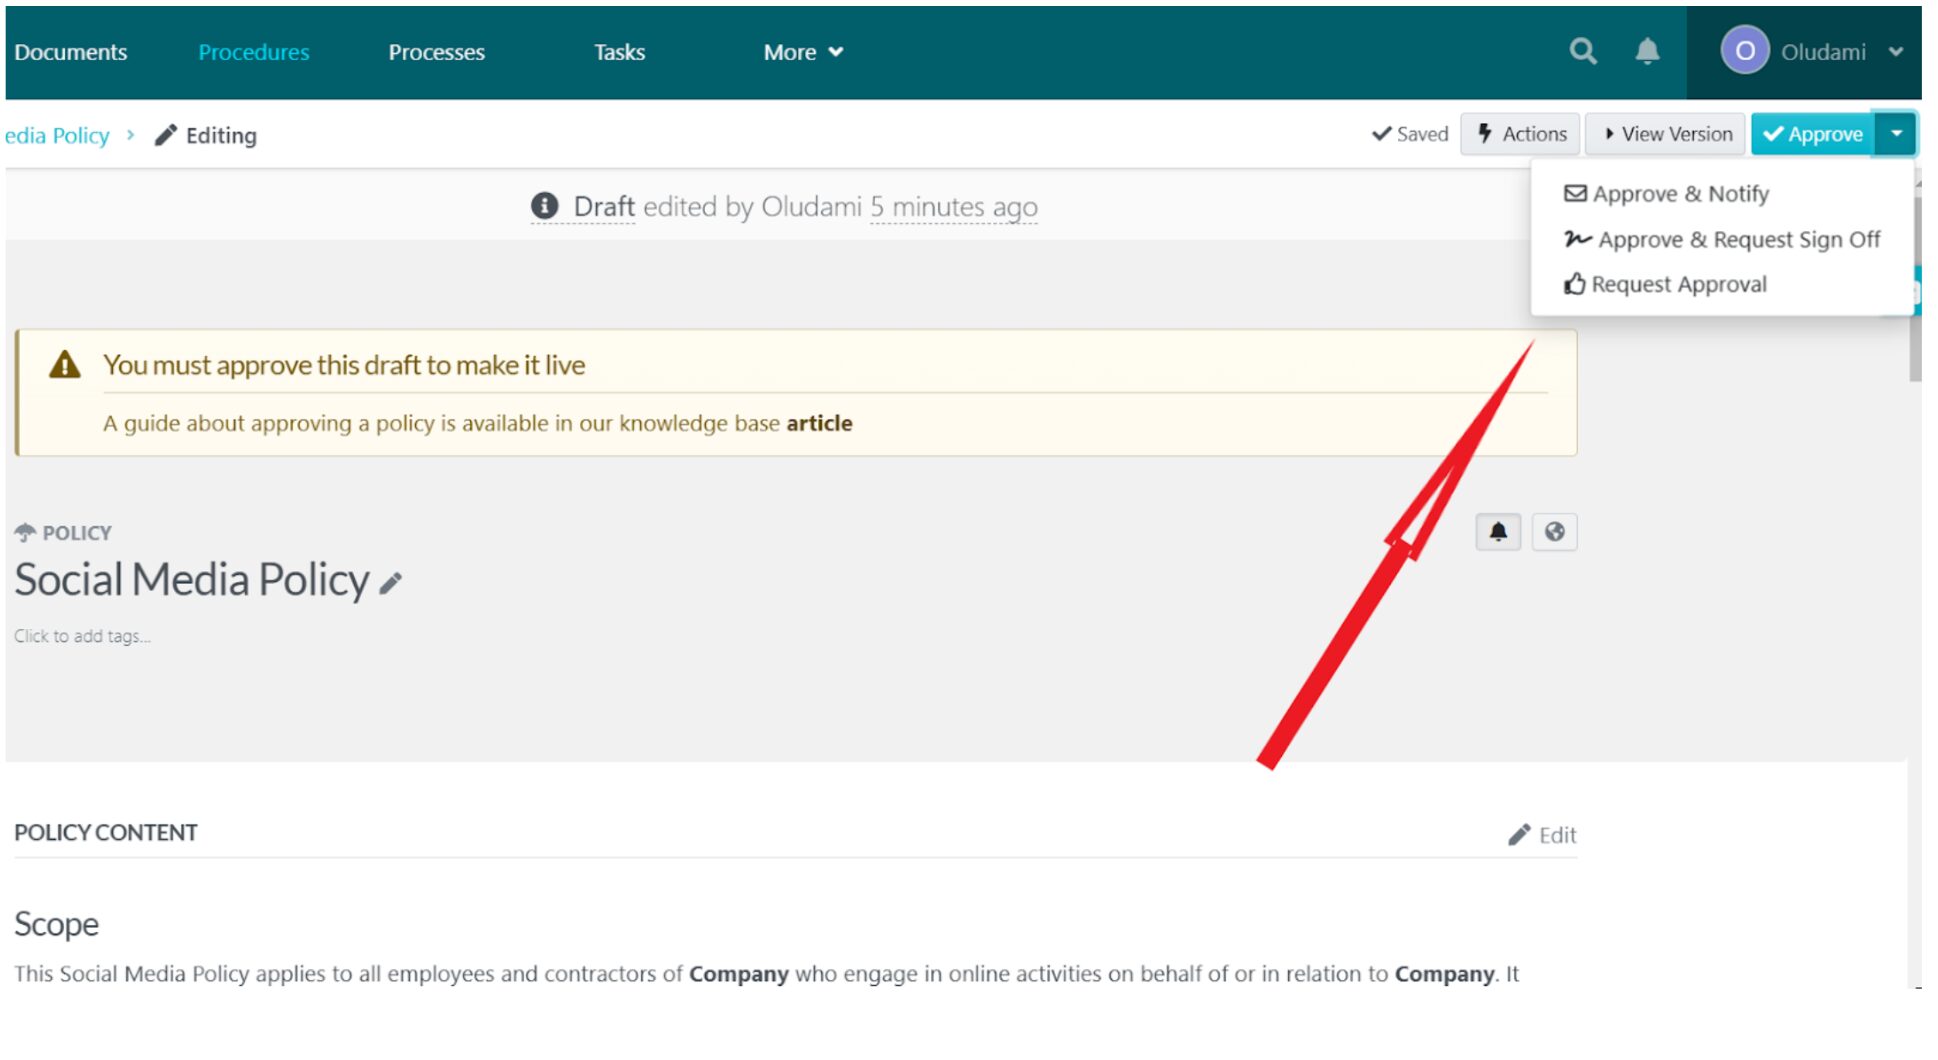
8. Next, click the “Approve” button at the top-right corner of the screen to approve your new policy and make it go live.
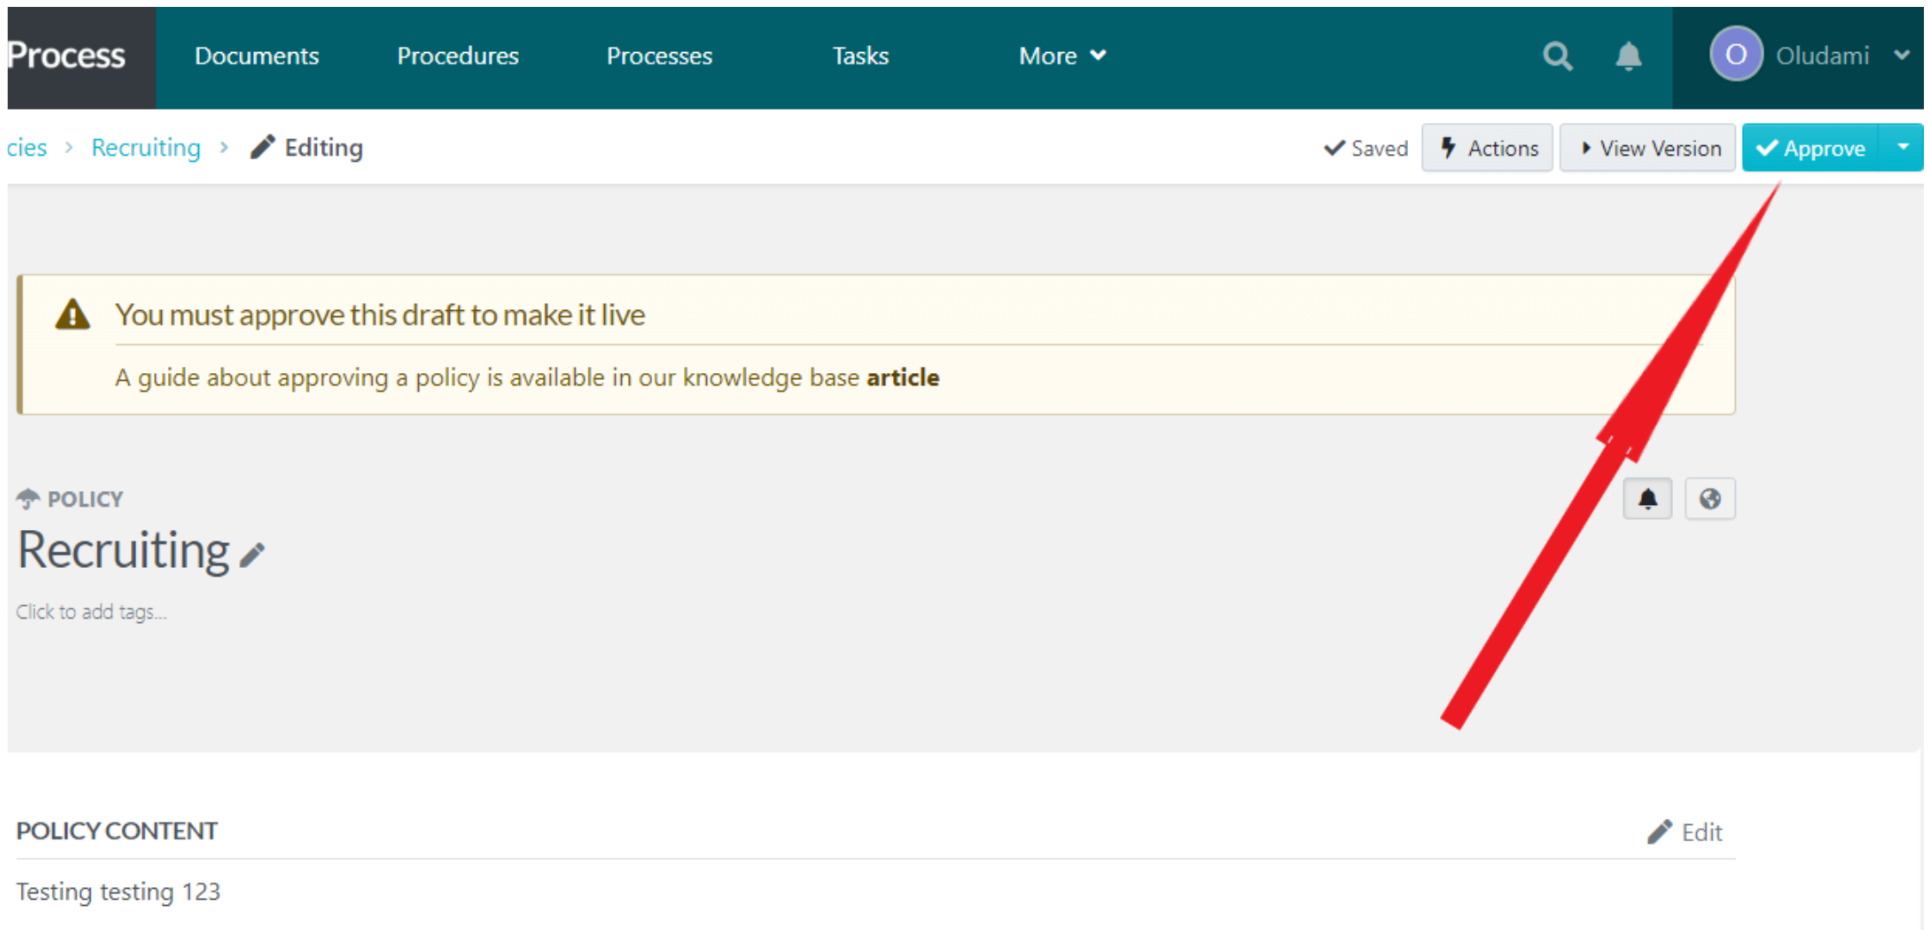
If you’re a manager, you’ll automatically be able to approve the draft. Otherwise, you must request approval so that whoever has the authority can go into the policy to approve it.

9. Once approved, your policy becomes live. Just as in procedures, you can find all your policies on the policies page where you can manage them however you deem fit.
To create your policy automatically, click the “Write with SweetAI” button instead of “Continue” after entering your title at the beginning. You’ll get a fully written policy instantly.
Next, you can click on the “Edit” link at the top-right corner of your new policy to adjust the content to perfectly suit your business. You can format the text however you like—font style, font color, background color, etc.—to keep it on brand. You can also add images, insert/embed videos, insert links, and even link to other policies and procedures of your company.
You can also attach files.
Once you’ve edited your policy to your satisfaction, click “Save changes” at the bottom right.
Next, follow the same approval process shared in the manual version above. You can also notify team members and request sign off.
Employees on the team you added will get notifications.
How To Create Quizzes to Test Your Team’s Understanding of Policies and Procedures

A quiz is a great way to gauge your team members’ understanding of your procedures and policies.
Here’s a step-by-step guide on building a quiz around your firm’s policies, processes, and procedures inside SweetProcess:
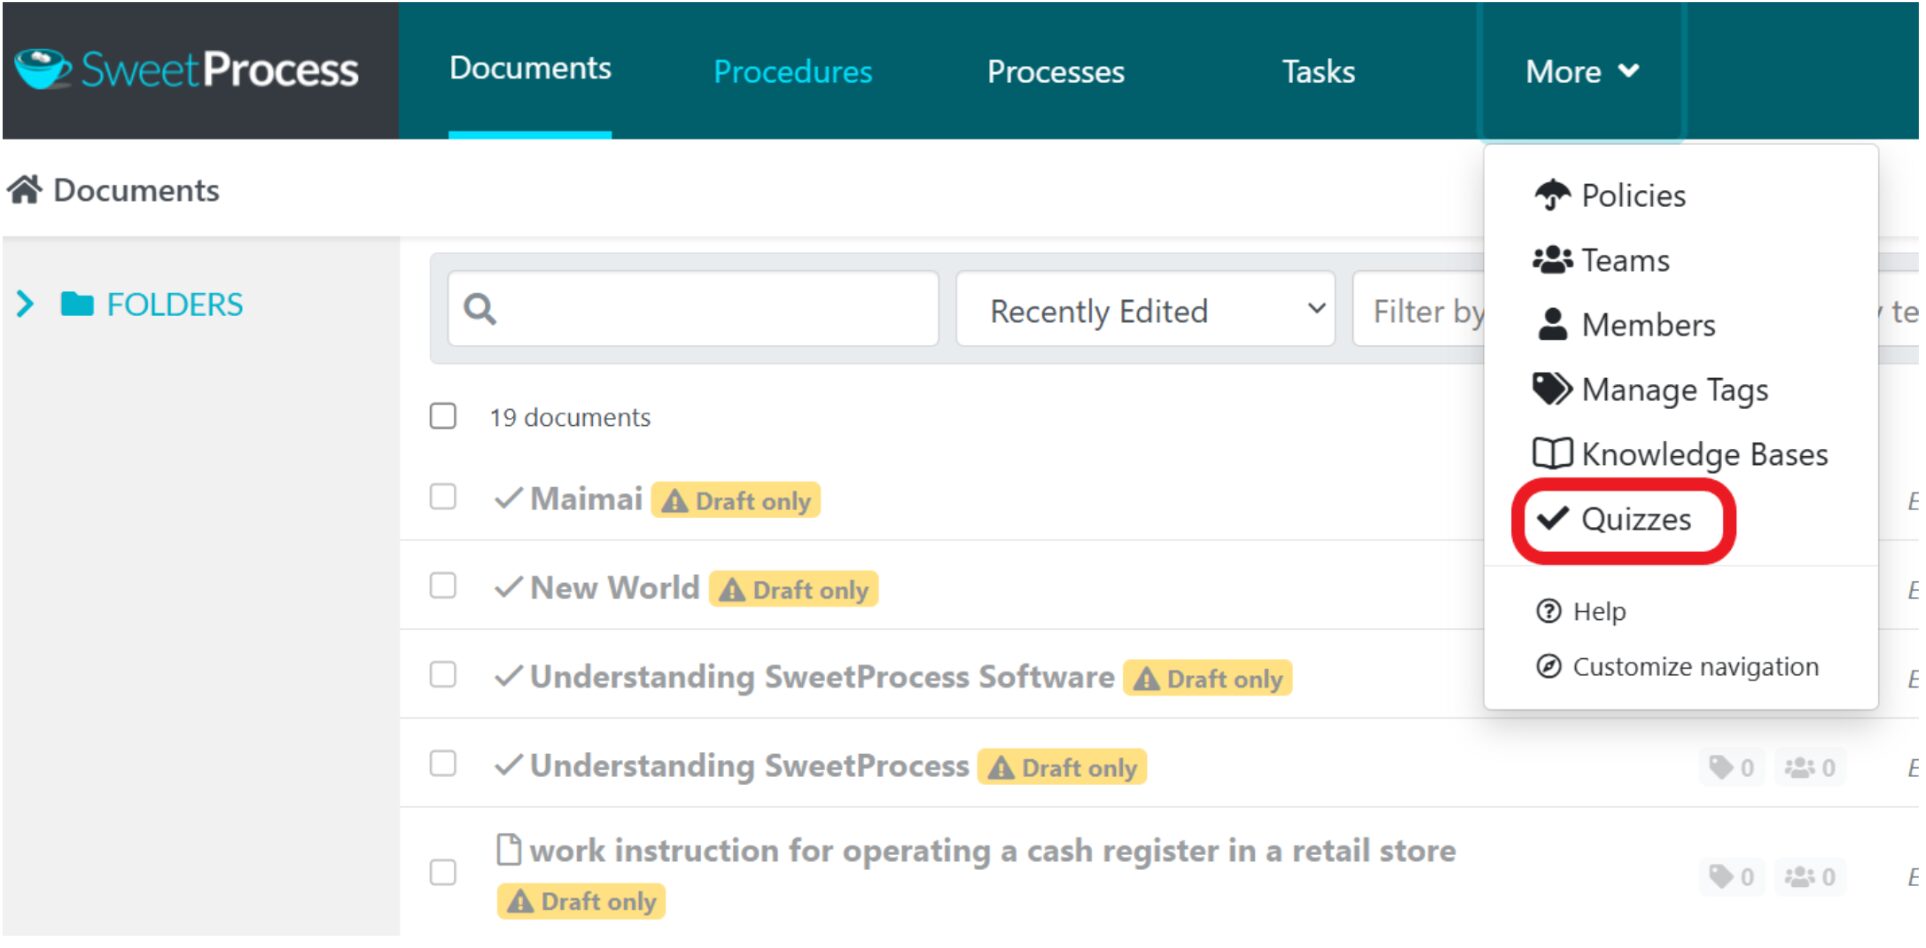
- From the menu at the top of your SweetProcess home page, click “More” in the drop-down menu and select “Quizzes.”
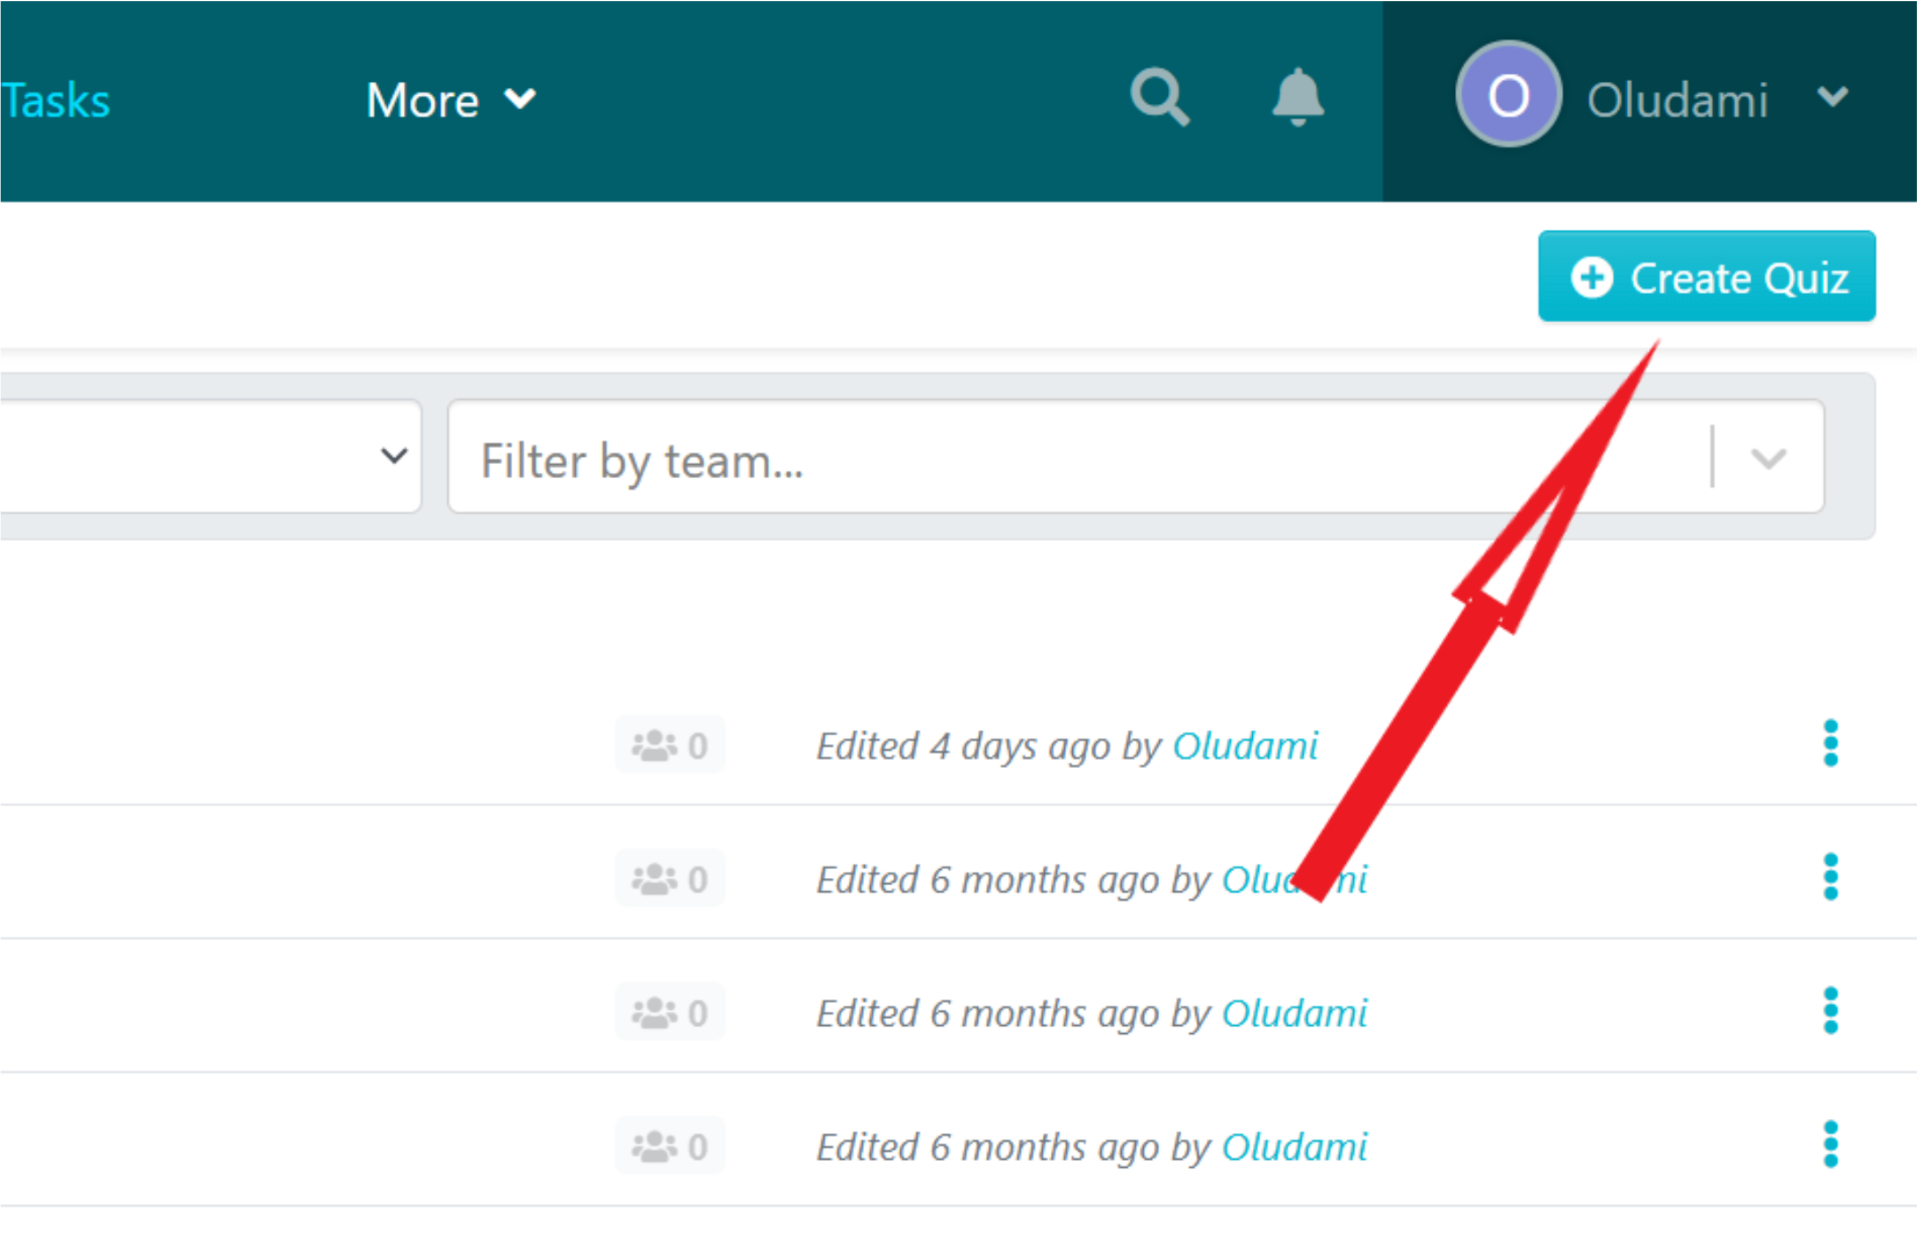
2. On the quizzes page, click “Create Quiz” at the top-right corner of the screen.
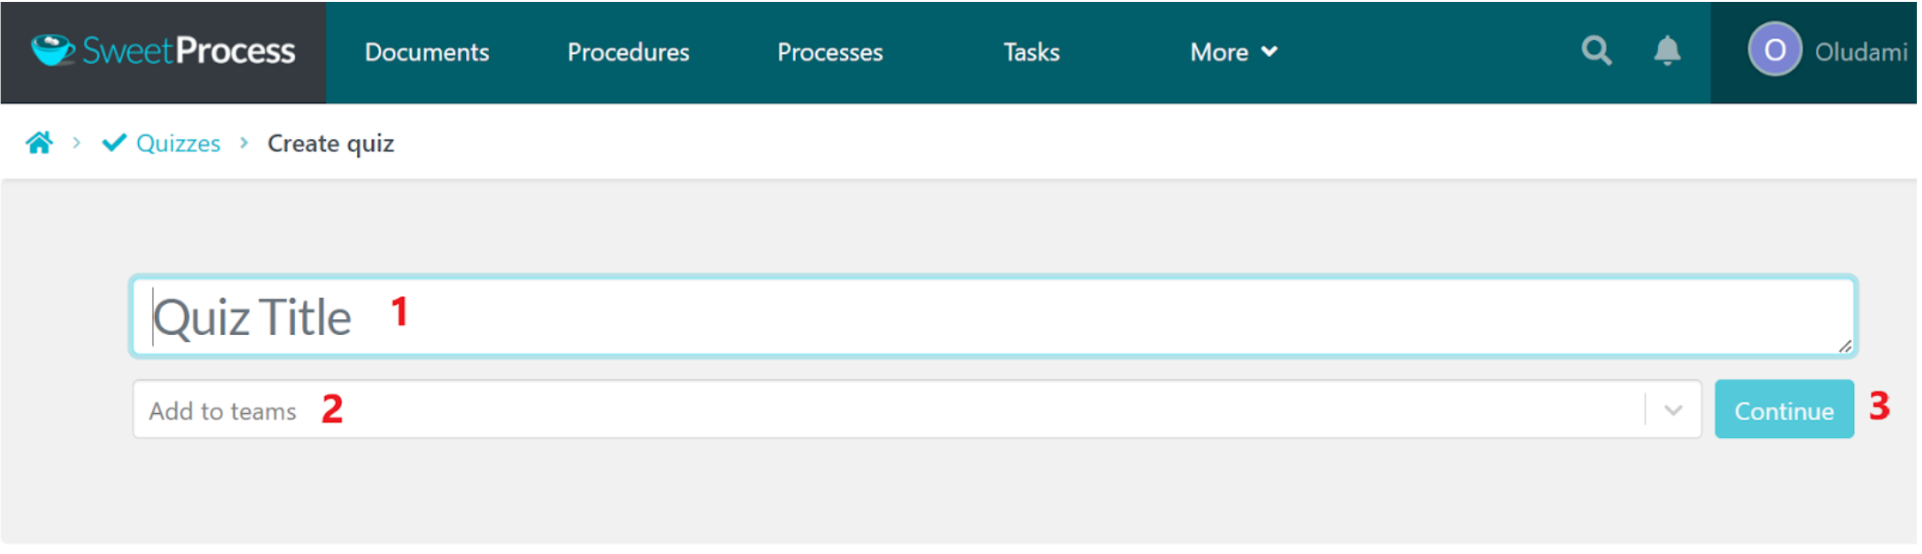
3. On the next page, enter your quiz title (1), select a team to assign it to (2), and click on “Continue” (3), as seen below.
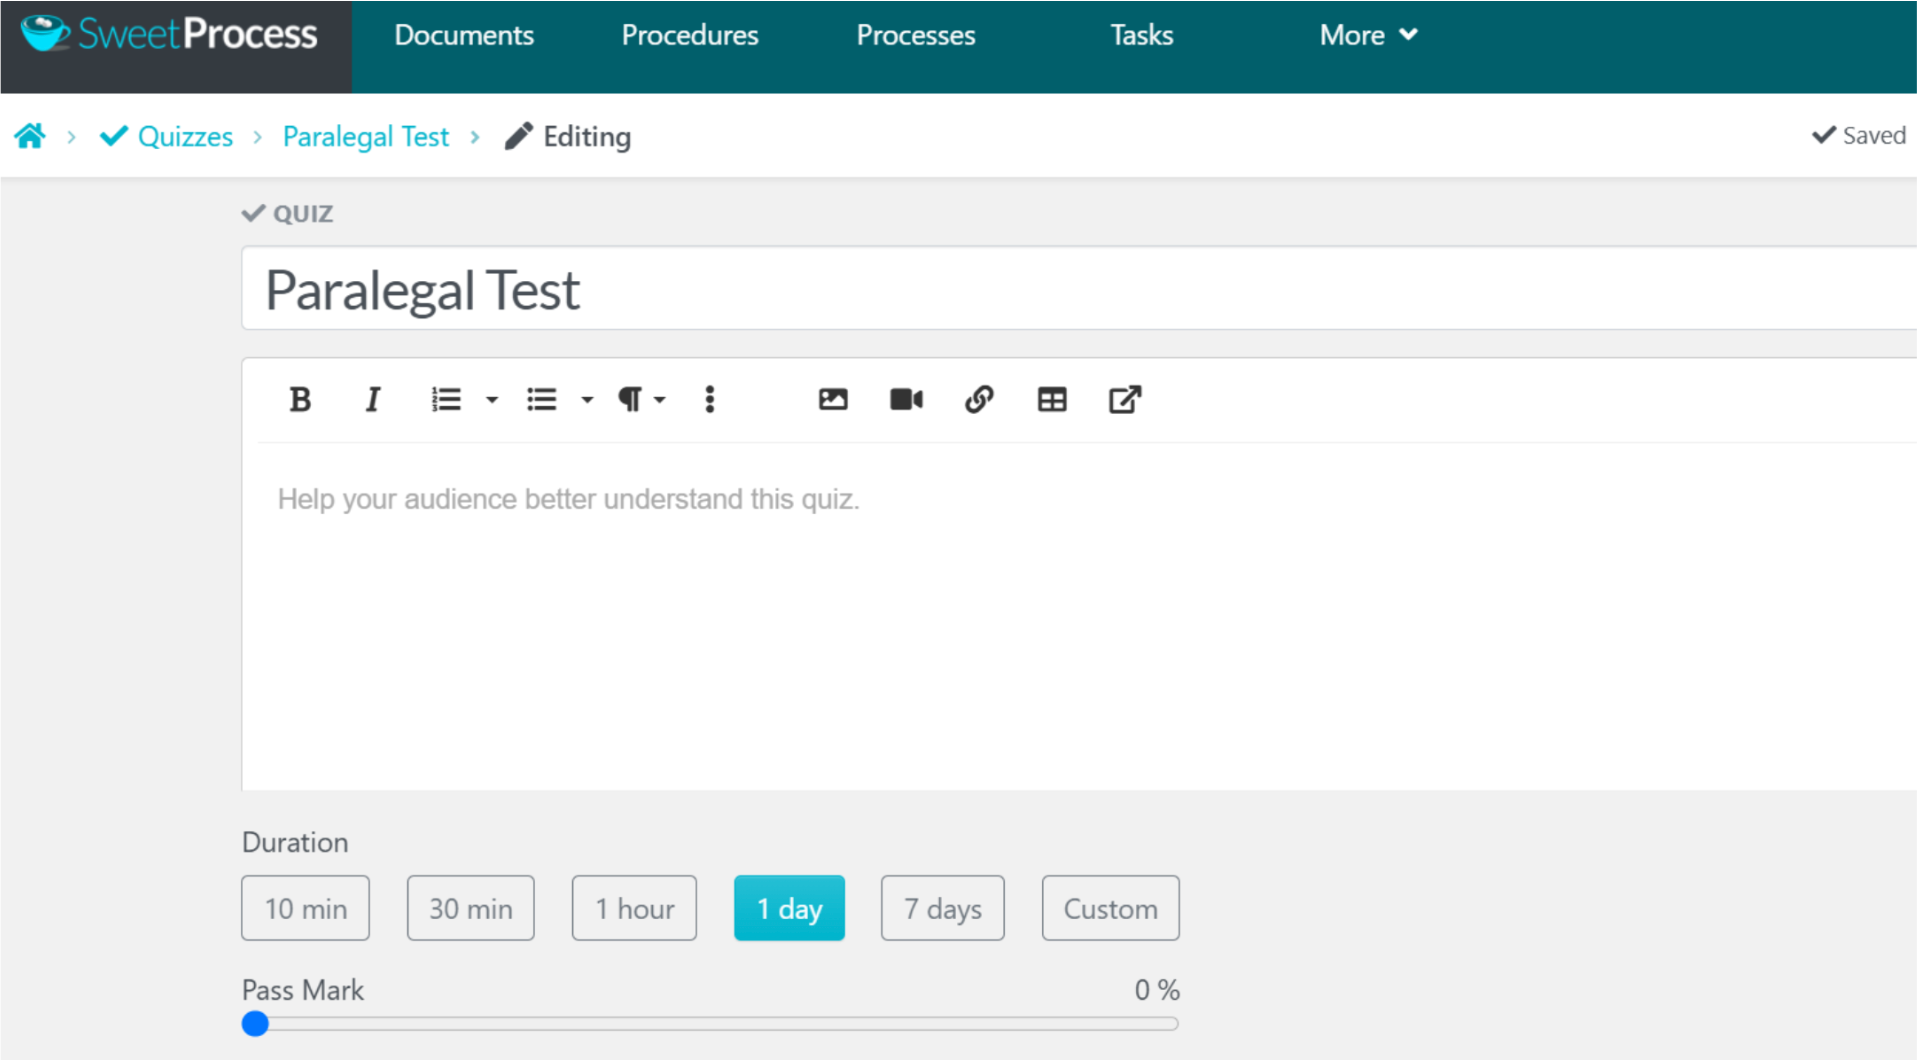
4. You’ll be taken to the quiz’s page. Click anywhere around the title to edit the quiz (setup). You can edit the title, add a quiz description, set the duration for the quiz, and set the pass mark.
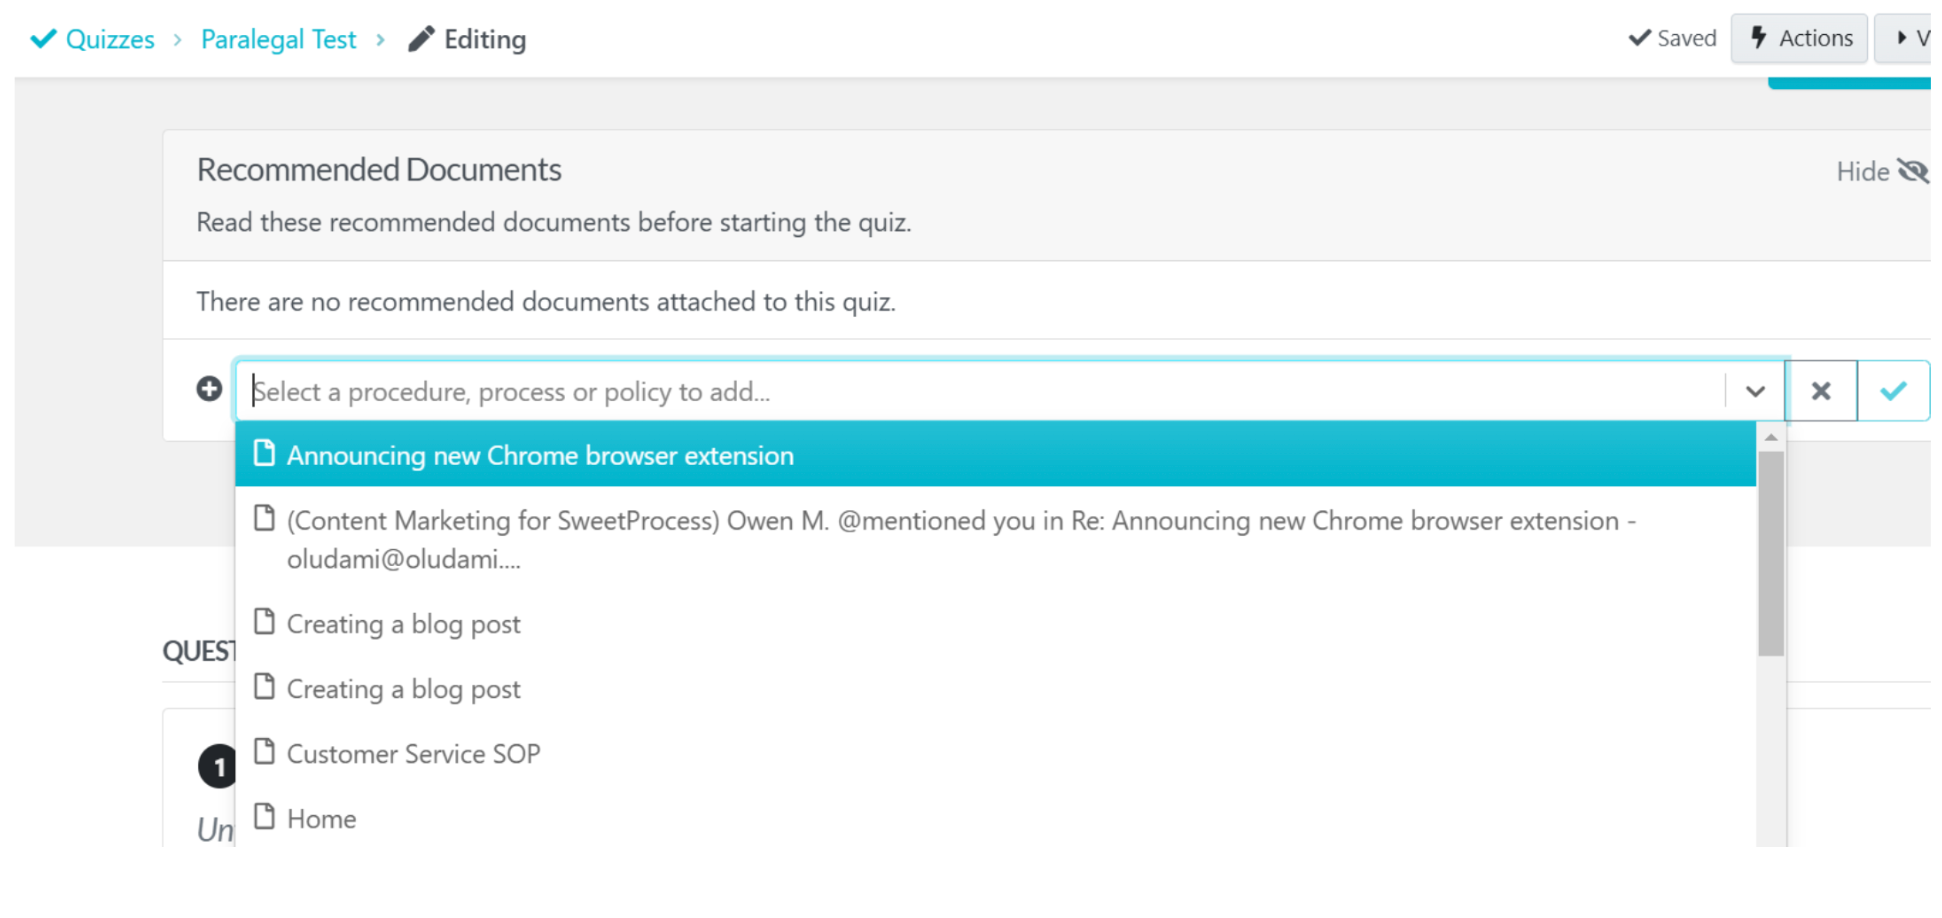
5. When you scroll further down, you’ll be able to attach any procedure, process, or policy you want to recommend in the quiz.
6. At the bottom of this same page, you can add your quiz questions. Your first question will be ready with its placeholders to be edited.
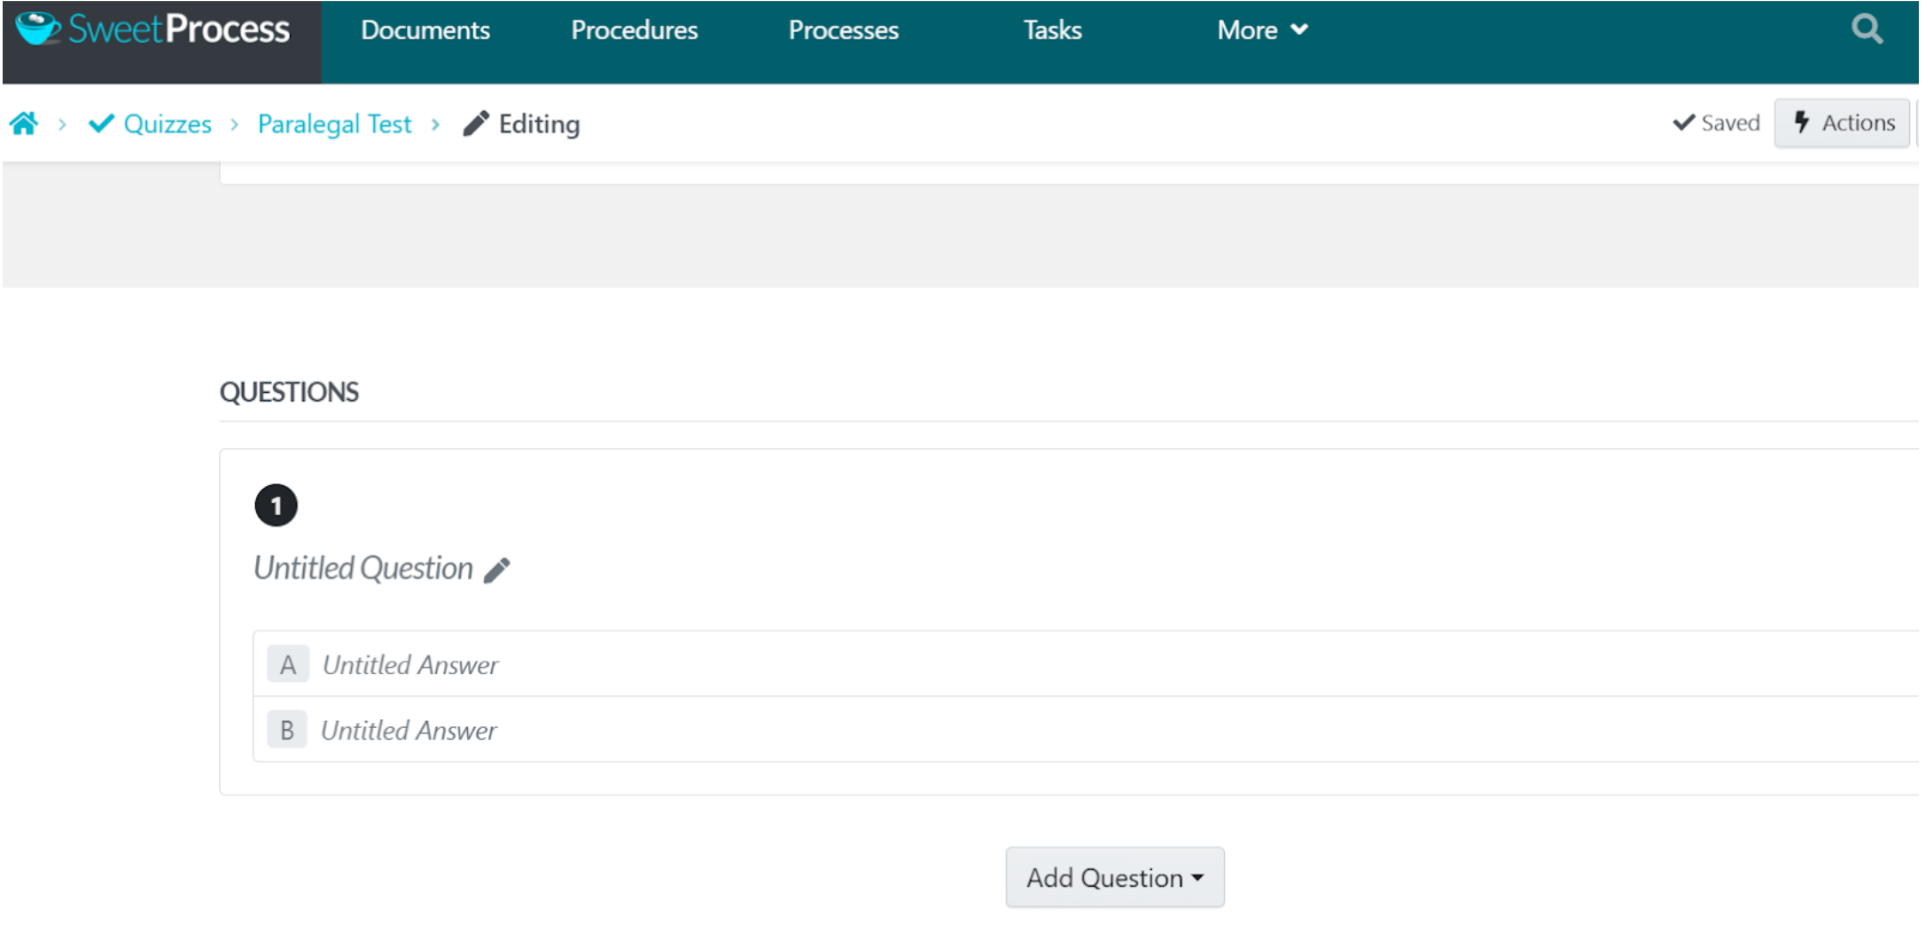
7. Click the edit pencil icon—or anywhere within the question box—to edit and input your first question and answer options. Click the checkbox to the right of each answer to select which is correct.
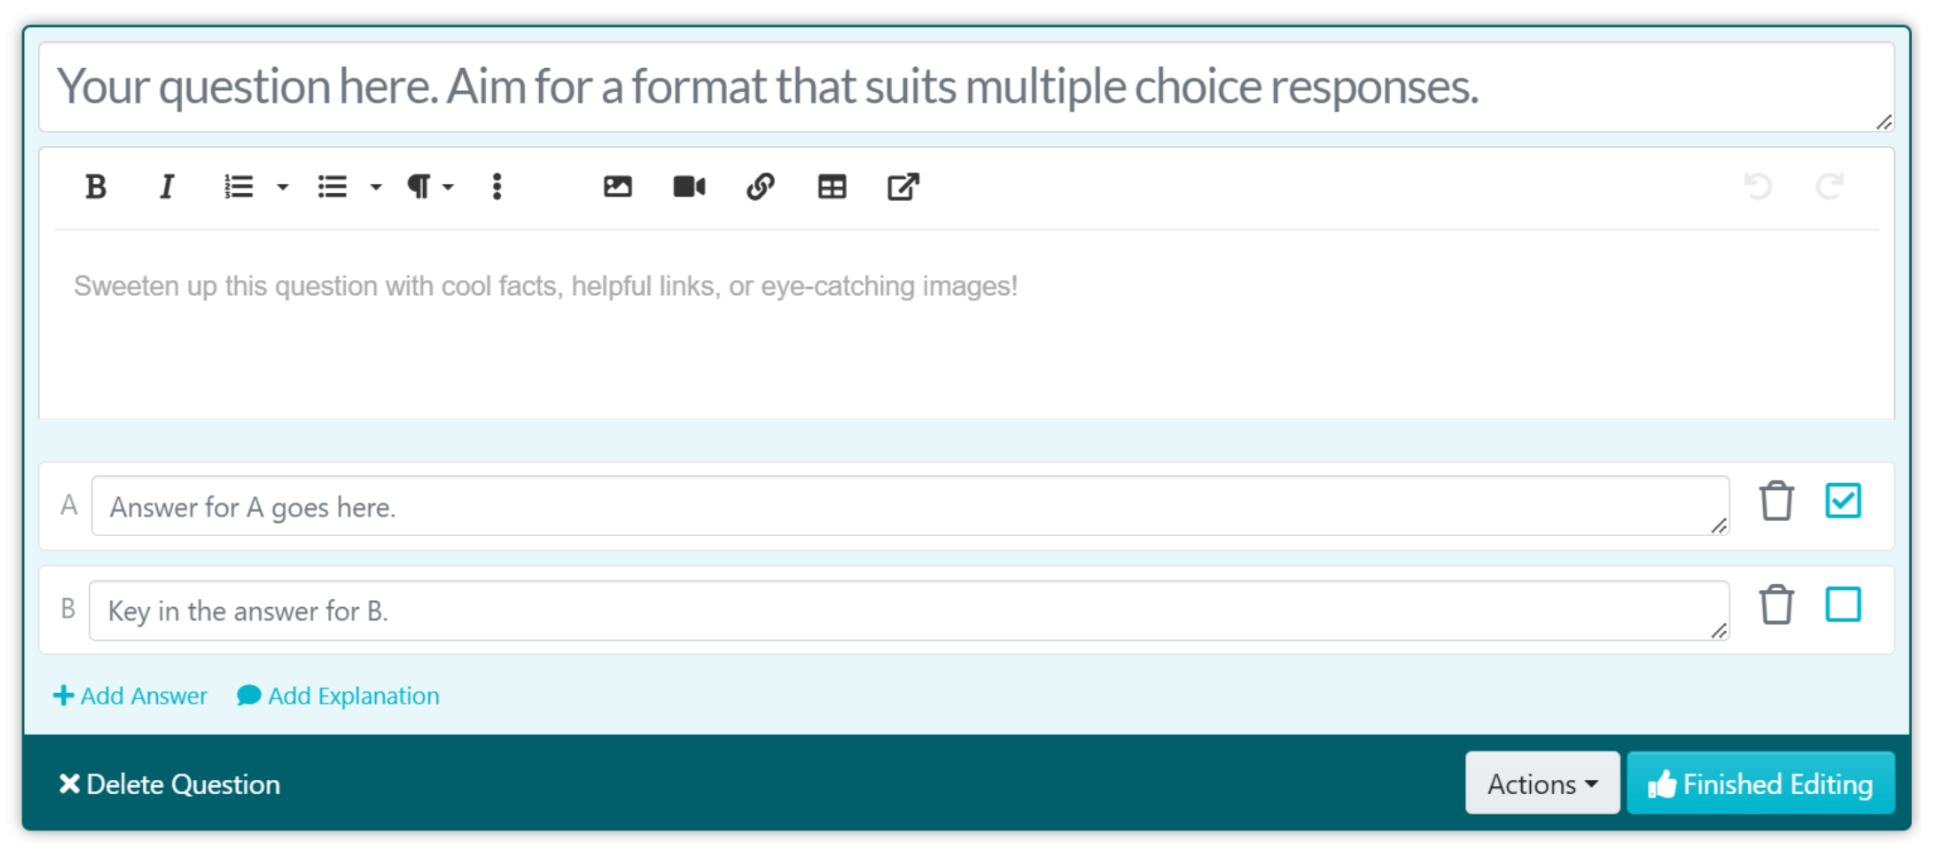
You’ll be able to add extra words, links, and images to your question and more answers by clicking “Add Answer.”
You can also click “Add Explanation” to explain to your team members why an answer is correct or incorrect.
8. Click on “Finished Editing” when you’re done, and you’ll get a preview of your quiz question.

You can click the “Add Question” button to add more questions to your quiz. You’ll be able to choose the kind of question it will be, whether multiple-choice or open-ended.
9. When you’re done setting up your quiz, click the “Approve” button at the top-right corner of the screen to make it live.
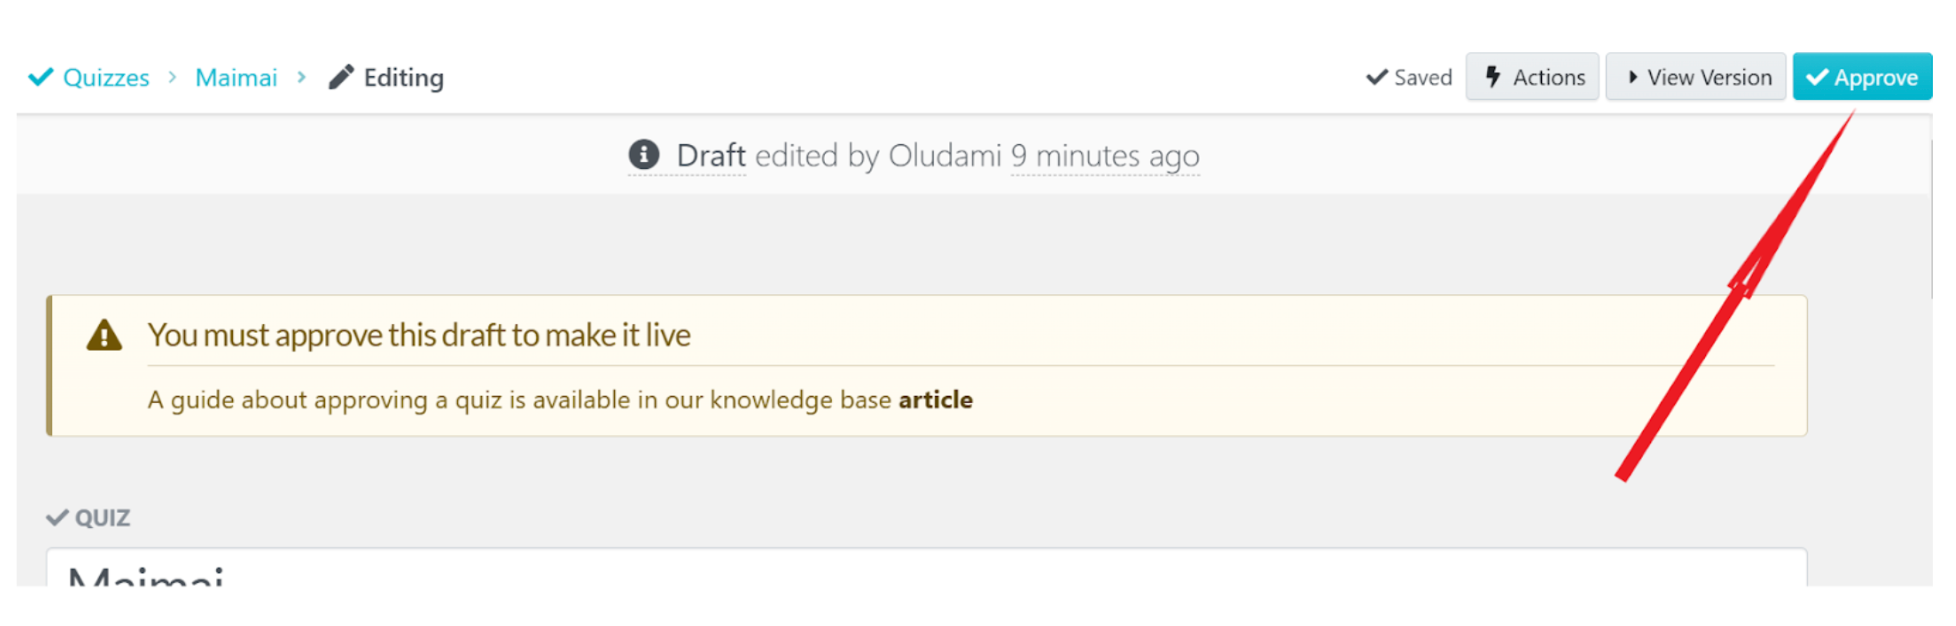
The quiz then becomes accessible to members of the assigned team and can be found on the quizzes page.
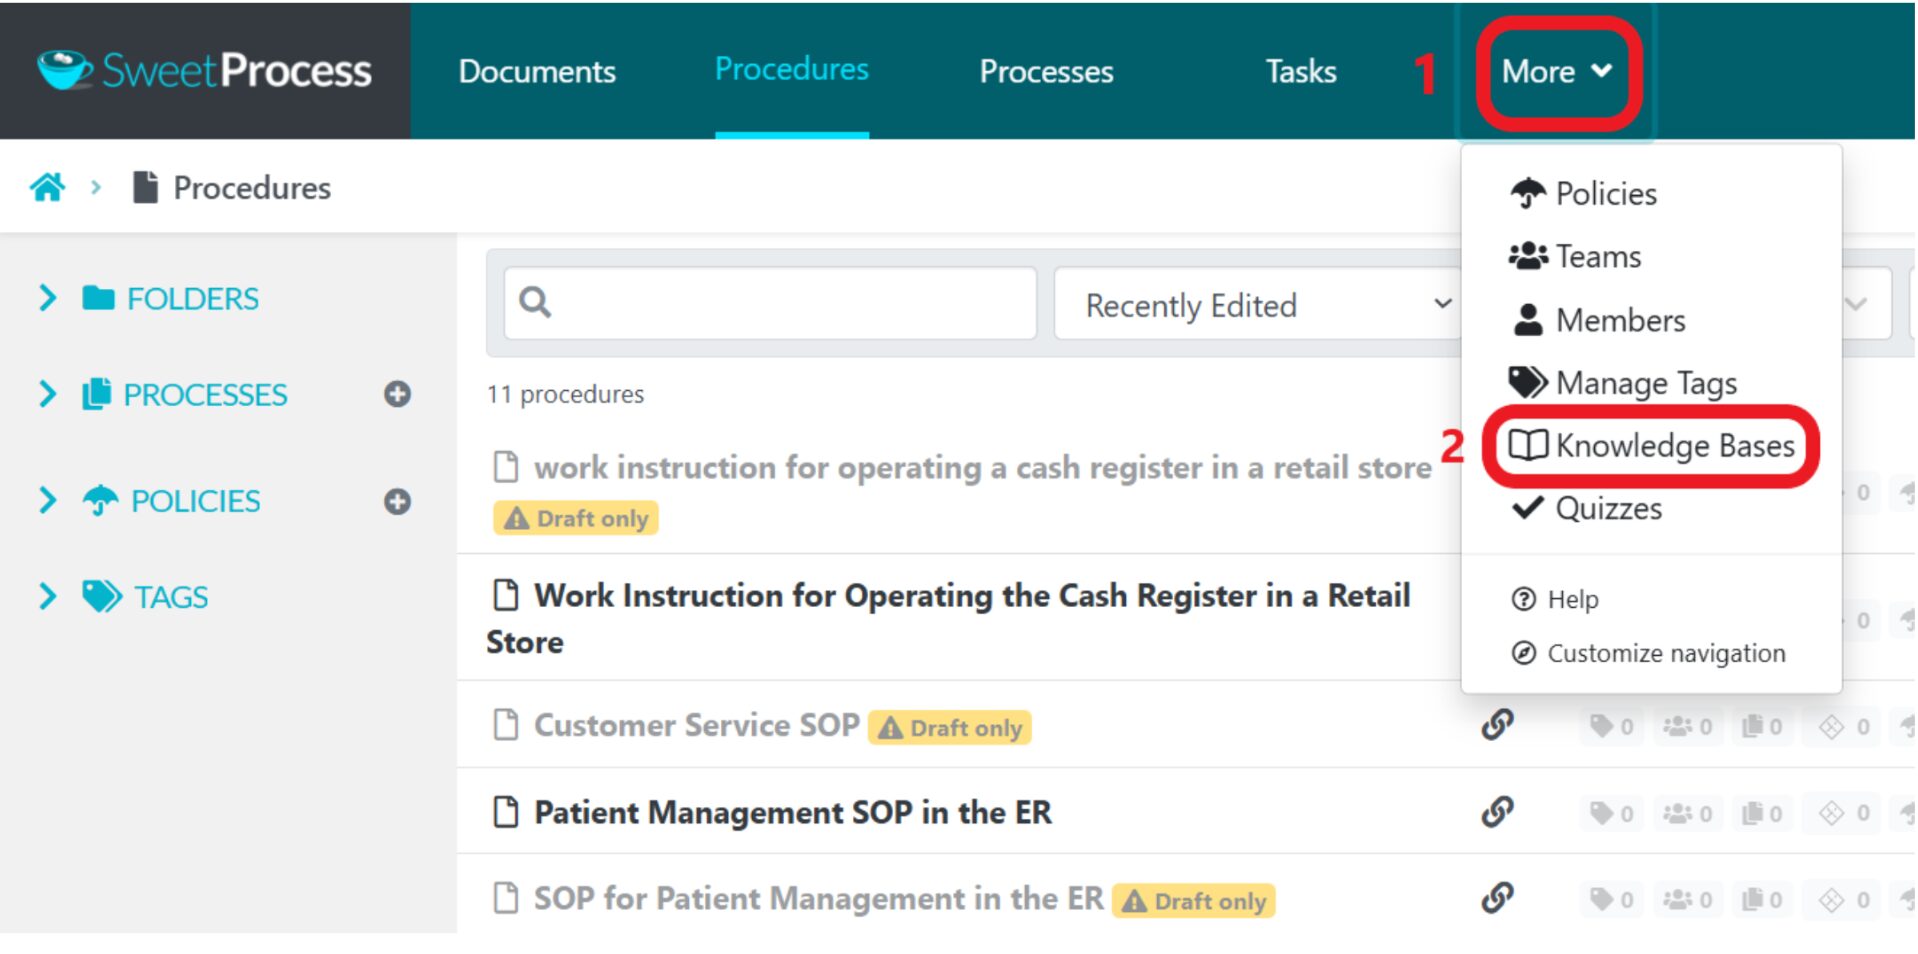
How To Create a Knowledge Base in SweetProcess

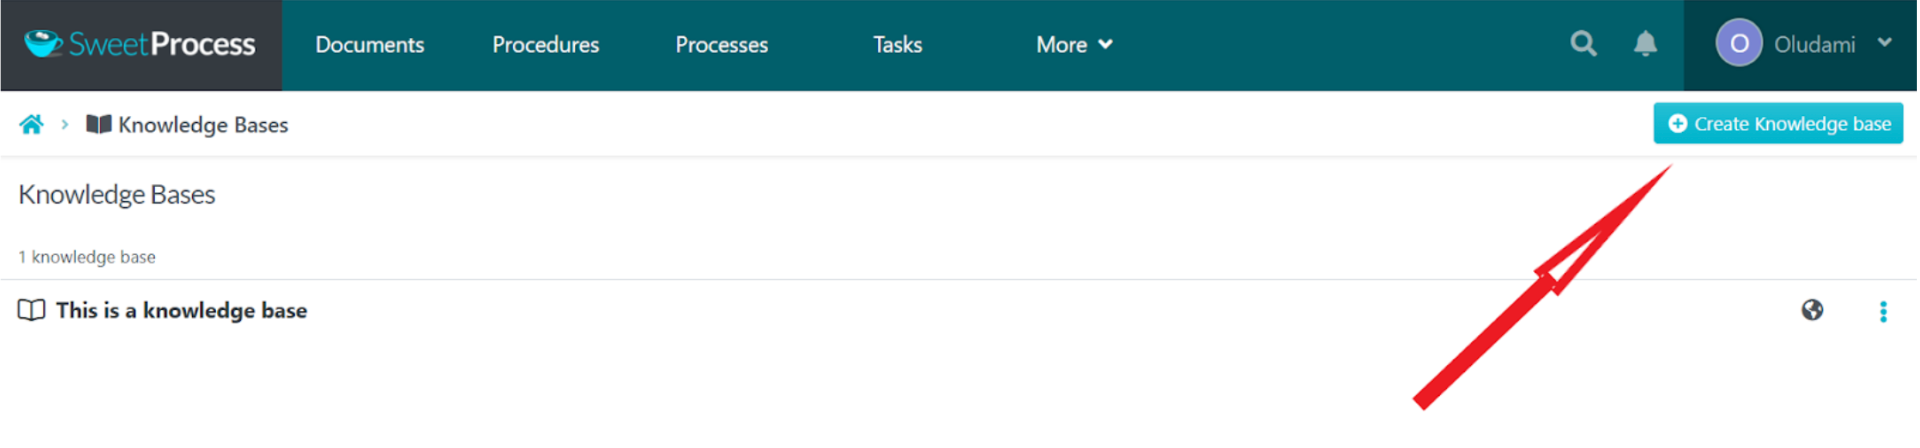
- Click on the “More” button in the navigation bar and select “Knowledge Bases” from the drop-down menu.
2. Click on “Create Knowledge base” at the top-right corner of the next page.
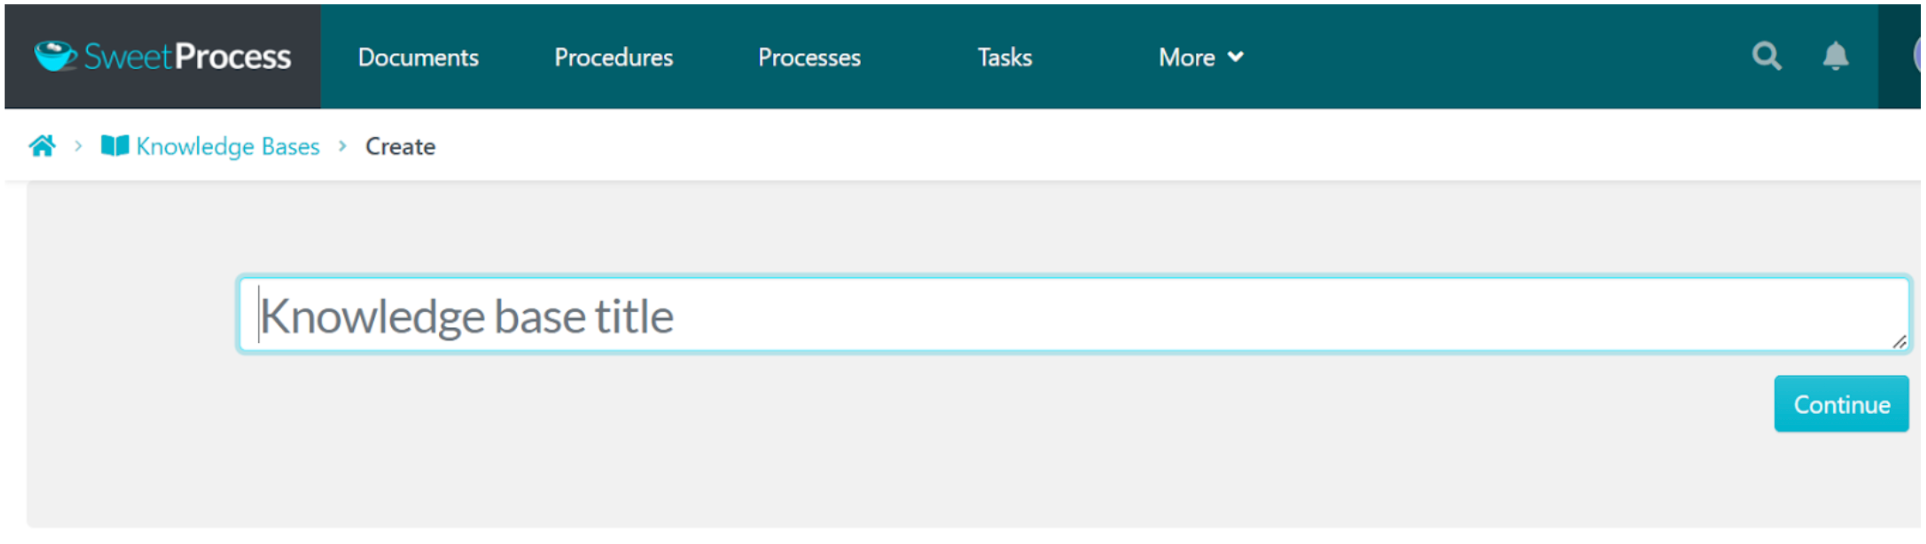
3. Enter your knowledge base title and click on “Continue.”
4. Click anywhere on the knowledge base page to edit the settings of the knowledge base. Here you can choose a theme, set control access, and set up feedback.
The “Control Access” setting is where you choose whether your knowledge base is public or private.
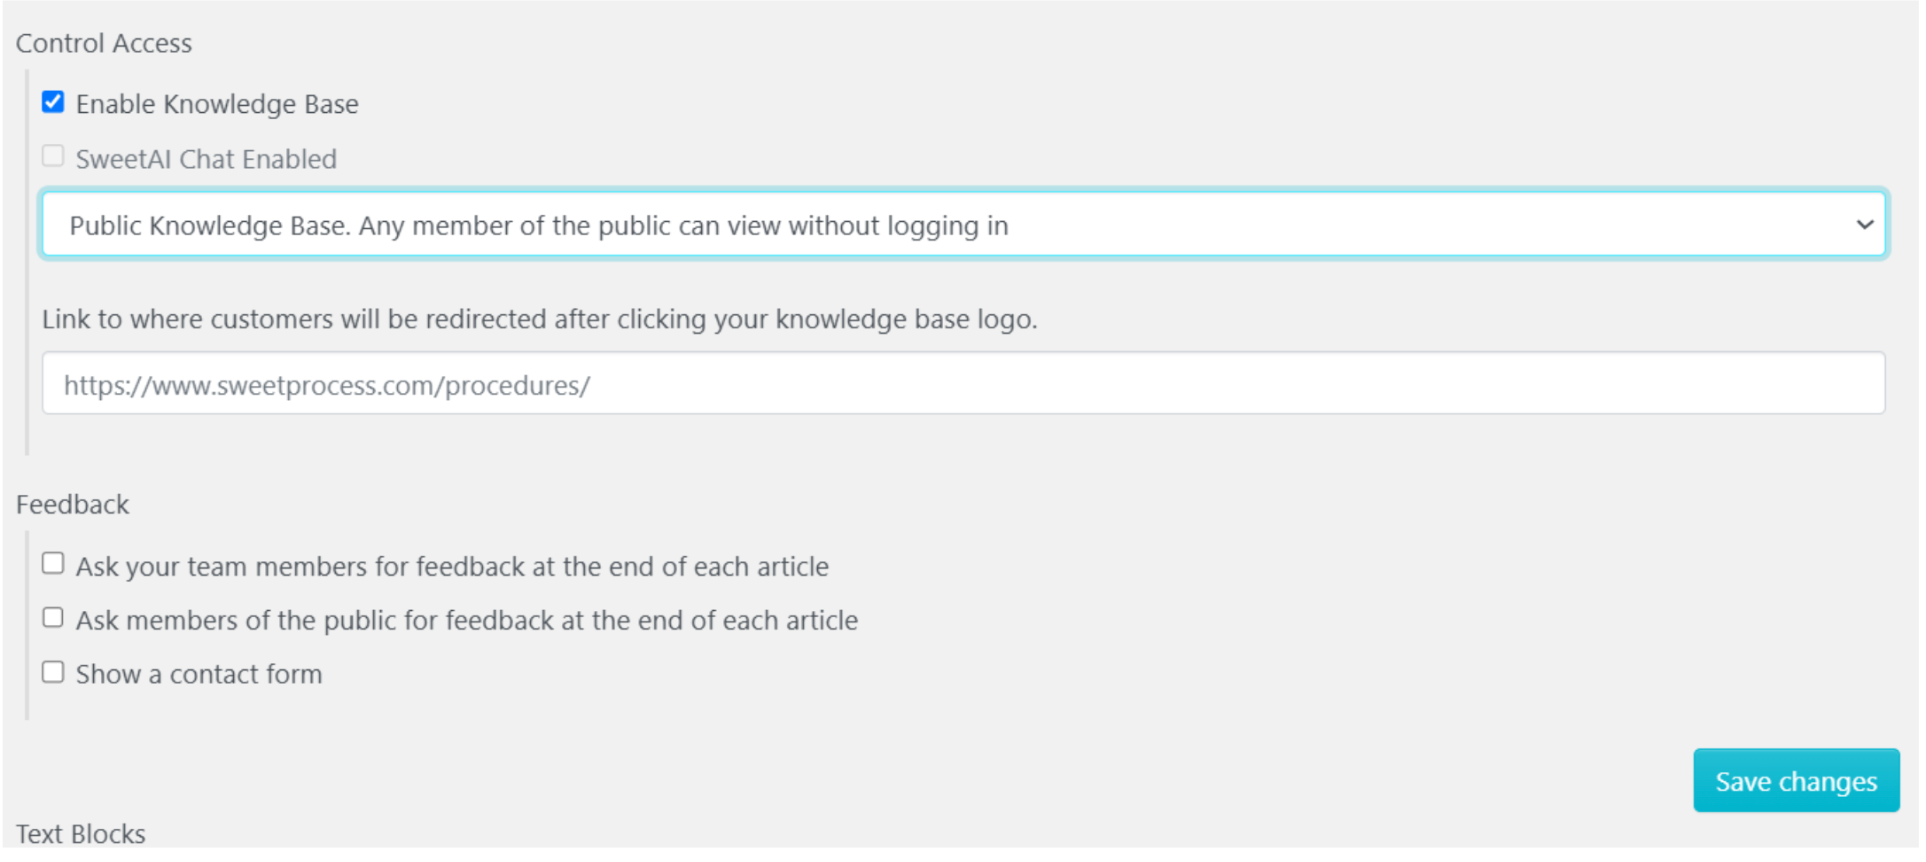
A public knowledge base is one that any member of the public can view without logging in. A private knowledge base, however, is one that only logged-in and permitted team members can view.
To create an internal knowledge base for your employees, click on the long drop-down button already pre-populated with “Public Knowledge Base” and select “Private Knowledge Base.”
5. Next, create a category for your knowledge base. You’ll see the “Create Category” button at the bottom of the page.
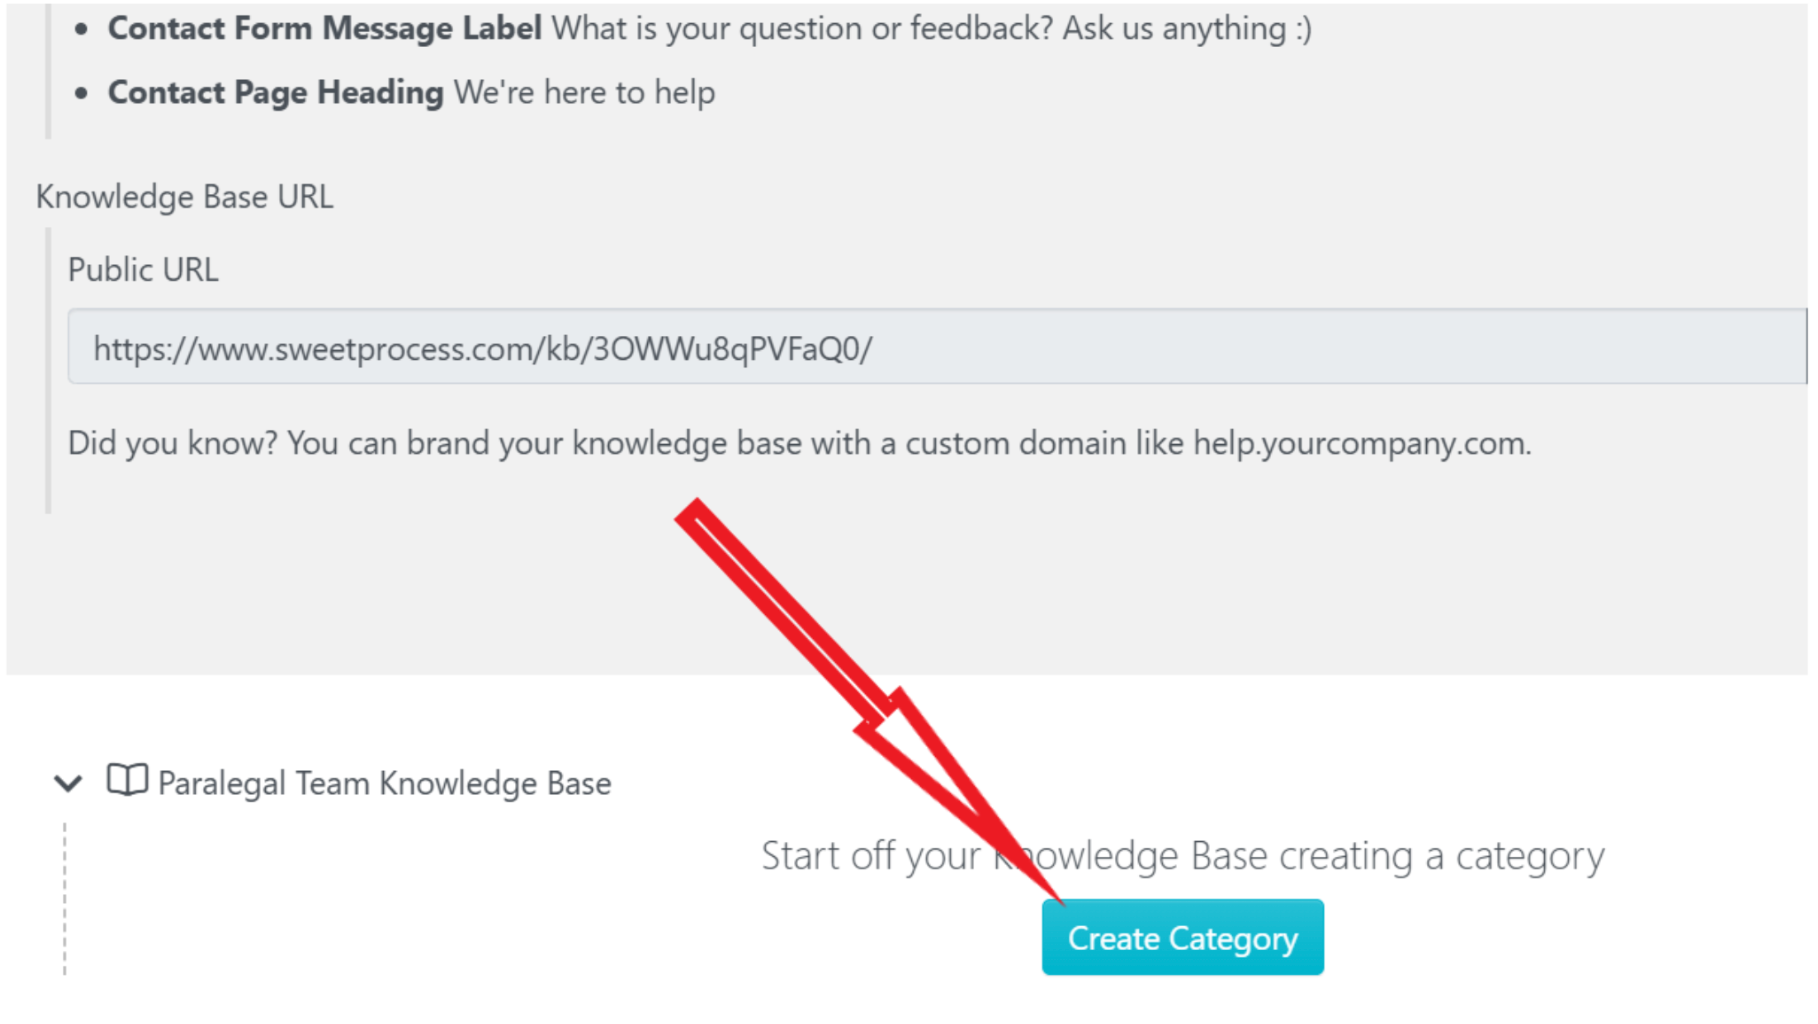
Click on the button, name the category, and click on the green checkmark.
6. Click on the new category you just named, and there’ll be a short drop-down list.
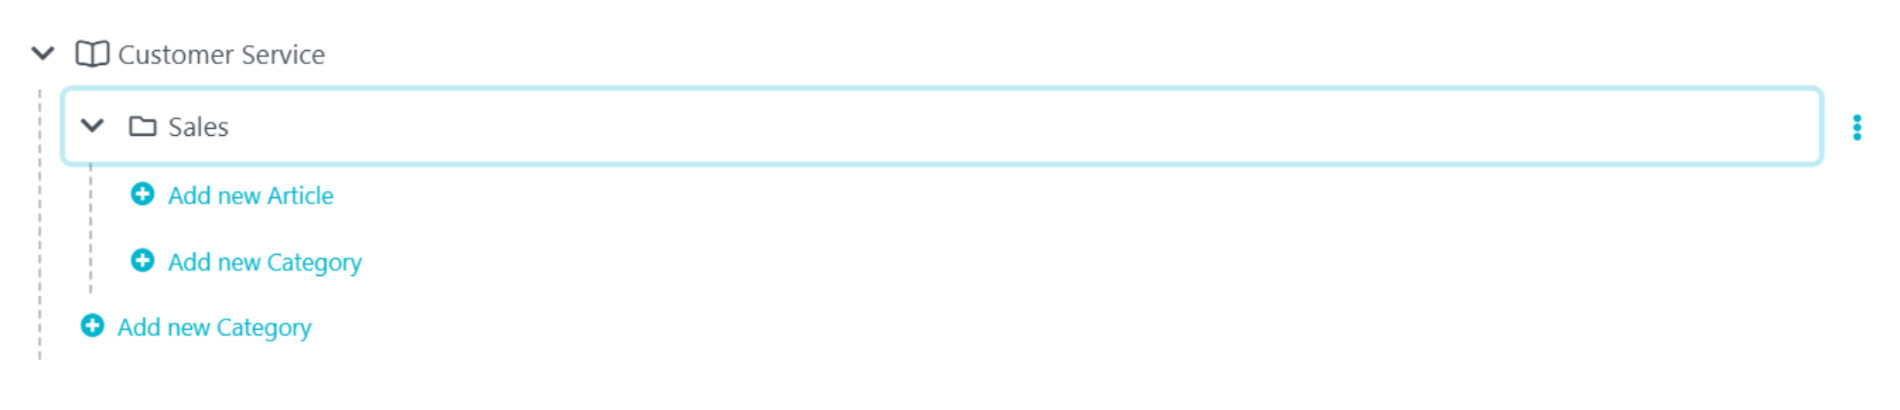
You can now add articles to your knowledge base by clicking on “Add new Article.” Simply click on the space provided to select a procedure or policy to add to your knowledge base, and then click the green checkmark on the far right to complete the addition.
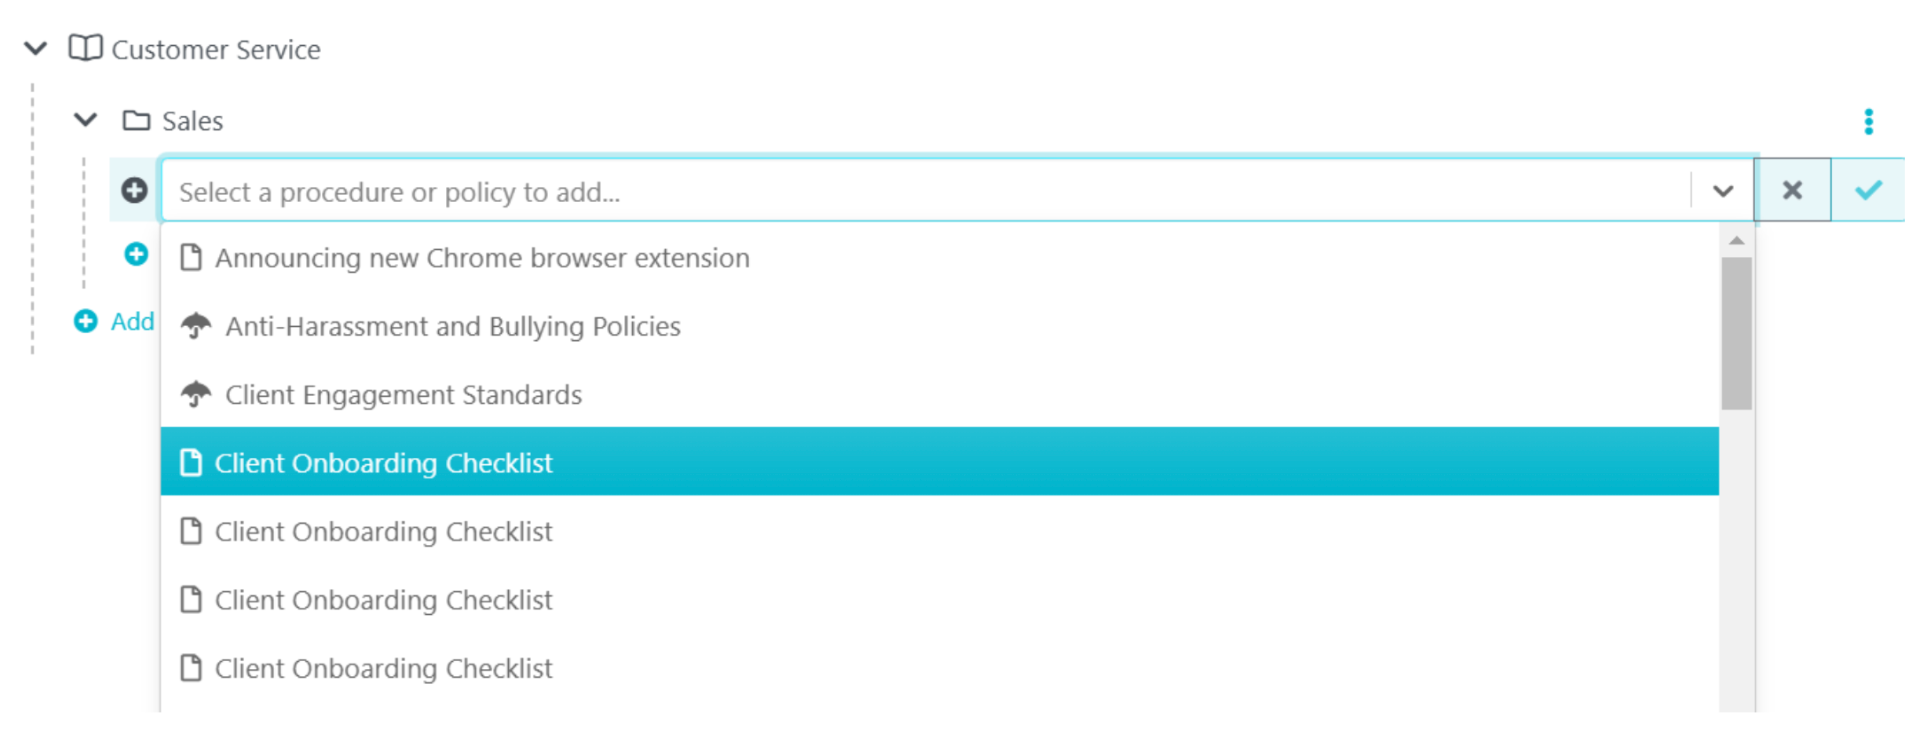
You can add as many policies and procedures as you want to your knowledge base this way.
Note: Whatever content you want to add to your knowledge base should have been created as a procedure or a policy beforehand.
Once you have created your internal knowledge base, you can always add policies and procedures to it by clicking the three dots beside the policy or procedure or the “Action” button and then selecting “Knowledge Base.”
A list of your existing knowledge bases will pop up, and you can choose the one to which you want to add the document. You can use the search bar to find your knowledge bases.
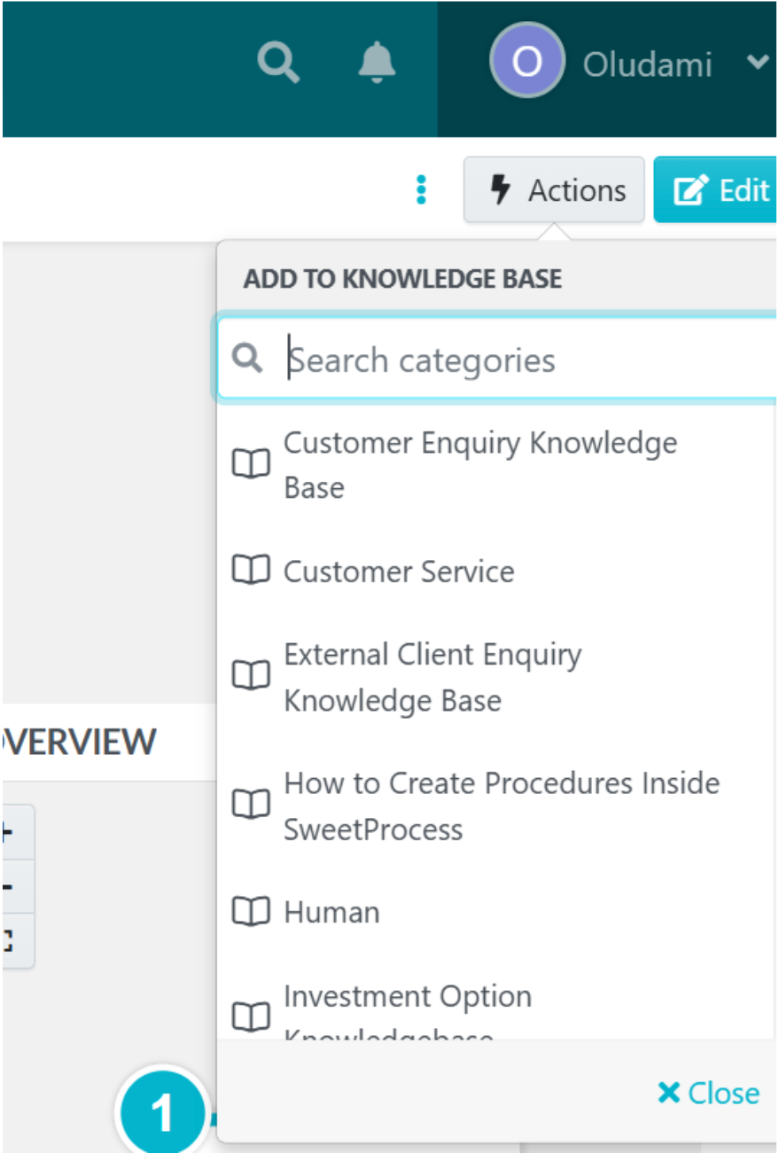
Once you choose a knowledge base, the categories under it open.
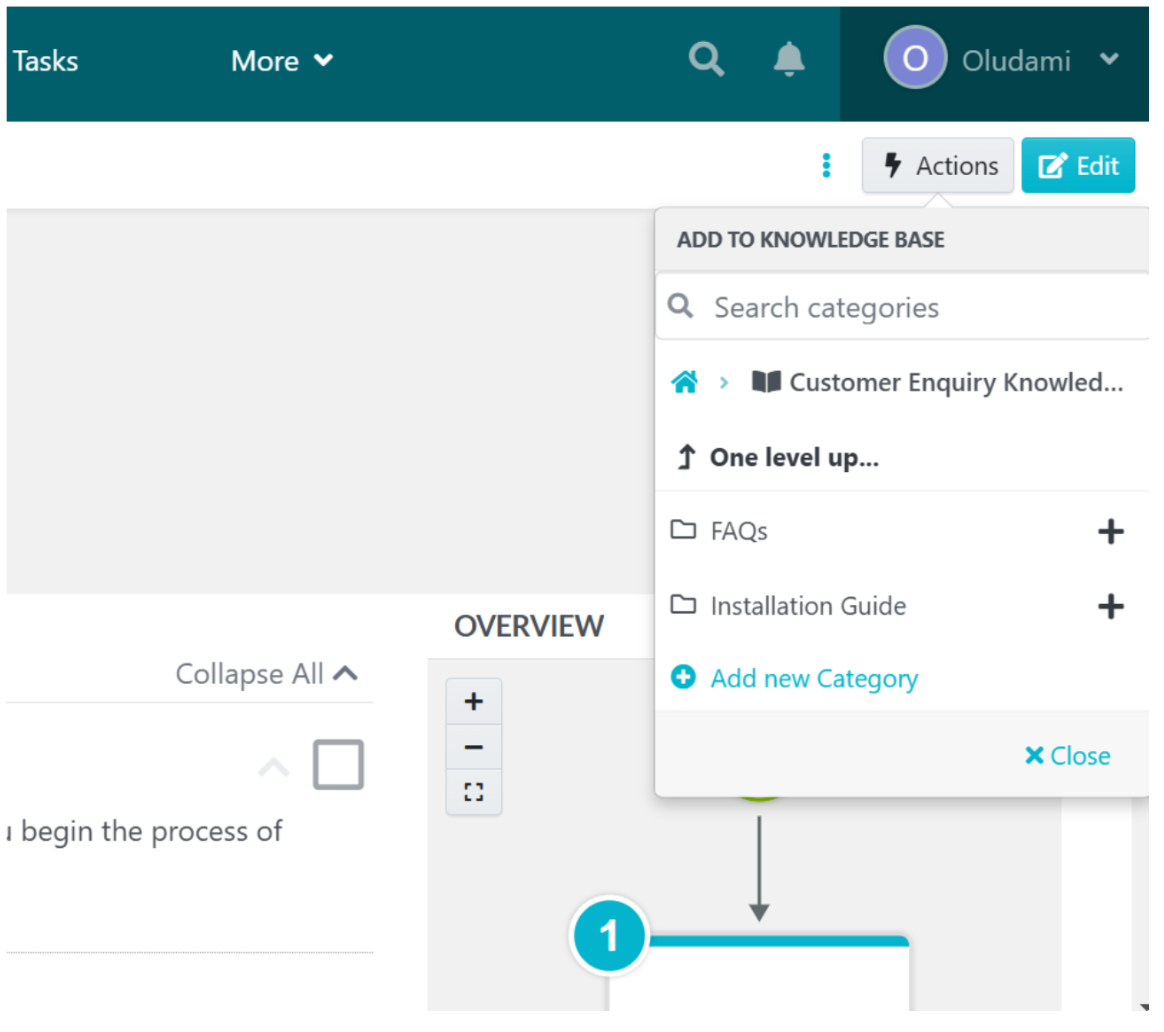
Simply click the “+” sign in front of the category to which you want to add your policy/procedure, and voila, you’ve added the policy or procedure to a knowledge base.
How To Collaborate With Team Members in SweetProcess
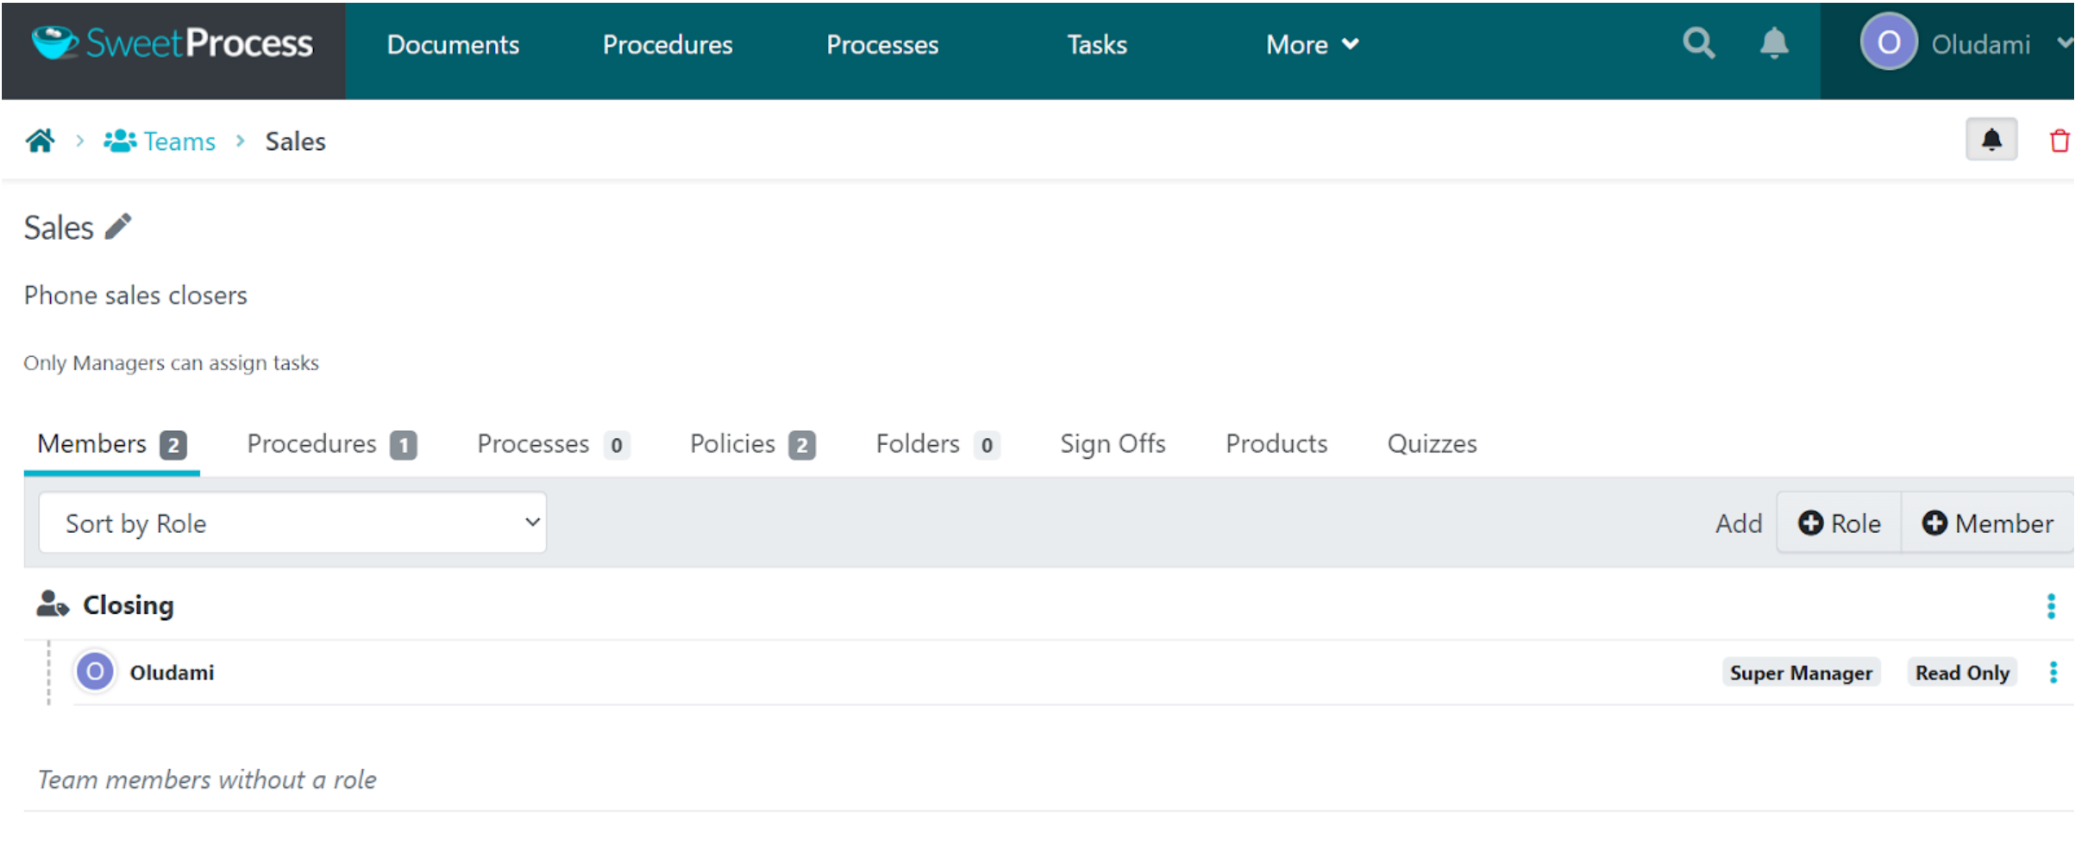
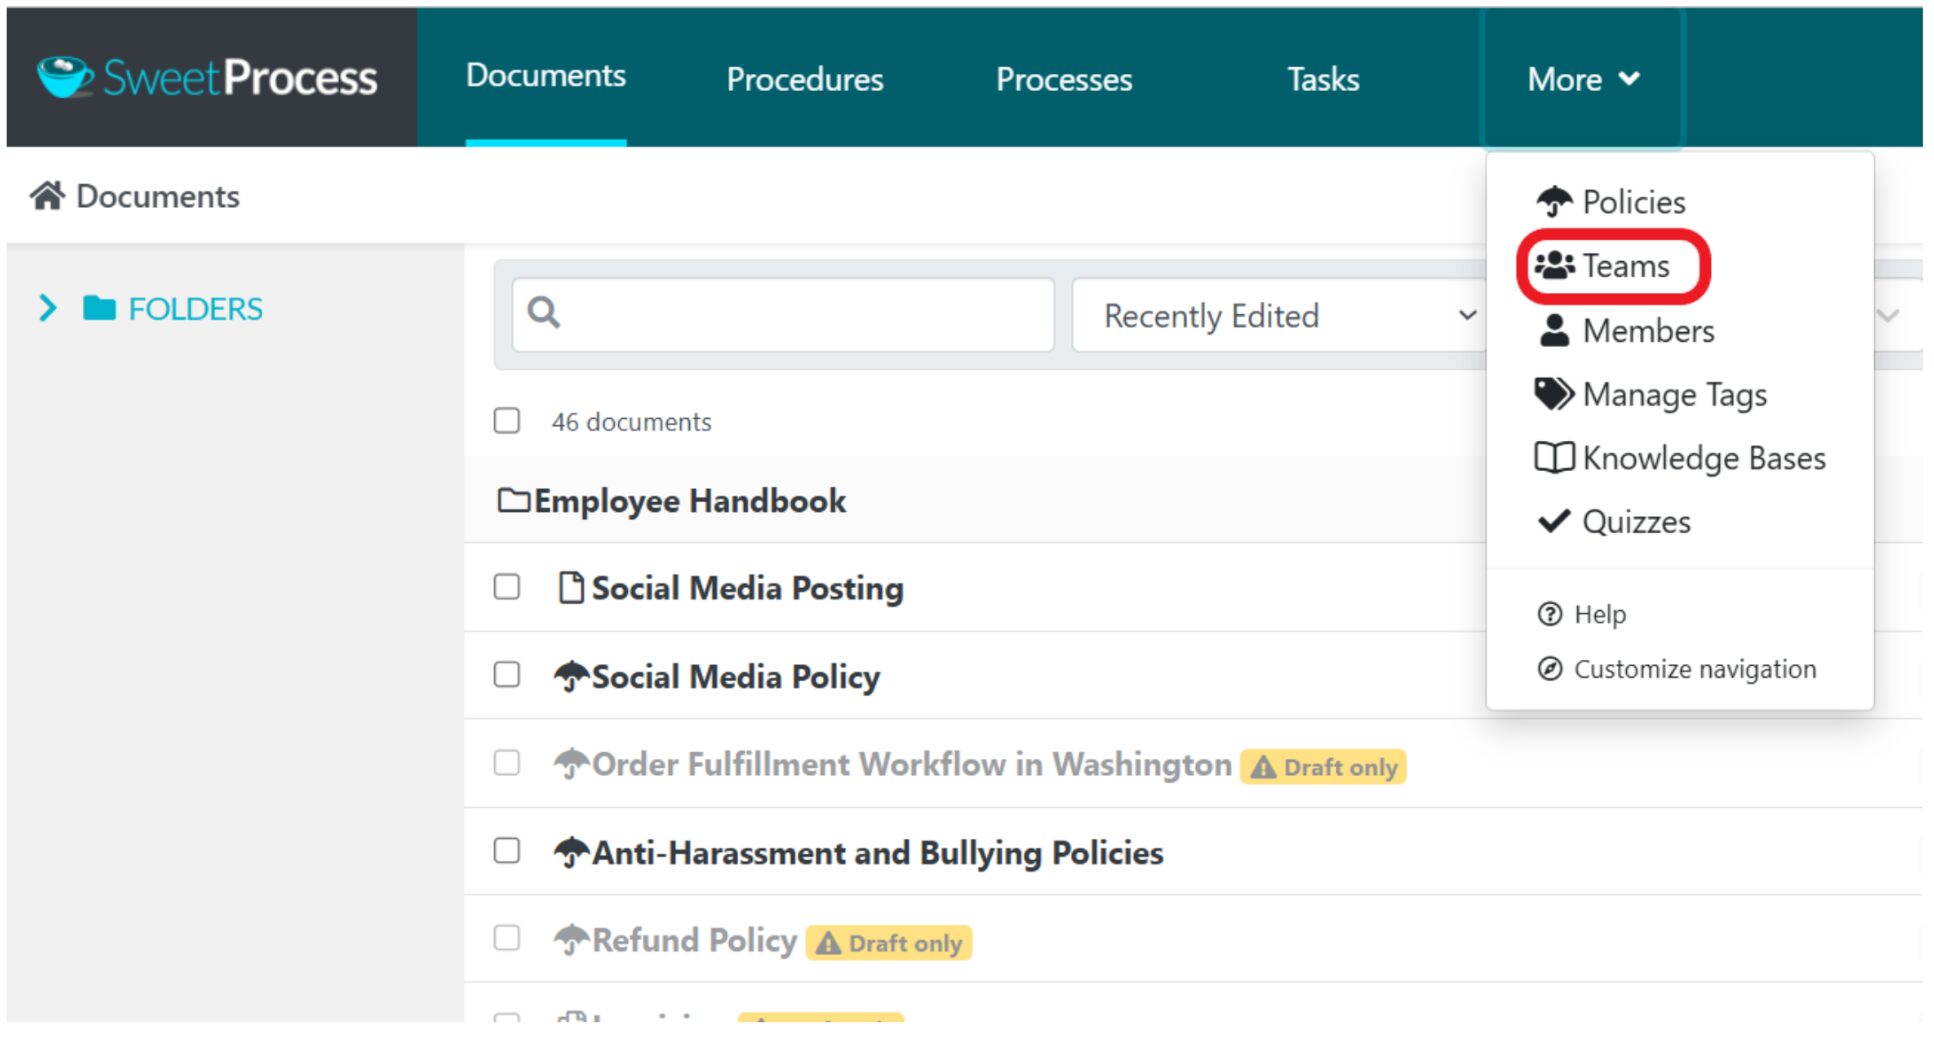
- From anywhere inside SweetProcess, click on the “More” navigation button and then select “Teams.”
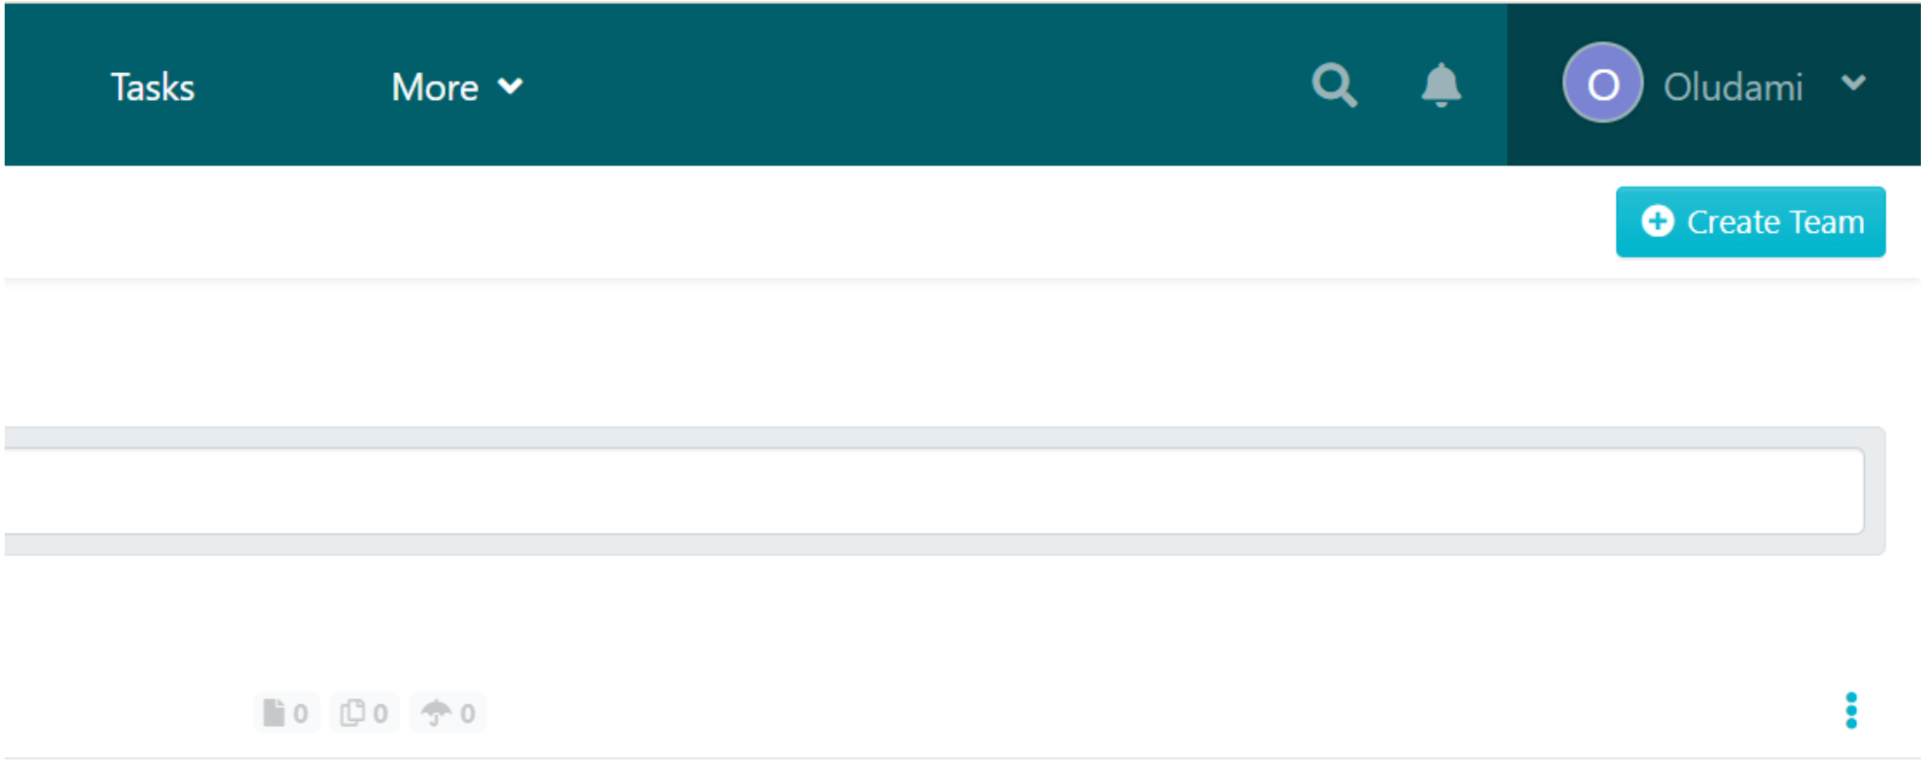
2. On the next page, click “Create Team” at the top-right corner of your screen.
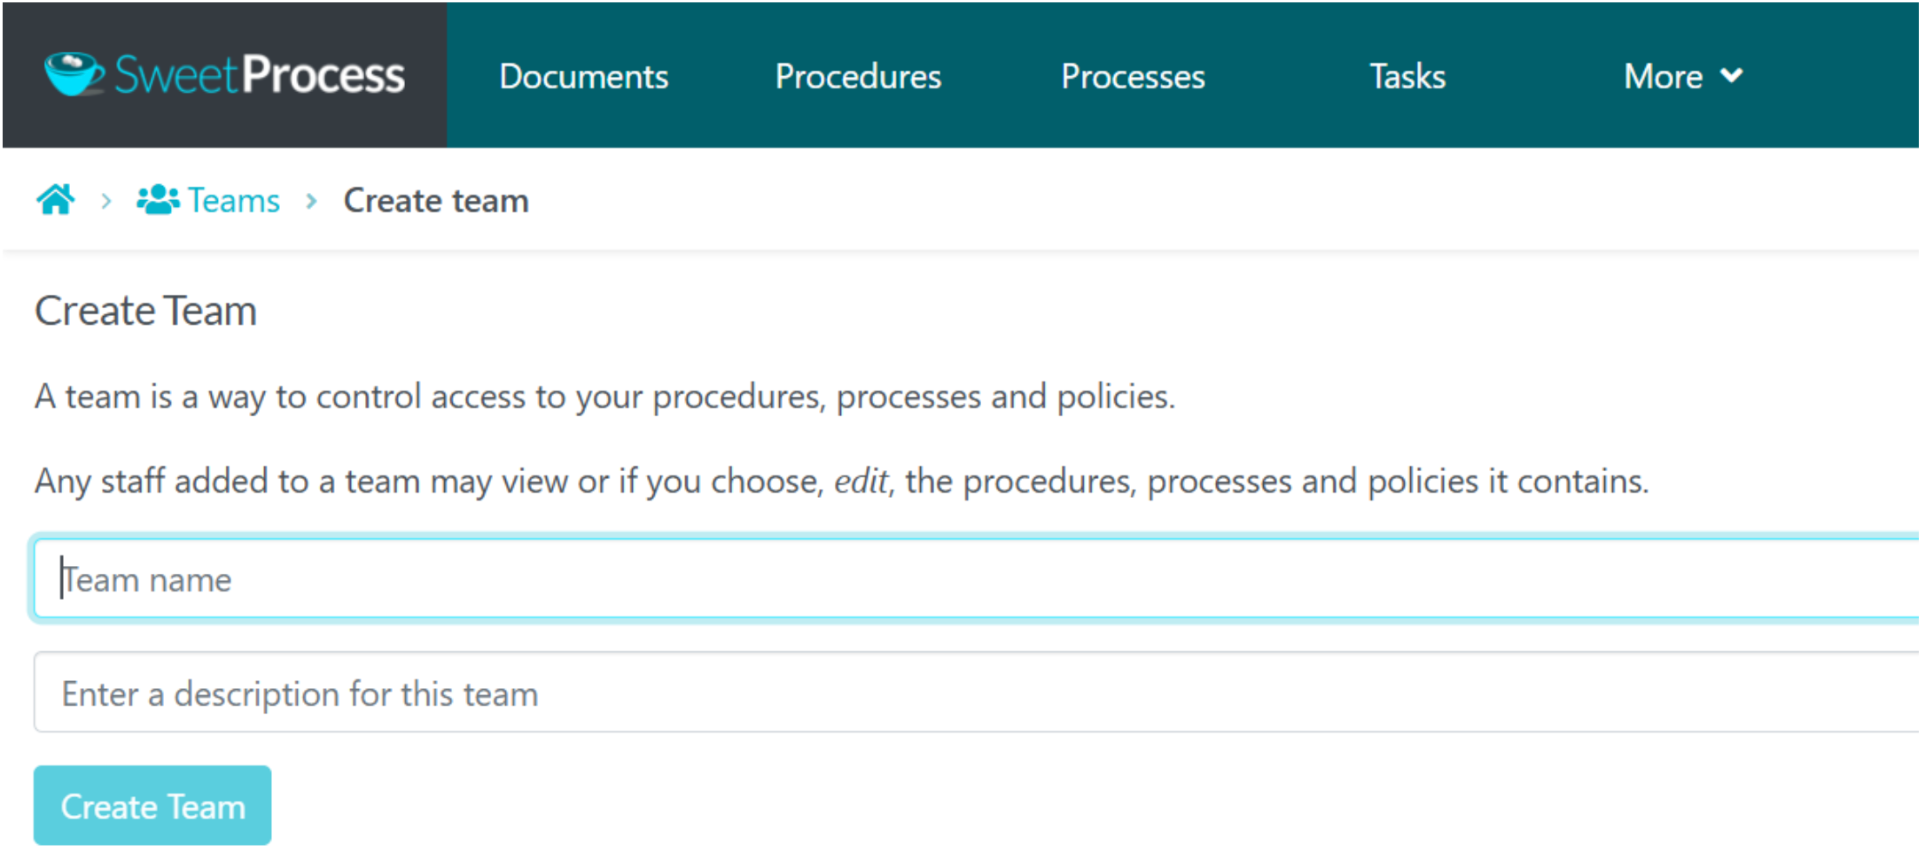
3. You’ll be required to enter a name and description for your team. Once you’re done, click on the “Create Team” button.
You’ll be taken to the team’s page.

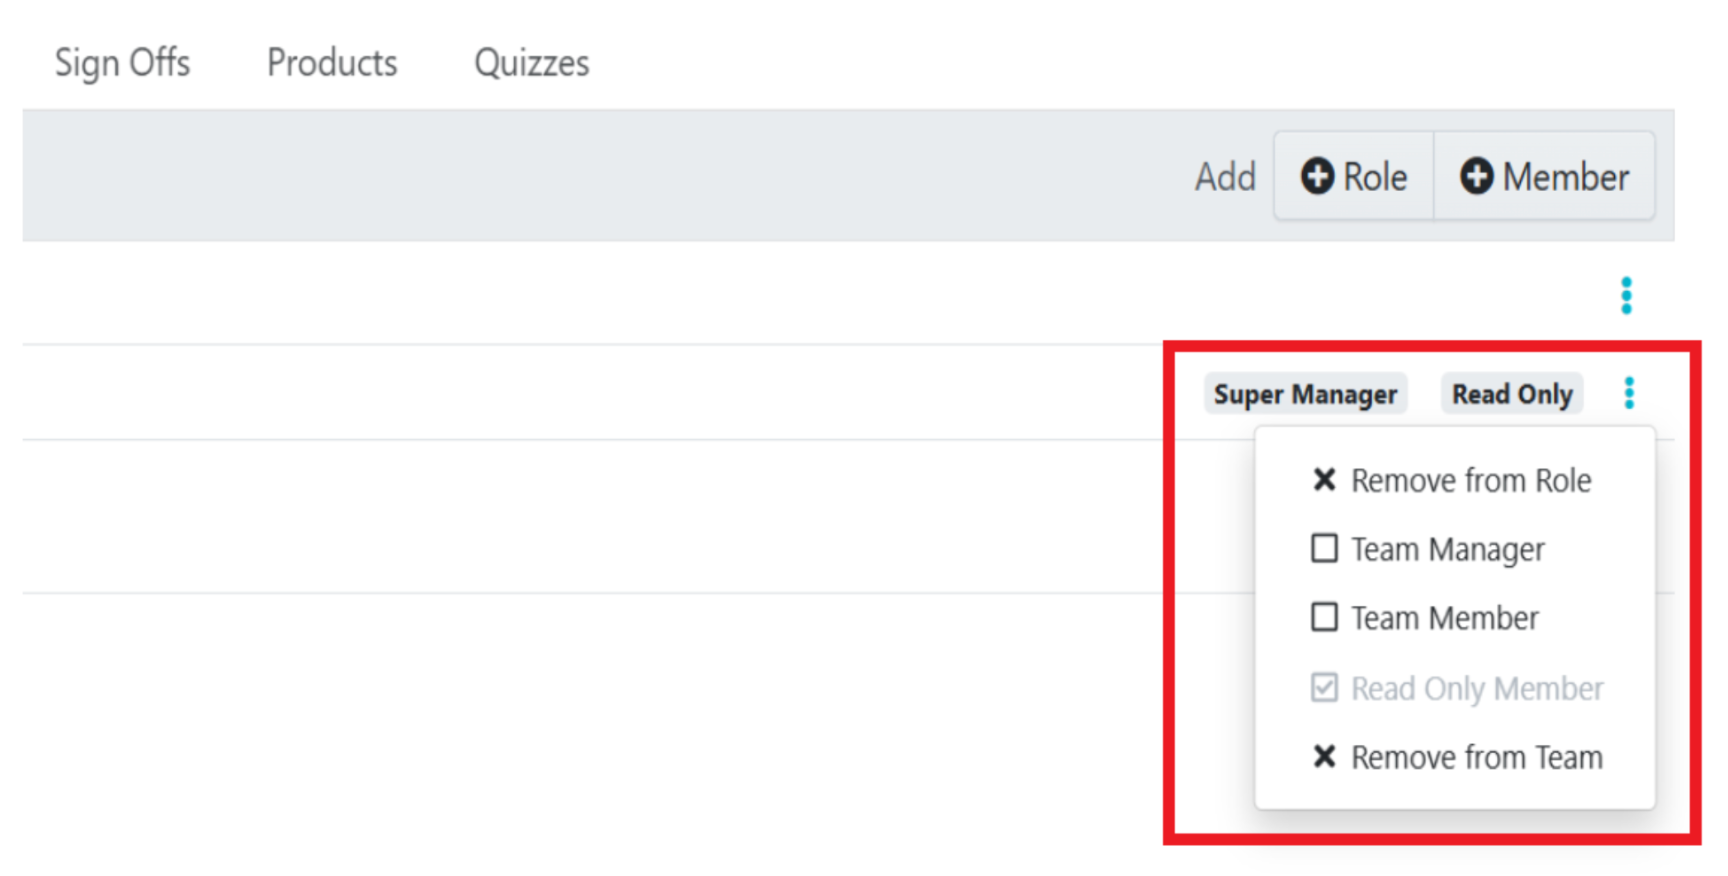
Here you can add roles and also add team members, using the “+Role” and “+Member” buttons respectively.
4. Using the three dots beside each member’s name, you can select the type of member each team member is: team manager, ordinary team member, or read-only member. You can also use this to remove a member from the team.
You can further manage your team using the menu on your team section, as seen below:

You can use the tabs in this menu to add and manage members, assign procedures, processes, or policies to the team, add a folder to the team, add sign-off rules to the team, and add products and quizzes to the team.
Team members automatically have access to whatever you add to this team page, and they’ll get notified for every activity on the page.
How To Assign Tasks to Your Team Members

- From your SweetProcess navigation menu, click on “Tasks.” At the top-right corner of your screen, click on “Assign Task.”

2. A box will pop up on your screen to set up and assign tasks. First, you’ll be asked to choose the process or procedure you want to turn into a task.
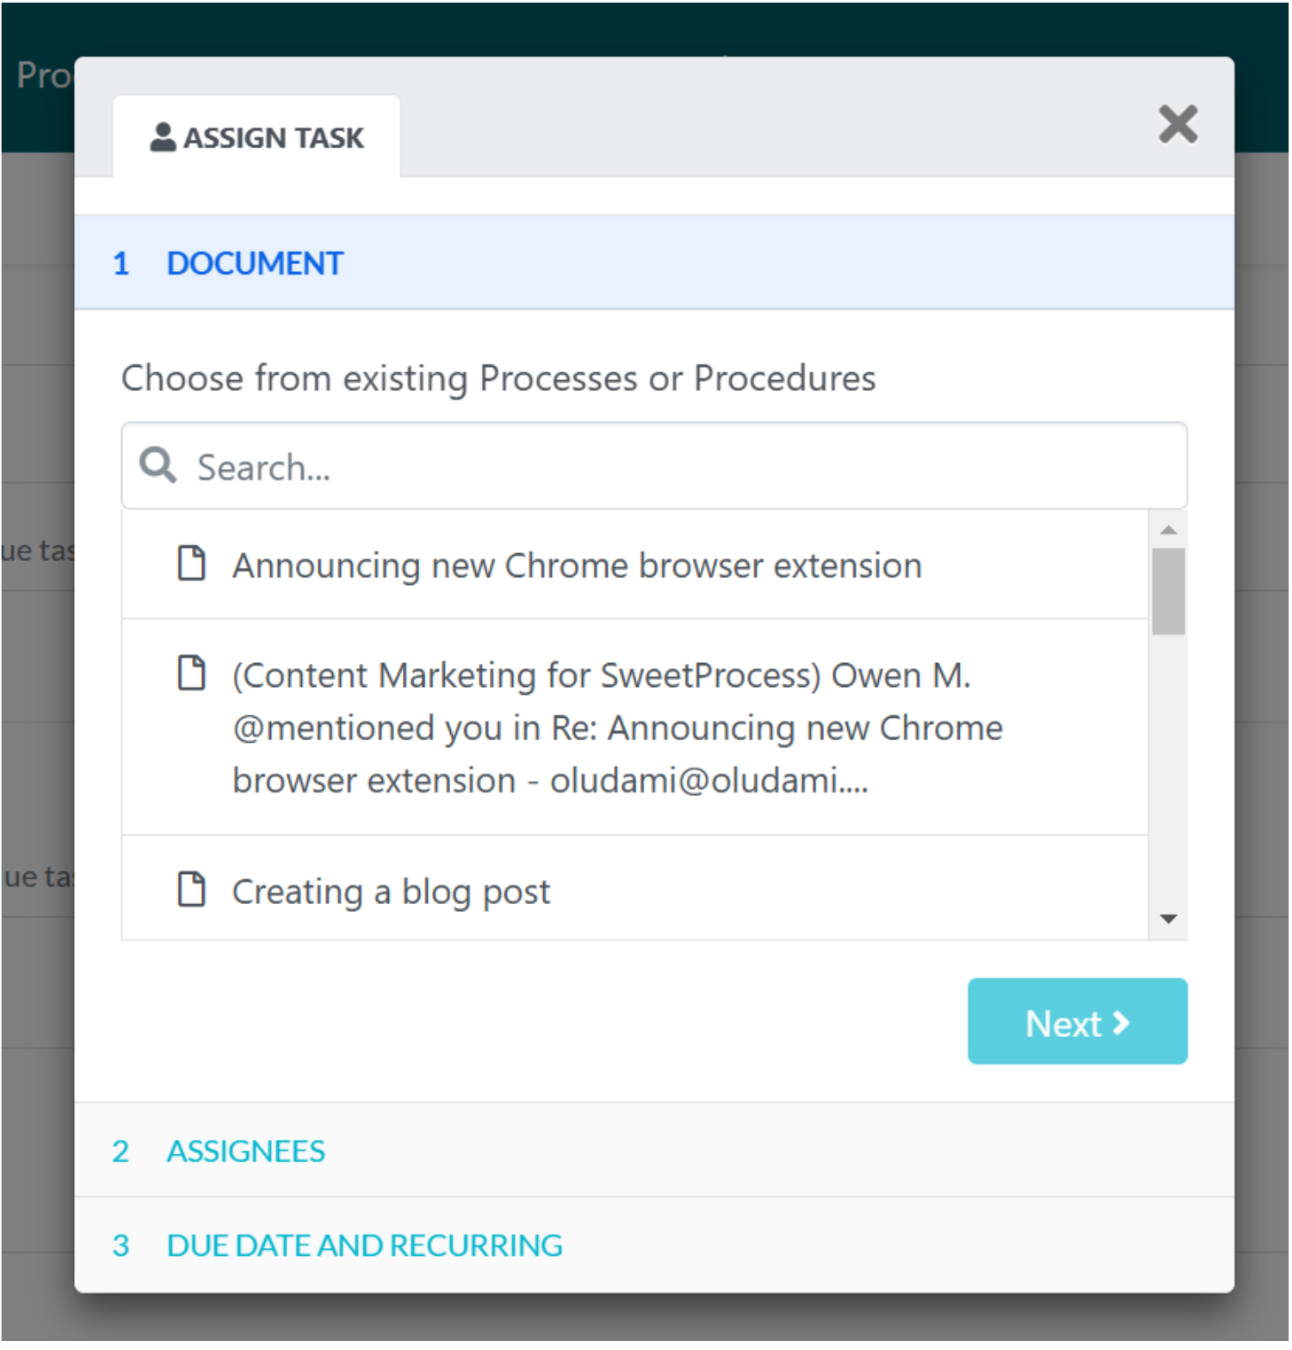
3. Next, you’ll be able to assign the task to teams and team members. You can assign teammates together or assign each teammate separately. You can even assign individual steps in a procedure or process.
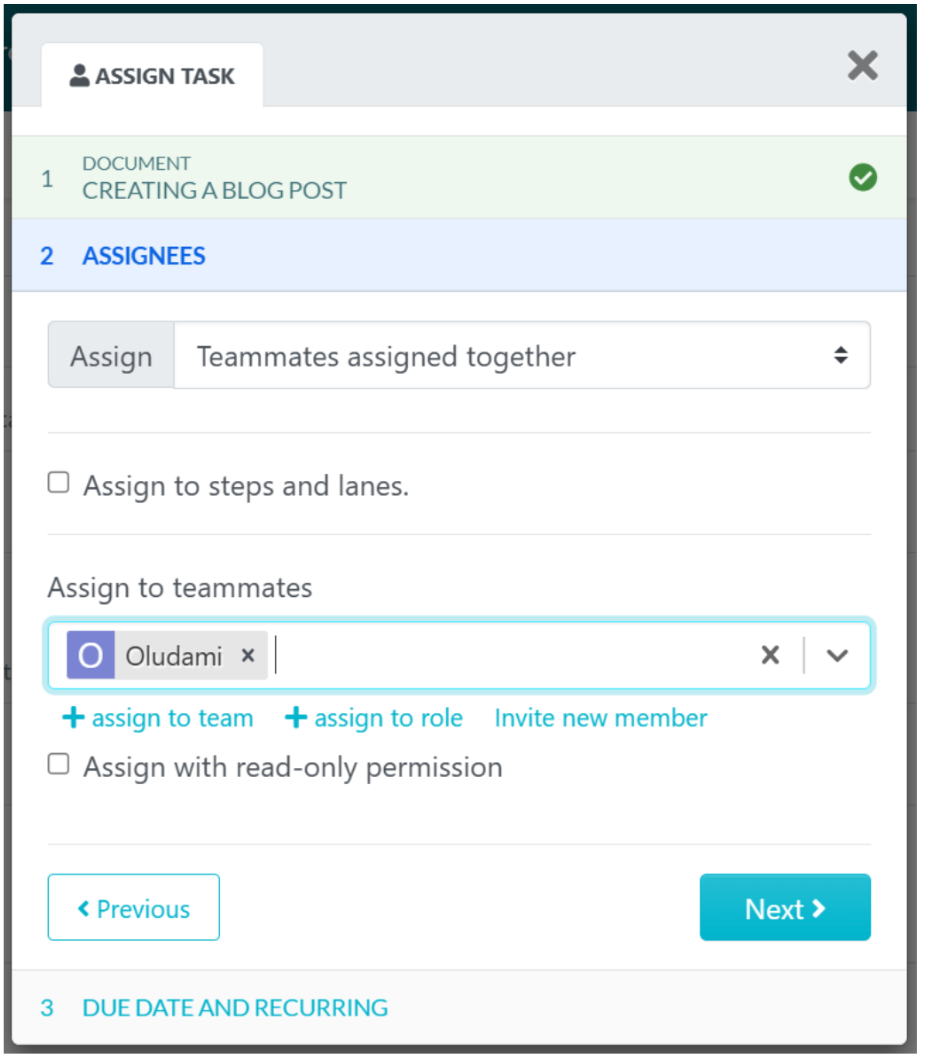
You can assign to a team or to a role, and you can invite a new member to assign to someone not already in your SweetProcess.
When you’re done assigning the task, click the “Next” button.
4. Next, you’ll name your task, set due date and due time, and even add a start time if you wish. For a repetitive task, you can set a task repetition schedule at this stage.
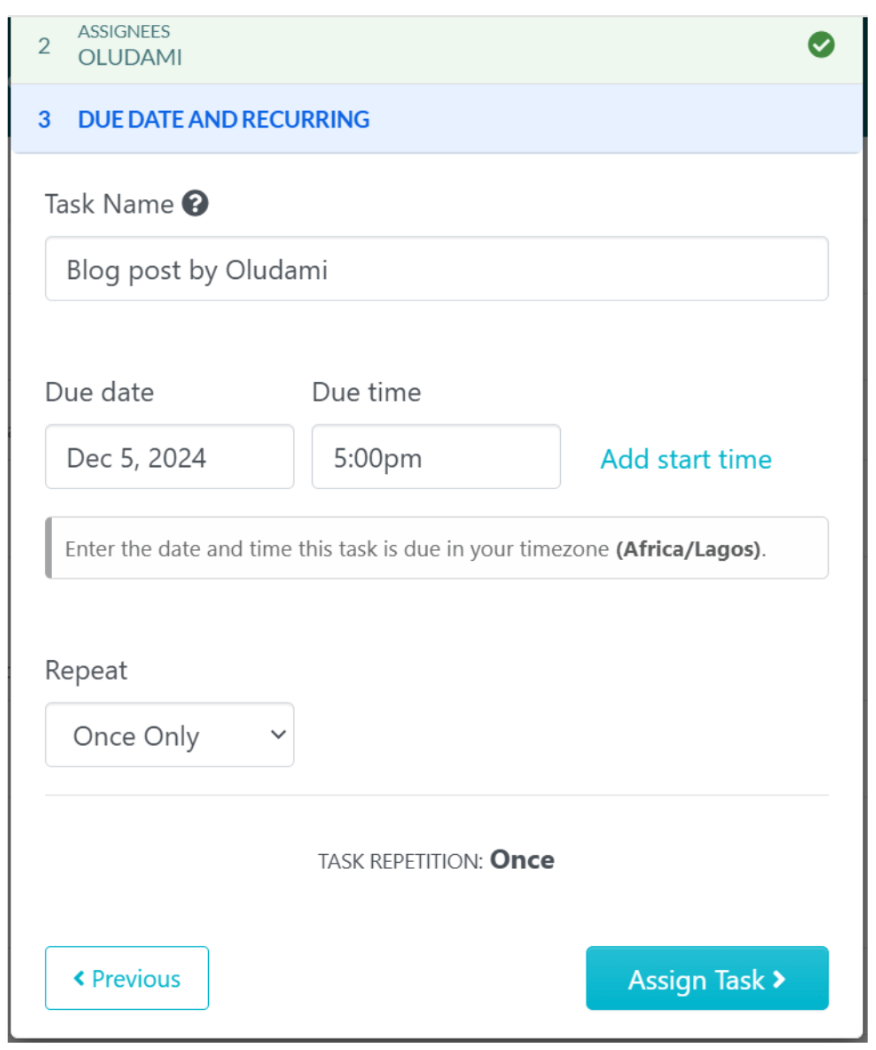
5. Once you’ve set up your task, click on the “Assign Task ” button. Your task is ready and can be found listed on the tasks page. To complete the task, the assignee must check off the procedure steps in sequential order.
Second Way
A second way to assign processes and procedures as tasks in SweetProcess is to open the process or procedure you want to assign as a task and, in the top-right corner, click on “Actions.” You’ll then see a drop-down list of the different actions you can take on that document, including assigning it as a task.
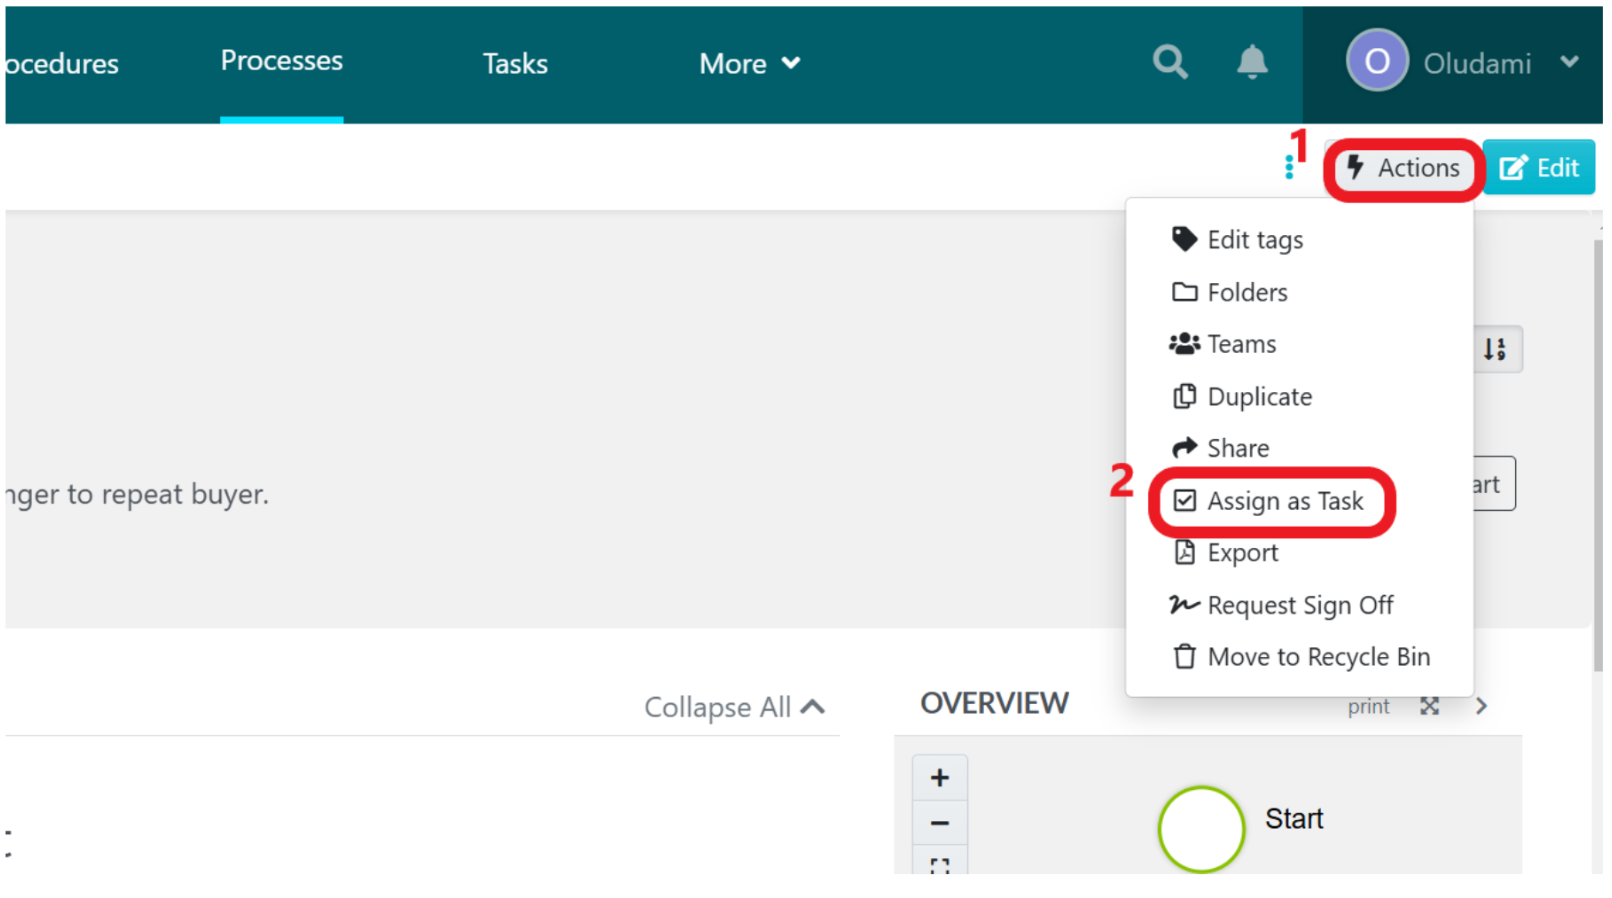
Simply click on “Assign as Task” from this list, and the same task pop-up as seen earlier will appear, but this time the first step is automatically done—the task to assign is already chosen.
Third Way
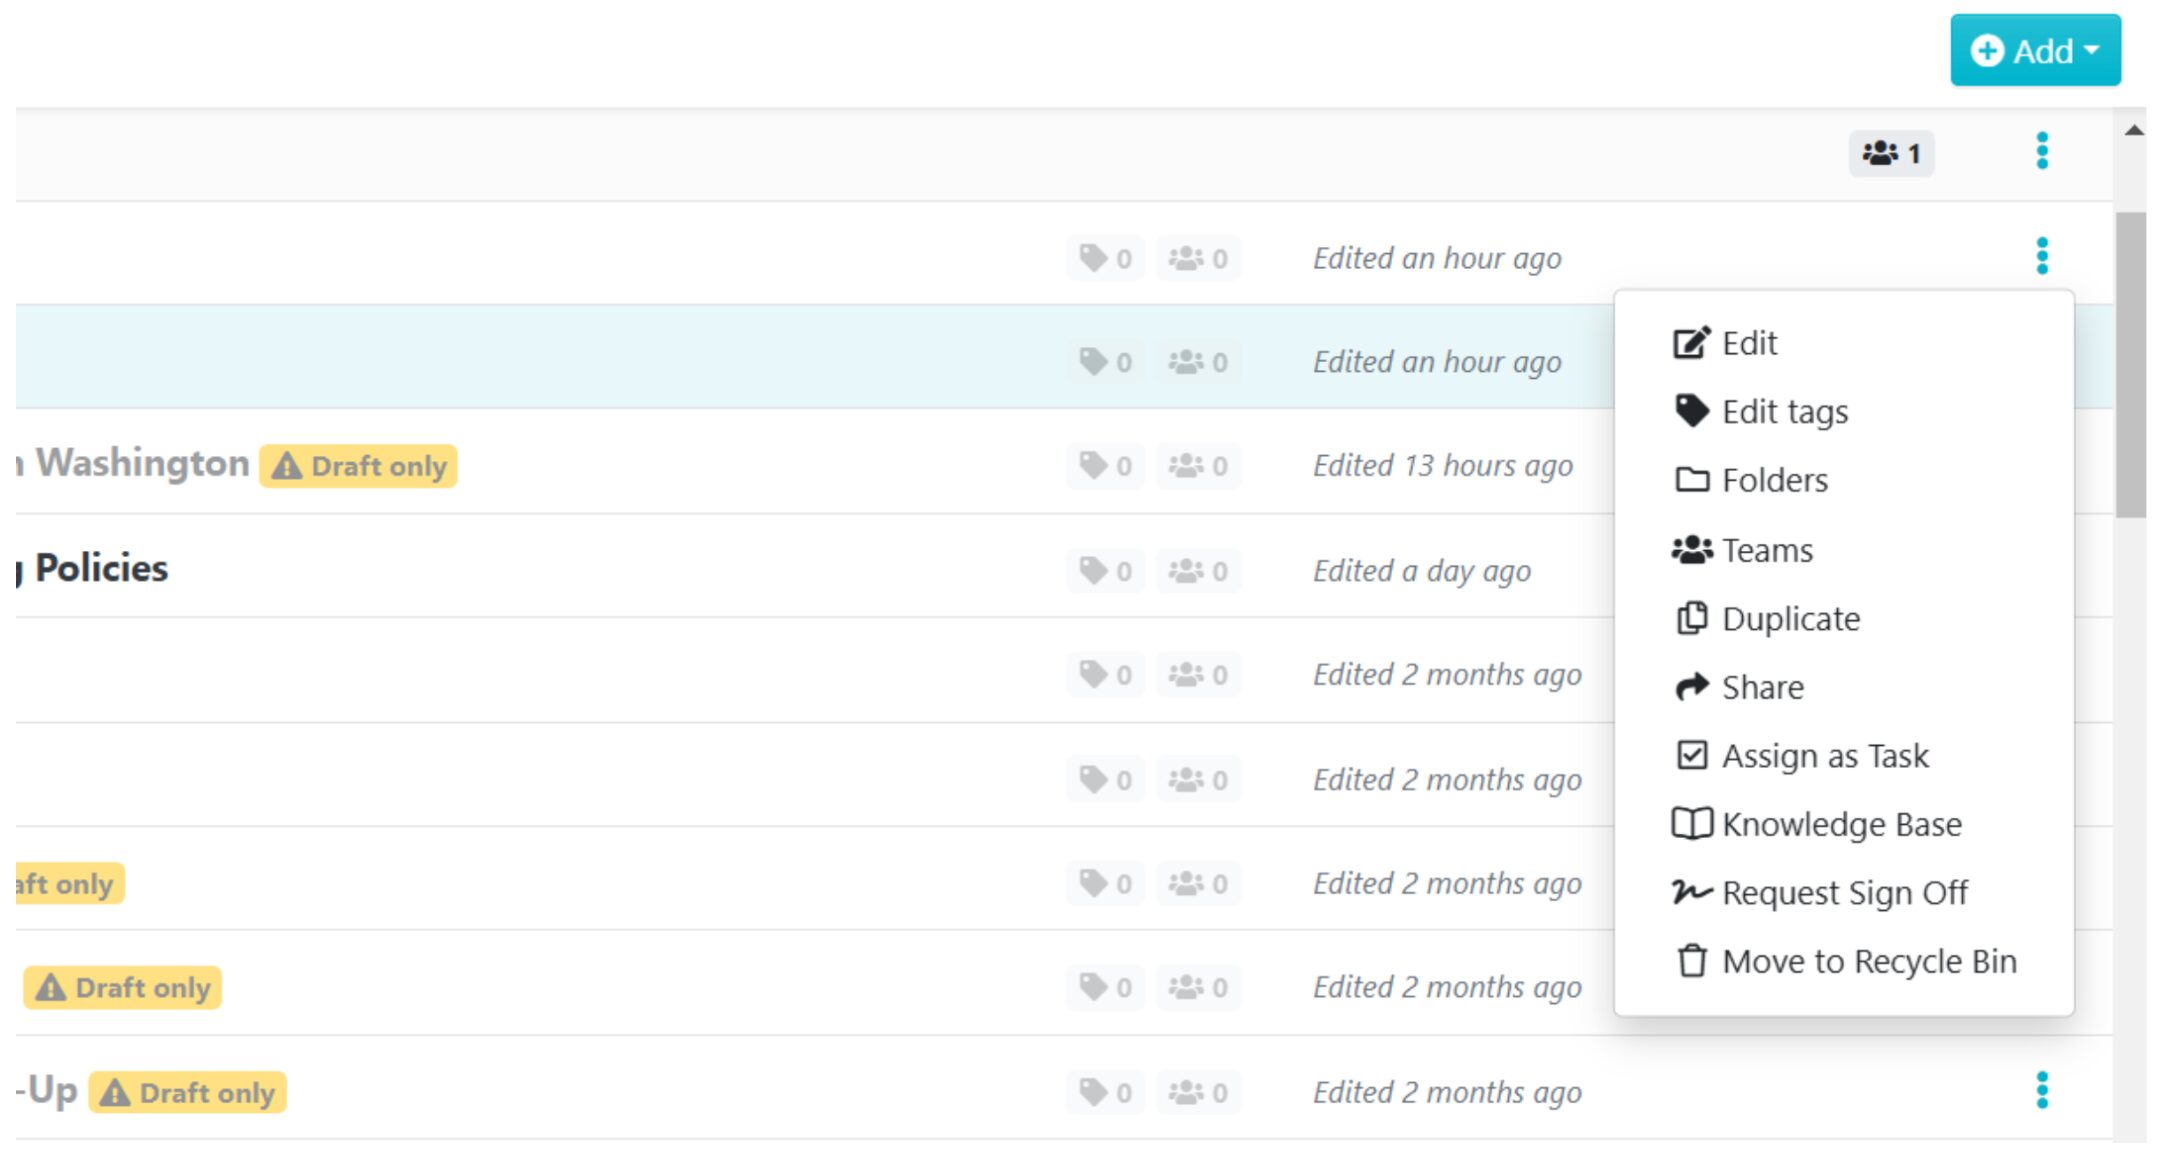
The third way to assign a process or procedure as an actionable task is to go to the procedures or processes page, depending on where the task is located. Then, from the list of procedures or processes, click on the three vertical dots on the extreme right of the process or procedure you want to assign, and a drop-down list will appear.
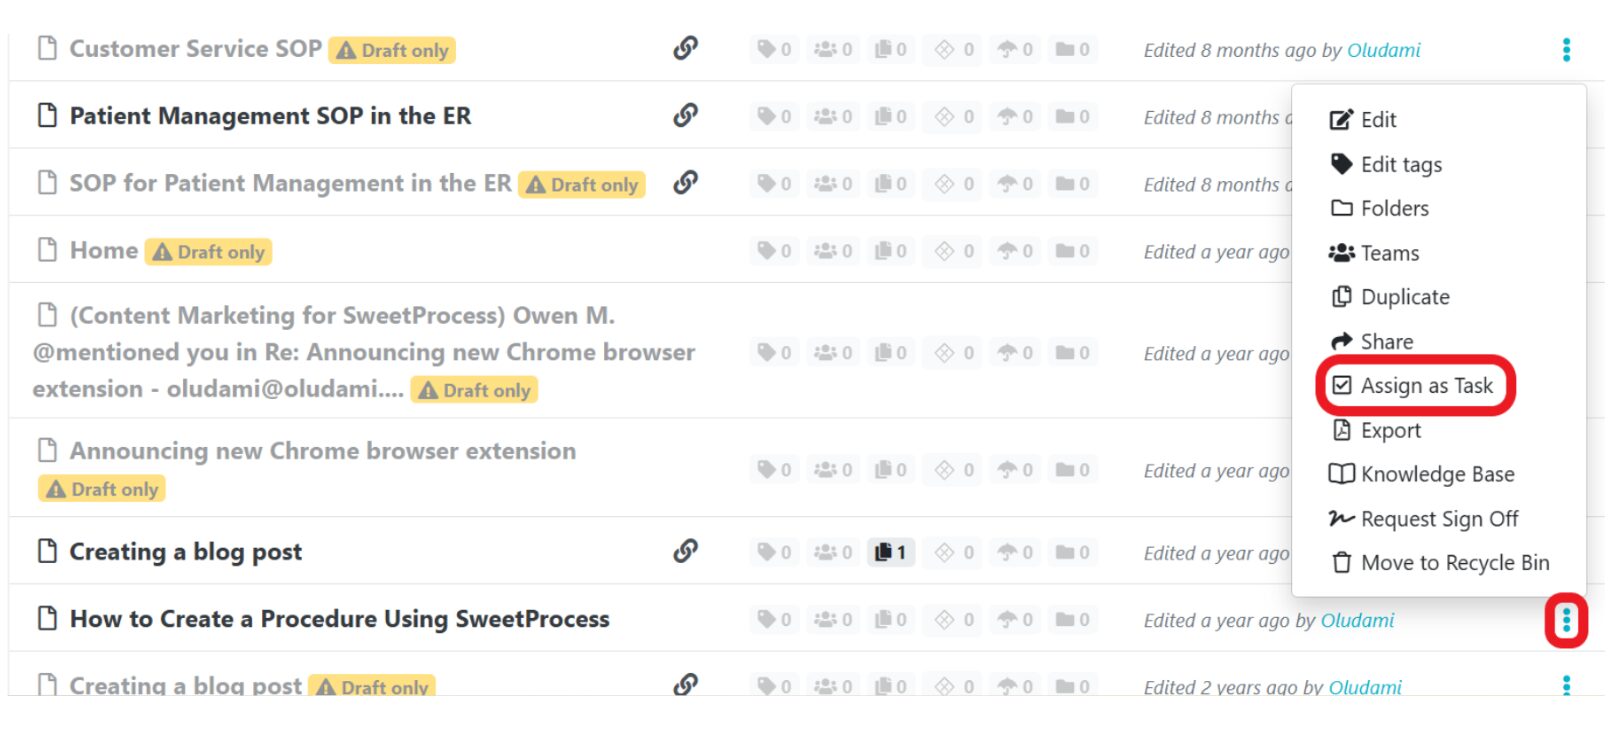
From this list, click on “Assign as Task,” and you can assign your process or procedure as a task, as described in the other methods above.
How To Manage Policies, Procedures, and Processes in SweetProcess

SweetProcess makes it easy to manage your company’s procedures, policies, and processes. In fact, you can do all the management you require in one place.
The great thing about SweetProcess is that every single policy, procedure, and process goes to the documents page and you can manage them right there.
First, click on the “Documents” navigation menu. You’ll see a list of all the documents you’ve created inside SweetProcess.
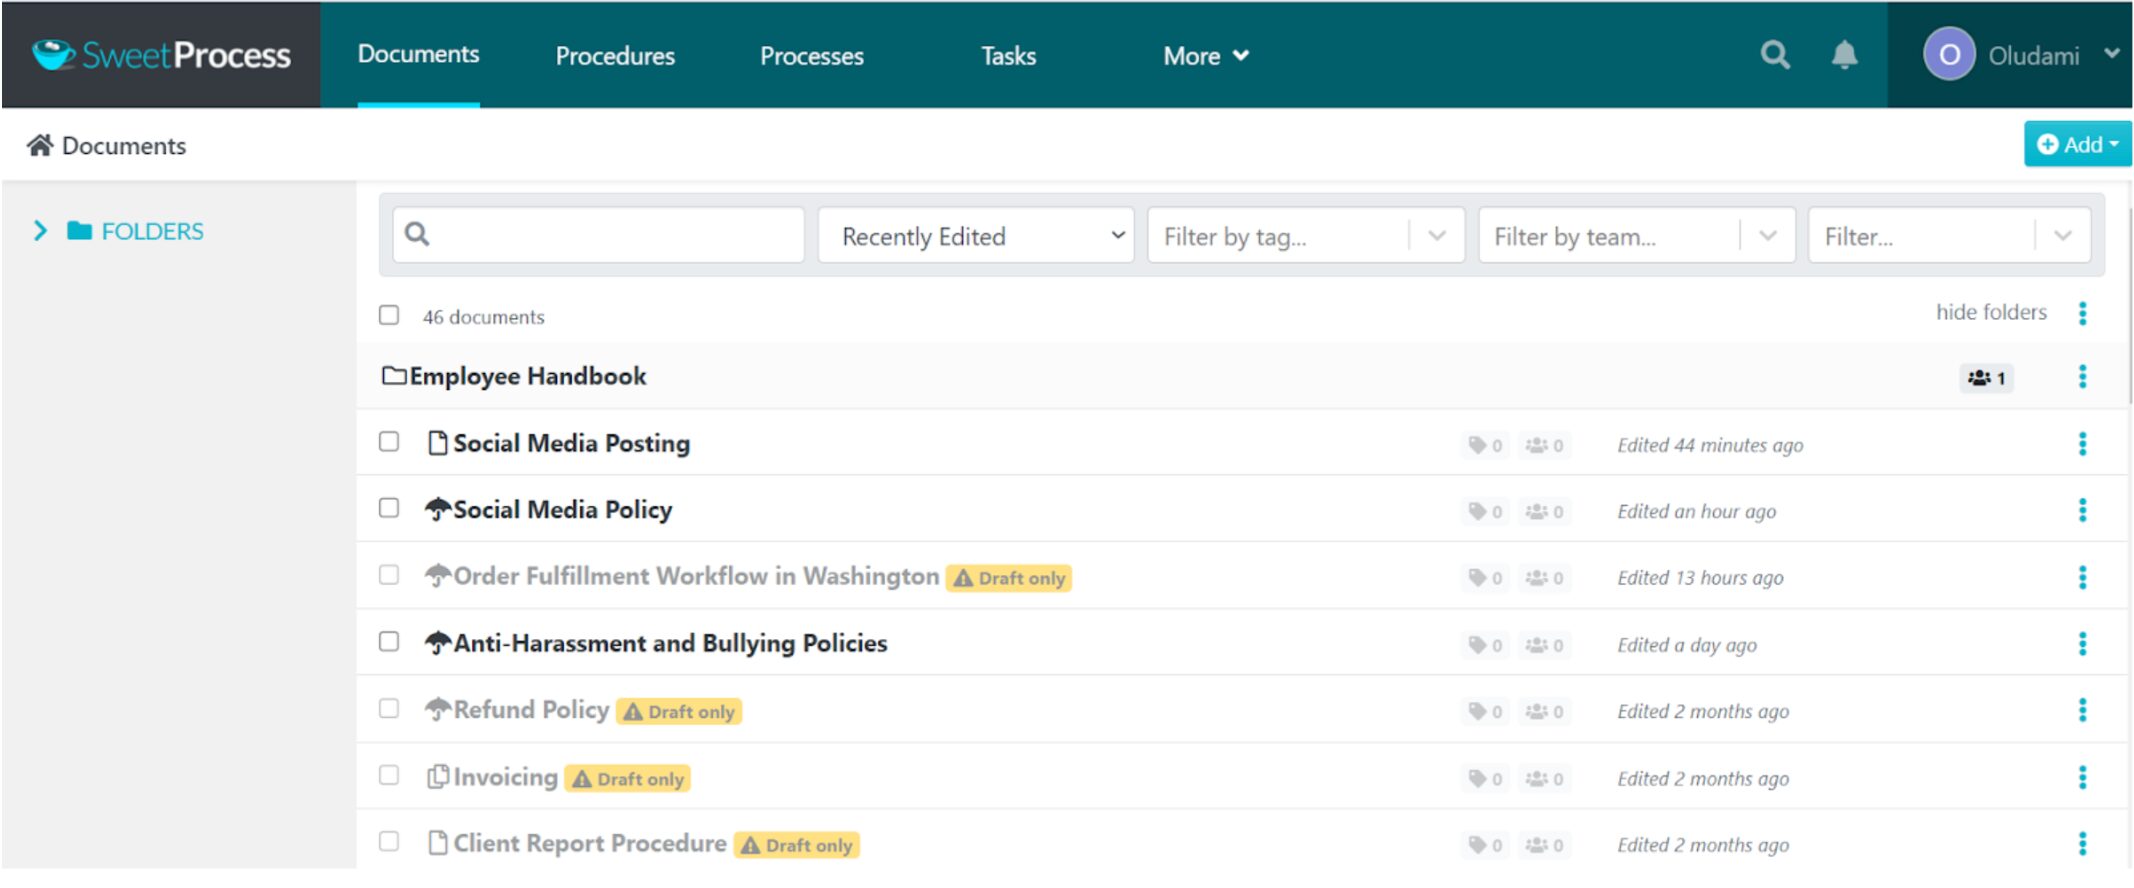
To manage any document, click on the three dots on its right side, and the list of actions you can take will come up.
You can edit the document, add it to a folder or a team, duplicate it, share it, assign it as a task, add it to a knowledge base, request sign off, and delete it.
Another way to manage your documents is to open the procedure, process, or policy you want to manage. Let’s use a policy for this demonstration.
Next, click the “Actions” button at the top-right corner of the screen to find a series of actions to help you manage your policy.
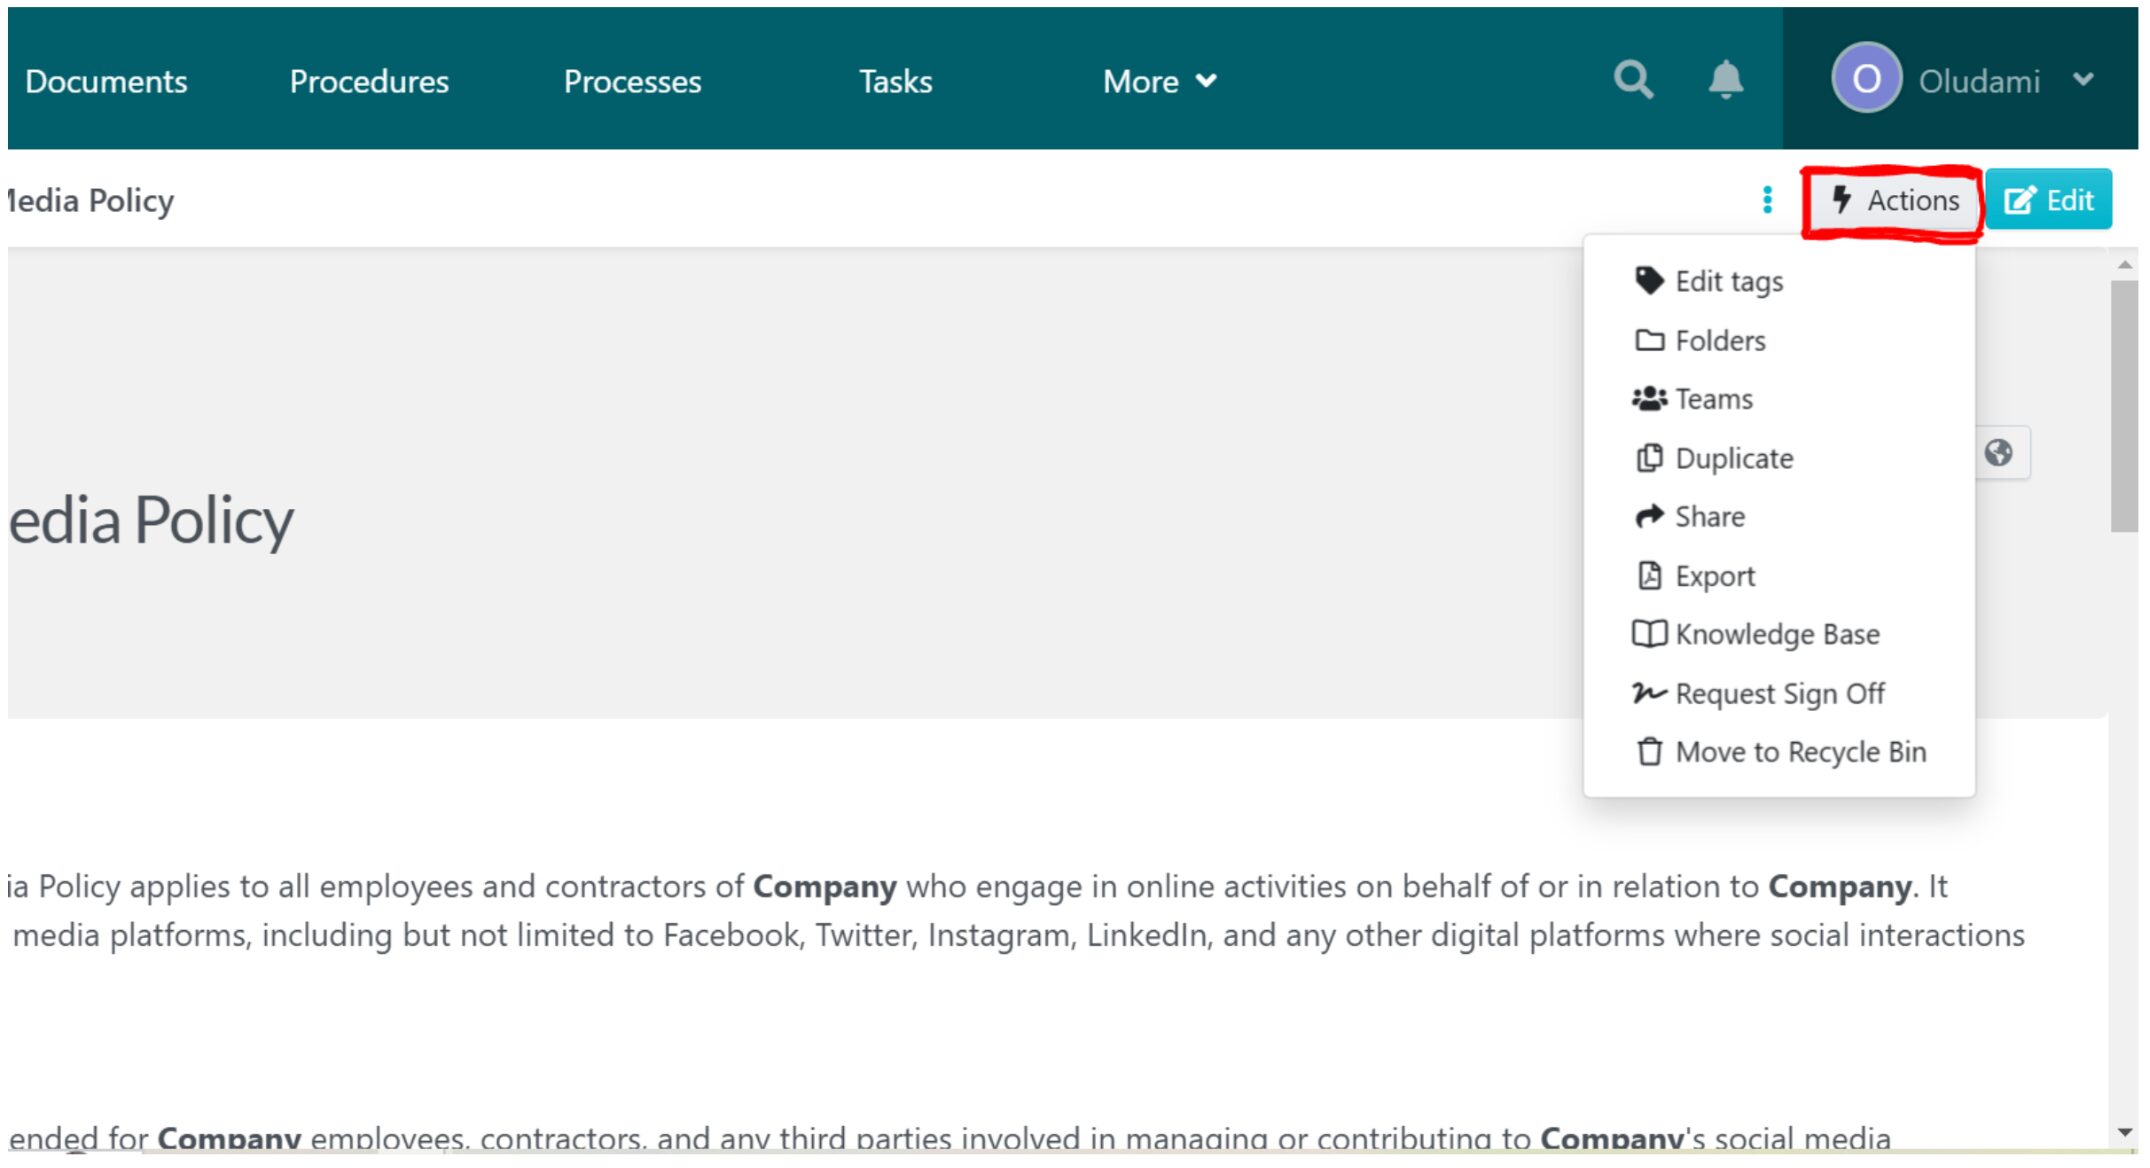
From the drop-down list, you can tag your policy, assign it to teams, share it with teams or team members, export it to a printable PDF, turn it into a knowledge base, request sign off from team members, and so on.
You also have more management options on the policy’s left panel.

Here you have the options to view version history, monitor/track policy activity (who viewed it and the actions they took), get the policy reviewed, view sign offs, and so on.
The same management tools are available in the same way as procedures and processes.
How Companies Use SweetProcess To Document Their Standard Operating Procedures

How Mesquite Chiropractic & Injury Eliminated Decades of Inefficiencies With SweetProcess

Mesquite Chiropractic & Injury, a busy chiropractic clinic in Texas, struggled with internal inefficiencies for years, due to poor documentation. Like many small businesses, their standard operating procedures were scattered across Word documents—hard to maintain, even harder to follow.
Most of the operational knowledge lived in the mind of co-owner Amber Lehmann. Whenever staffers had questions, they turned to her. This created a critical bottleneck.
Training new employees also became a time-consuming process that pulled her away from more strategic responsibilities.
Recognizing that this model wasn’t sustainable, Amber brought in Jacki Morgan Hulm, an experienced process manager, to help transform their systems.
After trying out a few platforms, they landed on SweetProcess, attracted by its ease of use and straightforward structure.
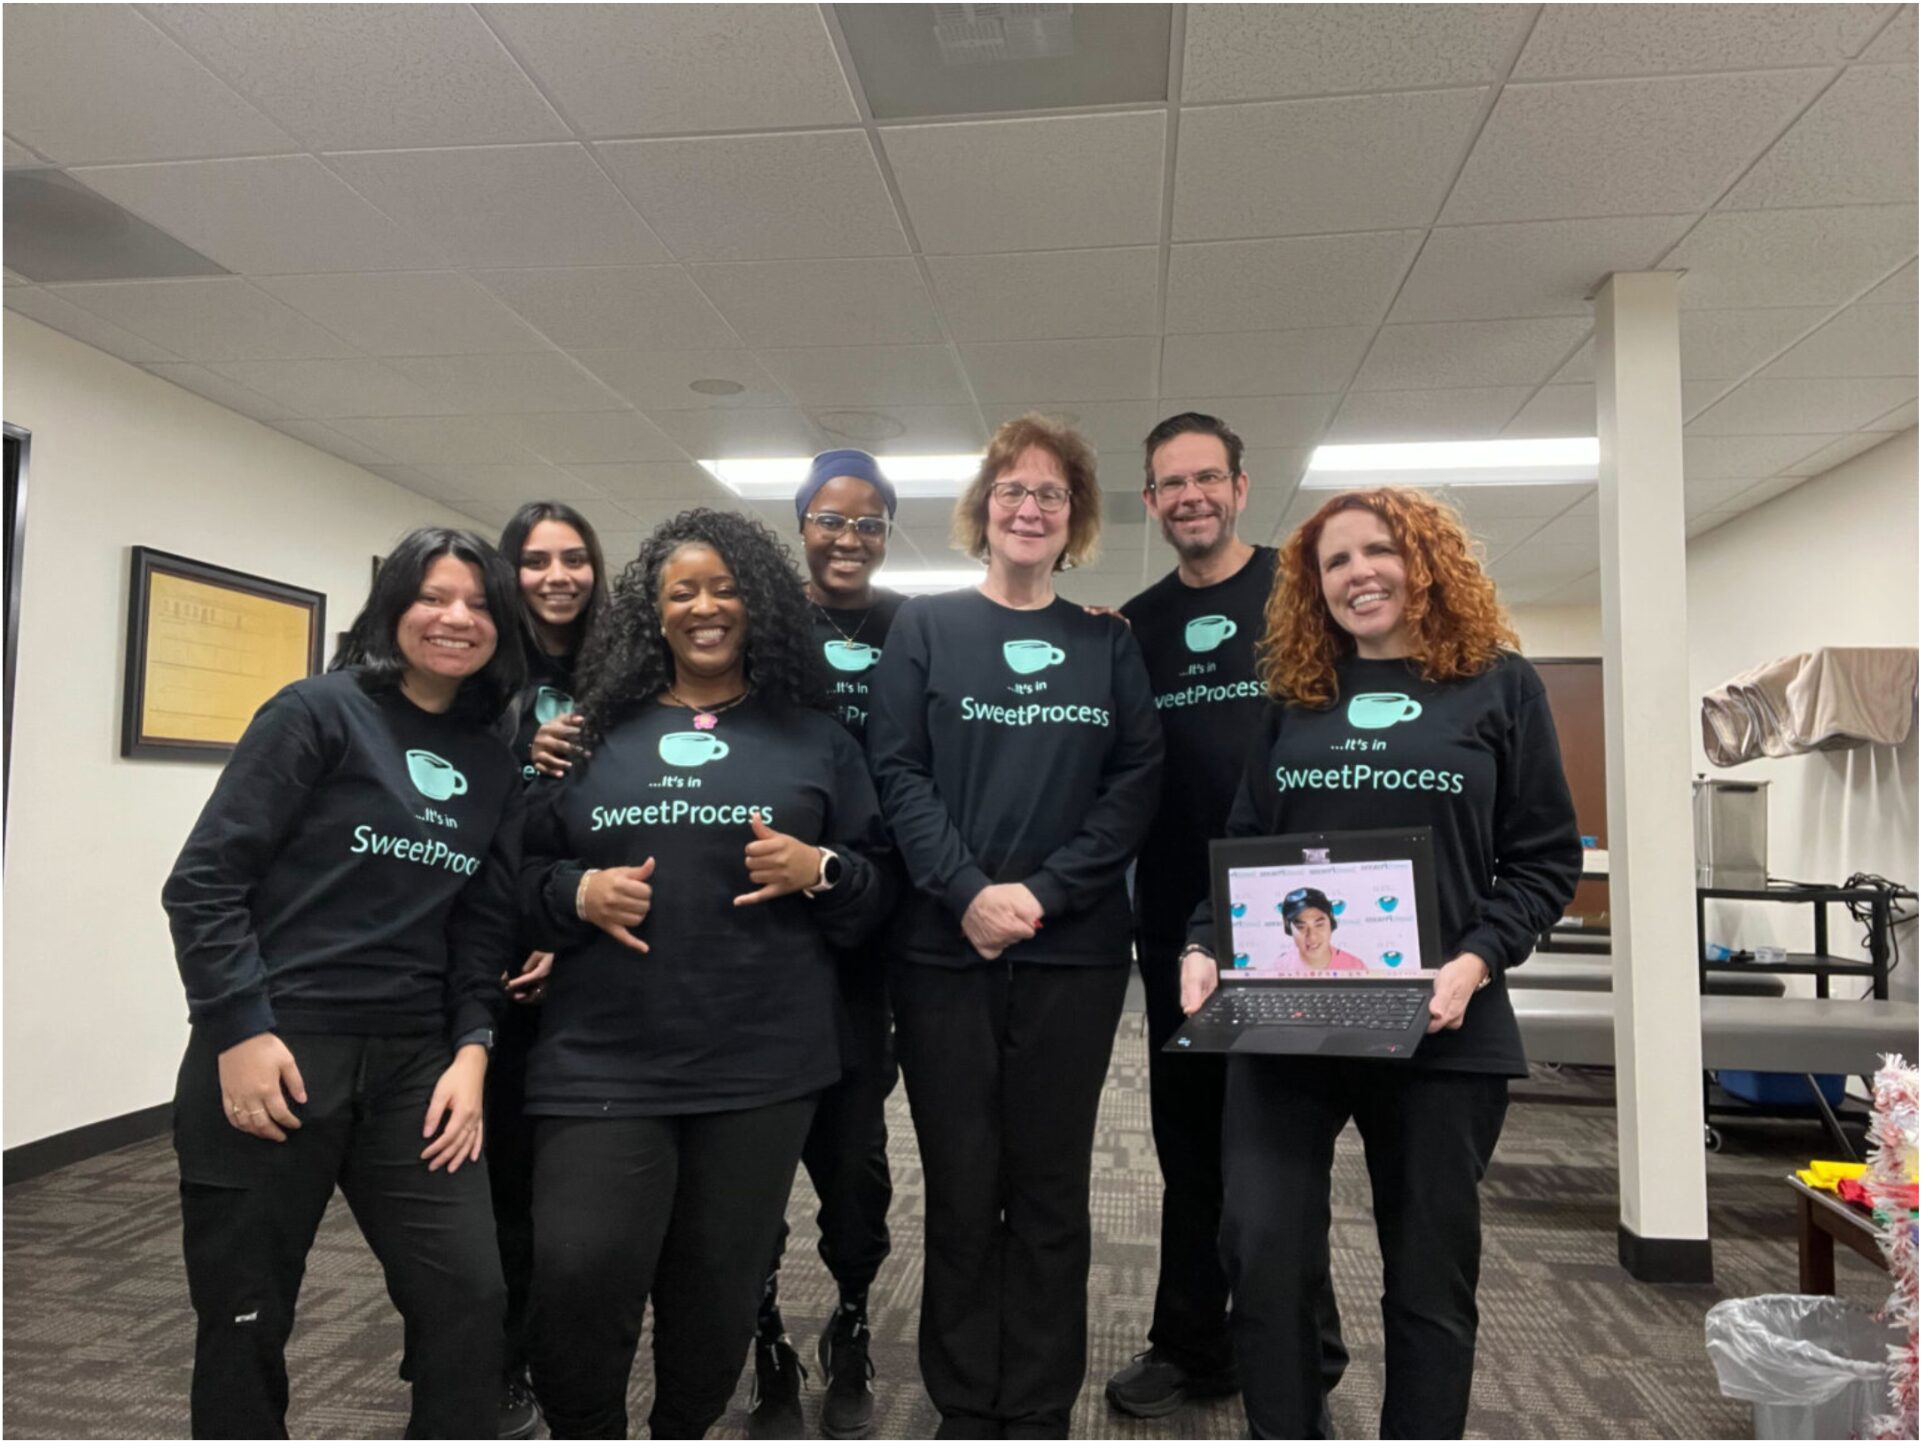
With her background in operational design, Jacki began transferring all procedures into the platform, step by step. As the team began to rely on it, something shifted. Staff stopped interrupting Amber with repetitive questions. They checked SweetProcess first. Over time, this became a habit, even part of the culture. The internal mantra became: “It’s in SweetProcess.”
From years of inefficiency to a streamlined, self-sufficient team, SweetProcess helped Mesquite Chiropractic & Injury reclaim time, reduce stress, and scale smarter.
How Next7 IT Achieved Operational Consistency Through Effective Documentation of Processes
Next7 IT, a managed services provider, helps businesses improve their security and productivity.
The team at Next7 IT suffered operational setbacks from using Microsoft Word in documenting processes. It was inadequate to meet their needs.
Don Houk, president at Next7 IT, discovered SweetProcess in his search for an effective workflow system to help improve his business operations. According to him, SweetProcess has not only improved his organization’s operations but has also helped his team deliver great work repeatedly.
Do you think your business operations can be better?
You can see more case studies on how dozens of other companies are using SweetProcess on our customer stories page.
SweetProcess Tutorial FAQs

Here are answers to some frequently asked questions about SweetProcess, some of which you might also have:
- What can I document with SweetProcess?
With SweetProcess, you can document procedures, processes, policies, knowledge bases, checklists, step-by-step instructions, and almost any document you can think of.
- How much does SweetProcess cost?
$99/month for a team with up to 20 active members + $5/month for each additional active member, if paid monthly.
Or $82.50/month for a team with up to 20 active members + $4.17/month for each additional active member, if billed yearly.
- Can I use SweetAI to create content automatically?
Yes, you can tap into the automation by choosing “Write with SweetAI” when creating your document.
- Does SweetProcess support collaboration and permissions control?
Yes, SweetProcess supports collaboration with features like share, assign, comments, reviews, approval, and sign-offs. And with SweetProcess, you can define the permission each member or team has to each document.
- Is SweetProcess ideal for small businesses?
Yes, SweetProcess is ideal for businesses of all types and sizes.
Document and Manage Your Standard Operating Procedures Using SweetProcess
You now know why SweetProcess is the ideal choice for streamlining your business operations and exactly how to create the various documents that will help you.
You also now know how to set up quizzes, assign tasks, and use other tools to ensure your employees indeed use the resources you’ve created for them.
You’ve seen how other companies use SweetProcess, and you now have an idea of what this all-in-one powerful tool can do for your business, if you allow it.
The next step to take is to create a procedure, process or policy inside SweetProcess for the first time. When you’re done, share it with your team members and see how great it makes them feel that you’re making their work easier.
You have nothing to lose—SweetProcess is free for your first 14 days and you don’t even need to enter a credit card number to get started. So it’s either you like it or you can cancel your account at any time.