How to Create Tour Schedules in Deggy Control
Creating a tour schedule in Deggy Control allows you to apply filters for more detailed and precise reporting. This includes tracking success percentages and identifying missing button visits. You can create multiple tours and organize them into Tour Groups to consolidate reports efficiently.
-
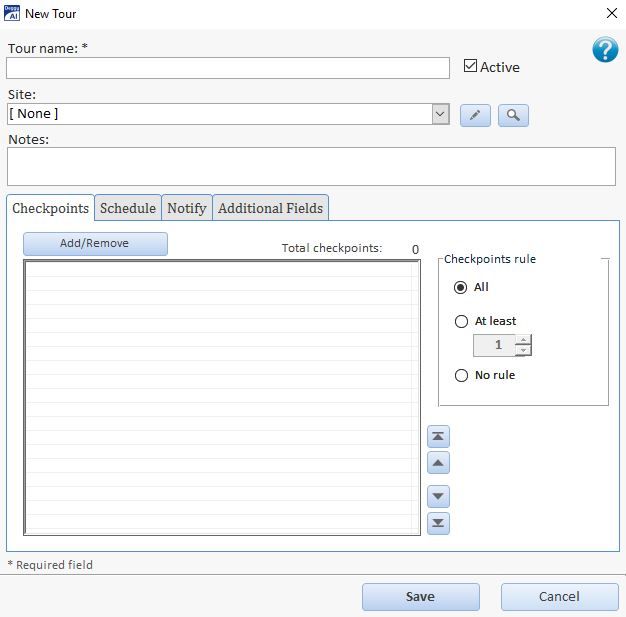
1Editing & Customizing the Default Tour ("Tour 1")By default, Deggy Control includes an example tour named "Tour 1", which you can edit to create a customized tour.
Steps:- Navigate to the Home tab and click Tours.
- Select the default "Tour 1" and click Edit.
- Rename "Tour 1" (e.g., "Morning Tour").
- From the Site dropdown menu, select an existing site or click Add New if necessary.
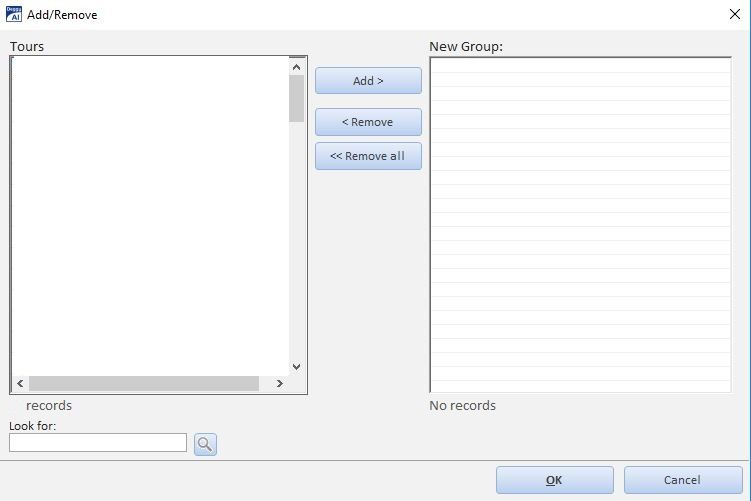
- Under the Checkpoints tab, click Add/Remove to add registered buttons to the schedule. (If buttons are pending registration, skip to Step 10.)
- Select registered buttons from the right panel and click Add.
- To remove buttons, select them from the right panel and click Remove.
- Click OK once all scheduled buttons are listed on the right-hand side.
- In the Checkpoints Rule section, set the mandatory minimum number of buttons that must be visited:
- All – Requires all buttons to be visited.
- At least – Specifies a required number of visits.
- No Rule – No visit requirement.
- Go to the Schedule tab and set the tour details:
- Enter the start and end time (e.g., 9 AM - 5 PM).
- Set the duration for personnel to complete the tour (e.g., every 1 hour).
- Adjust Tolerance to allow for early/late starts or finishes (e.g., 5 minutes).
- Select the applicable days of the week (e.g., Monday - Thursday).
- In the Notify tab, configure email alerts:
- Select the preferred notification type.
- Click Add to enter email recipients.
- Click Set Alarm to enable alarm reporting
- Review all settings and click Save.
Helpful Information
The 'Notify' tab options are available to clients who maintain their software running at all times, have setup their email server settings and require frequent data downloads to assure accuracy -
2Creating New or Additional Tours
Creating a New Tour
Steps:- In the Tours menu, click New and enter a tour name.
- Follow Steps 4-12 from the Editing & Customizing "Tour 1" section above.
Helpful Information
Creating tours will provide the filters needed to successfully use all tour based reports -
3Creating Tour GroupsTour Groups allow you to organize multiple tours into a single report for streamlined monitoring.
Create Tour Group
Steps:- Navigate to the Home tab and click Registers.
- Select Tour Groups.
- Click New.
- Enter a name for the Tour Group (e.g., "Weekday Tours").
- Click Add/Remove to add existing tours to the group.
- Select the desired tours from the left panel.
- Click Add to move to the right panel New Group.
- Click OK once all are added.
- Click Save.